Do you have a question about the BITMAIN APW12 and is the answer not in the manual?
Ensure PSU is powered off and disconnected from outlet before working.
Allow capacitors to discharge for at least 10 minutes after unplugging to eliminate stored energy.
Wear appropriate PPE like insulating gloves and safety goggles for protection.
Use one hand to minimize risk of current passing through vital organs during contact.
Exercise extreme caution and attentiveness during the entire repair process.
Modifying internal circuitry will void the warranty; research risks before proceeding.
Lowering voltage/frequency reduces power draw, but avoid minimum voltage limits.
Removing hash boards reduces power draw by a third per board, allowing higher frequencies.
Lists necessary tools like screwdrivers, soldering iron, and 1 MΩ resistors.
Unplug PSU, wait 10 minutes for capacitors to discharge safely.
Remove 6 chassis screws to detach the top PSU cover plate.
Unscrew the 10 PCB mounting screws, noting potential conformal coating.
Gently lift PCB from enclosure, keeping power and fan connectors attached.
Position PCB top-down with enclosure aside for back-side access.
Identify the two sets of three 0805 surface mount resistors, labeled '2204'.
Scrape conformal coating from 4 pads where resistors will be soldered.
Bend and trim 1 MΩ resistor leads to span cleaned pads before soldering.
Solder two 1 MΩ resistors, ensuring they lie flat and do not touch other components.
Align PCB's black plastic correctly in the enclosure to prevent contact with metal.
Slide PCB back, align screw holes, and insert 10 mounting screws without touching metal.
Align and install the top PSU cover plate with its six screws.
Power on PSU, check fans, and verify 12V DC output at the 6-pin ATX connector.
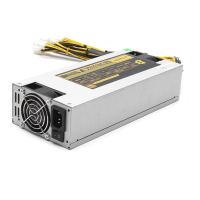
The APW12 120V Unlock Guide details the process of modifying a Bitmain APW12 power supply unit (PSU) to enable it to operate from a 120V AC input, rather than its factory-configured 200V AC minimum requirement. This modification is particularly useful for users who need to power Bitmain X19 and X21 mining rigs in environments where only 120V AC power is available. The guide emphasizes that while the APW12 is a robust and high-performance PSU capable of delivering up to 3600 watts from 240V AC, operating it from 120V AC will significantly reduce its maximum output power capability. Therefore, careful attention must be paid to limiting the power draw of the connected mining equipment to prevent overloading the 120V circuit.
The core function of this modification is to bypass the APW12's brown-out detector circuits, which are designed to prevent the PSU from fully powering on if the input voltage on either of its two input power legs falls below 200V AC. By adding two 1 MΩ, 0.25 W axial resistors to the sense resistor networks of these brown-out detectors on the back side of the PCB, the PSU can be tricked into recognizing a 120V AC input as sufficient. This allows the APW12 to function in regions or setups where higher voltage inputs are not readily available, expanding its versatility for miners.
One of the primary usage features highlighted is the ability to power most Bitmain X19 and X21 mining rigs from a standard 120V AC outlet. However, this comes with a crucial caveat: the miner's power draw must be significantly reduced to avoid overloading the circuit. The guide provides two main strategies for achieving this: reducing hash voltage and hash frequency, and removing hash boards.
When reducing hash voltage and hash frequency, users are advised that lower settings will generally result in lower power draw. However, it's critical not to lower the hash voltage below the miner's minimum requirement, as this can lead to ASIC chip failure, reduced efficiency, or increased power consumption. For multiple hash boards powered from a 120V outlet, both running the hash boards at or near their minimum hash voltage (around 12V for most X19 variants, but 14V for some) and significantly underclocking them with a hash frequency well below stock levels are recommended. The guide suggests starting with a low hash frequency (50-100 MHz) and gradually increasing it until the desired power limit is met. If using an autotune feature, it should be set to the lowest possible power target and then slowly adjusted upwards. If the lowest autotune setting still exceeds 1440 watts, removing one or more hash boards is advised.
The second usage feature for limiting power draw involves physically removing hash boards from the miner. Standard X19 miners typically come with three hash boards, each capable of drawing between 350 W and 2000 W depending on hash voltage, frequency, and chip temperature. Removing one hash board reduces the nominal power draw by a third, and removing two reduces it by two-thirds. This allows the remaining hash board(s) to operate at higher hash frequencies and achieve a better hash rate without exceeding power limitations. If hash boards are removed, proper airflow management is essential; air must flow through the heatsink fins, not around them. Any gaps that could allow air to bypass the heatsinks should be filled. An interesting usage feature is that removed hash boards can be repurposed with their own PSU, control board, enclosure, and cooling equipment to create additional 120V mining rigs. For multiple rigs in the same location, spreading them across available circuit breakers is crucial to prevent overloads.
The maintenance features described in the guide primarily revolve around the modification process itself and the safety precautions necessary for working with high-voltage equipment. Before any work begins, the PSU must be completely powered off and disconnected from the electrical outlet. A critical maintenance step is to allow at least 10 minutes for the high-voltage capacitors to discharge after unplugging, as they can retain a dangerous charge. The guide strongly recommends wearing appropriate personal protective equipment (PPE), including insulating gloves, safety goggles, and non-conductive footwear, to protect against electric shock. The "One Hand Rule" is also advised, where one hand is kept behind the back or in a pocket to minimize the risk of current passing through vital organs in case of accidental contact.
The modification steps themselves involve several maintenance-like actions. Users must remove the top PSU cover plate by unscrewing six chassis screws. Subsequently, ten PCB mounting screws need to be removed, some of which may be covered by a white silicone conformal coating. To access the back side of the PCB, the PCB is partially removed from the enclosure by gently lifting the center heat sink and PCB edges. It's noted that the power cables and fan connectors do not need to be detached. Once the PCB is accessible, the user must locate the two brown-out detector resistor networks. A sharp scraping tool is then used to gently remove the conformal coating from the four specific pads where the new resistors will be soldered. This step is critical, as failure to remove the coating will lead to harmful, toxic fumes during soldering. Users are warned not to scrape off the green solder mask, as this could expose copper conductors and lead to permanent damage if inadvertently soldered.
After preparing the pads, the 1 MΩ axial resistors are prepared by bending and trimming their leads to fit the distance between the cleaned pads. The resistors are then soldered into place, ensuring they lie flat on the back of the PCB and do not touch any other components. The solder joints must not extend beyond the solder pad boundaries. Finally, the PCB is reinstalled into the PSU enclosure, ensuring that the black plastic insulator is correctly aligned to prevent direct contact between the PCB and the metal enclosure, which could cause permanent damage. The 10 PCB mounting screws are reinserted, followed by the top PSU cover plate with its six screws, taking care not to overtighten them.
The final maintenance check involves powering on the modified PSU by plugging it into a 120V AC outlet. If the modification is successful, the PSU fans should power on immediately. Users can then power a control board by plugging it into the PSU's auxiliary 12V DC, 6-pin ATX connector, which should also power on. Alternatively, a multimeter can be used to verify a 12V DC output at the ATX connector. The guide clarifies that no voltage will be present on the main power terminals until the full miner is powered on and begins hashing. The document also includes a warning that modifying the power supply's internal circuitry will void its warranty, advising thorough research of risks and benefits before proceeding. The guide also mentions that the outlined modifications are believed to work for all APW12 variants, such as APW121215a, APW121215e, and APW121417a.
| Model | APW12 |
|---|---|
| Input Voltage | 200-240V AC |
| Input Current | 10A |
| Output Voltage | 12V |
| Rated Output Power | 1200W |
| Cooling | Fan |
| Output Power | 1600W |
| Operating Temperature | -20°C-70°C |