ENGLISH
6
or removingaccessories.
WARNING: Do not attempt to tighten drill bits (or any
other accessory) by gripping the front part of the chuck
and turning the tool on. Damage to the chuck and
personal injury may occur when changingaccessories.
To Insert a Drill Bit or Other Accessory
1. Grasp the rear half of the chuck
8
with one hand
and use your other hand to rotate the front half
9
in
the counterclockwise direction, as viewed from the
chuckend.
2. Insert the bit or other accessory fully into the chuck, and
tighten securely by holding the rear half of the chuck and
rotating the front portion in the clockwise direction as
viewed from the chuckend.
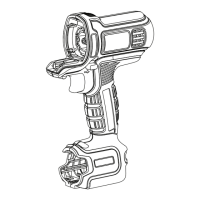
Keyless Chuck (Fig. A)
WARNING: Make certain the lock‑off button is
engaged to prevent switch actuation before installing
Trigger Switch/Reversing Button (Fig. A)
1. The drill is turned ON and OFF by pulling and releasing
the trigger switch
1
.
2. A forward/reverse control button
2
determines the
direction of the tool and also serves as a lock off button.
3. To select forward rotation, release the trigger switch and
depress the forward/reverse control button to the left.
4. To select reverse, depress the forward/ reverse control
button the opposite direction.
NOTE: The center position of the control button locks the
tool in the off position. When changing the position of the
control button, be sure the trigger is released.
OPERATION
WARNING: To reduce the risk of serious personal
injury, turn unit off and disconnect it from
power source remove the battery pack before
making any adjustments or removing/installing
attachments or accessories. An accidental start‑up
can causeinjury.
ASSEMBLY AND ADJUSTMENTS
WARNING:
To reduce the risk of serious personal
injury, turn unit off and disconnect it from power
source
remove the battery pack
before making any
adjustments or removing/installing attachments
or accessories. An accidental start‑up can causeinjury.
charging until the battery has reached an appropriate
temperature. The tool then automatically switches to
charging mode. This feature ensures maximum batterylife.
1. A cold battery may charge at a slower rate than a
warmbattery.
2. The hot/cold delay will be indicated by the green
charging LED
6
remainingOFF.
3. Once the battery has reached an appropriate
temperature, the green charging LED
6
will continuously
illuminate, indicating that the tool has resumed the
chargingprocedure.
Electronic Protection System
Li‑Ion tools are designed with an Electronic Protection
System that will protect the battery against overloading,
overheating or deep discharge. The tool will automatically
turn off and the battery will need to berecharged.
Important Charging Notes
1. The tool may become warm to the touch while charging.
This is a normal condition, and does not indicate a
problem. To facilitate the cooling of the tool after use,
avoid placing the tool in a warm environment such as in
a metal shed or an uninsulatedtrailer.
2. If the tool does not charge properly, take the tool and
charger to your local servicecenter.
3. You may charge a partially used battery whenever you
desire with no adverse effect on thetool.
Screw Driving
• For driving fasteners, the forward/reverse control
button
2
should be pushed to the left.
• Use forward/reverse control button
2
pushed to the
right for removing fasteners.
• When moving from forward to reverse, or vice versa,
always release the trigger switch
1
first.
Drilling
• Use sharp drill bitsonly.
• Support and secure work properly, as instructed in the
Safety Instructions.
• Use appropriate and required safety equipment, as
instructed in the Safety Instructions.
• Secure and maintain work area, as instructed in the
Safety Instructions.
• Run the drill very slowly, using light pressure, until
the hole is started enough to keep the drill bit from
slippingout.
• Apply pressure in a straight line with the bit. Use enough
pressure to keep the bit biting but not so much as to stall
the motor or deflect thebit.
• Hold the drill firmly with two hands, one hand on the
handle, and the other gripping the bottom around the
batteryarea.
• DO NOT CLICK THE TRIGGER OF A STALLED DRILL OFF
AND ON IN AN ATTEMPT TO START IT. DAMAGE TO THE
DRILL CANRESULT.
• Minimize stalling on breakthrough by reducing pressure
and slowly drilling through the last part of thehole.
• Keep the motor running while pulling the bit out of a
drilled hole. This will help reducejamming.
Drilling in Wood
• Holes in wood can be made with the same twist drill bits
used for metal or with spade bits. These bits should be
sharp and should be pulled out frequently when drilling
to clear chips from theflutes.
Drilling in Metal
• Use a cutting lubricant when drilling metals. The
exceptions are cast iron and brass which should be

 Loading...