Do you have a question about the Black & Decker GH3000 and is the answer not in the manual?
Defines DANGER, WARNING, CAUTION, NOTICE symbols for hazard identification.
Basic precautions for electric gardening appliances to prevent fire, shock, and injury.
Warns about chemicals in dust causing cancer, birth defects, or reproductive harm.
Mandates use of safety glasses, eye protection, and hearing protection during operation.
Defines electrical and operational symbols found on the trimmer for proper understanding.
Additional warnings specific to string trimmers, including line care and cleaning.
Requirements for using polarized plugs and cords with polarized outlets to prevent shock.
Use outdoor-rated cords of appropriate gauge for safe operation and to prevent overheating.
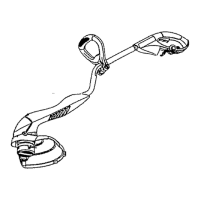
Lists and describes key components of the trimmer, e.g., trigger switch, guard, spool.
Lists the Phillips Screwdriver as the only required tool for assembly.
Step-by-step guide to securely attach the guard for user protection.
Instructions for mounting and adjusting the auxiliary handle for comfortable grip.
Details on using the telescopic mechanism to set the trimmer to a comfortable height.
Instructions for activating and deactivating the trimmer using the trigger switch.
Instructions on how to use the integrated cord retainer for secure connection.
Guidance on cutting angle, technique, and maintaining safe distance from feet.
How to adjust the trimmer head for trimming or edging operations.
Guidance on using the edging wheel for precise cuts on lawn edges.
Correct line type and explanation of automatic line feeding mechanism.
Procedure for resolving jams caused by debris or tangled cutting line.
Detailed steps to remove and install a new spool, including lever alignment.
Ensures the new line protrudes the correct length from the housing for proper cutting.
Step-by-step guide to wind line onto a spool neatly and correctly.
How to cut and secure the end of the wound line in the spool slots.
Addresses issues like power cord connection or blown fuses/tripped breakers.
Explains why line may be consumed quickly in edge mode and how to correct it.
Guidance on keeping air intakes clean, storing line, and cleaning parts.
How to find local service centers for technical advice, repair, or parts.
Details what the 2-year warranty covers and excludes, and how to make a claim.
Options for returning the product to the retailer or sending it to a service center.
States that warranty information for Latin America may differ and is found in packaging or online.
| Power Source | Corded Electric |
|---|---|
| Line Diameter | 0.065 inches |
| Amperage | 6.5 Amps |
| Voltage | 120V |
| Cutting Swath | 13 inches |
| Line Feed | Automatic |
| Cutting Width | 13 inches |