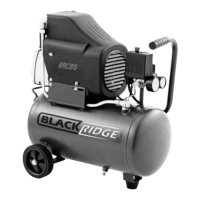
The Blackridge BRC95 is a portable air compressor designed for general light-duty tasks around the home. It is not recommended for commercial use, continuous running, or for use with a spray gun. The compressor is suitable for various light-duty air tools such as ball inflators, toy inflators, tire inflators, mini air brushes, touch-up spray cans, staplers, combo nailers, C-bradders, and T-nailers.
Technical Specifications:
- Model Number: BRC95
- Voltage: 240V AC ~ 50Hz
- Motor: Electric 2 Hp
- Wattage: 1500W
- No Load Speed: 2800 RPM
- Free Air Delivery (FAD): 95 L per minute (in accordance with Australian Standard AS 4637-2006)
- Tank Size: 21 L
Usage Features:
The BRC95 compressor requires minor assembly before initial operation, including fitting the oil breather, rubber stoppers, wheels, and air filter. It is crucial to ensure the compressor is fully assembled before use to avoid voiding the warranty and potential personal injury.
Oil Breather and Lubrication:
Before operating, the transport plug must be removed and replaced with the oil breather. The oil level should always be checked before use, ensuring it is above the red dot on the sight glass. The compressor is pre-filled with SAE30 oil. To check the oil level, the compressor should be on flat, level ground. For confirmation, the back (wheel end) should be lifted approximately 20cm, held for about 1 minute, and then placed back on the ground. If additional oil is required, SAE30 oil should be added to the top of the red dot on the sight glass. Overfilling or underfilling with oil should be avoided.
Assembly:
- Oil Breather: Remove the transport plug and screw in the oil breather.
- Rubber Stopper: Attach the rubber stoppers to the bracket on the bottom of the tank by undoing the nut, removing the washer, pushing through the bracket, replacing the washer, and tightening the nut.
- Wheels: Insert a bolt through the wheel, push it through the tank wheel bracket, and tighten the nut.
- Air Filter: Carefully screw the supplied air filter into the threaded hole on top of the pump head by hand. Do not overtighten, as this can damage the air filter or cylinder head.
Starting and Stopping:
The compressor must be plugged directly into a standard 240V AC power point; extension cords are not recommended due to potential voltage drop, power loss, and overheating. The compressor is started by lifting the red ON/OFF button on the pressure switch and stopped by pushing it down. The power point switch should never be used to operate the compressor.
Running In:
A running-in procedure is required for new compressors:
- Ensure the transport plug is removed, the oil breather is fitted, the oil level is correct, and the compressor is fully assembled.
- Plug the power cord into a 240V AC power point.
- Open the air tap and the tank drain tap.
- Start the compressor using the ON/OFF button.
- Run for approximately 1 minute to ensure full lubrication under no load.
- Stop the compressor, allow it to cool for 10 minutes, and recheck the oil level.
Using the Compressor:
Before each use, follow a simple checklist:
- Confirm transport plug is removed and oil breather is fitted.
- Check oil level (must be correct).
- Ensure air tap is closed and drain tap is fully closed.
- Check the power lead for damage.
- Plug into a 240V 10Amp AC power point and turn ON.
- Lift the compressor ON button.
- Allow the air tank to fill completely.
- Turn the compressor OFF.
- Turn the power point OFF and disconnect the power lead.
- Connect air hose and tools.
- Reconnect to power lead and turn ON.
- Turn the compressor ON.
The compressor will start and stop automatically, controlled by the pressure switch. Pumping starts at a minimum of 85 PSI and stops at a maximum of 115 PSI. Once the initial pump-up is complete, the outlet air pressure can be adjusted using the red regulator knob, and the air tap can be fully opened.
Adjusting Pressure:
The outlet air pressure is adjusted using the red regulator knob and monitored via the outlet pressure gauge. Turn anti-clockwise to lower pressure and clockwise to increase it. Always check the tool manufacturer's recommended working pressure.
Safety Valve:
The safety valve should be checked regularly. With the air tank full, gently pull the ring outwards to release air under pressure. Releasing the ring should stop the airflow immediately. If the safety valve malfunctions, the compressor must be stopped and serviced by an authorized center.
Air Tap:
The air tap controls the airflow to attached tools. Rotate the handle to align with the fittings and hose to open, and rotate 90° to close.
Drain Tap:
After use, the drain tap should be opened to drain excess air and moisture. Pull the lever down to vertical to open and push it up to horizontal to seal. The drain tap should be left open when storing the compressor to allow moisture to drain. Remember to seal the drain tap before starting the compressor.
Post-Use Procedure:
- Turn the compressor OFF using the ON/OFF switch.
- Turn the power point OFF and disconnect the power lead.
- Disconnect air tools and hose.
- Clean air hose and tools.
- Store air hose and tools in a secure, well-ventilated cabinet.
- Slowly open the tank drain tap to vent excess air and moisture.
- Leave the tank drain tap open during storage.
Maintenance Features:
- Daily (Before Use): Seal the tank drain tap, check oil level, and check safety valve operation.
- Daily (After Use): Open the tank drain tap, wipe down the compressor, and store securely.
- Every 50 Hours: Replace the air filter and drain/replace oil completely.
- Oil Drain: Loosen and remove the drain bolt, drain used oil into a funnel/bottle, dispose of properly, replace and tighten the drain bolt, wipe up spills, and refill with fresh SAE30 oil to the top red dot on the sight glass.
- Work Area: Keep work areas tidy, clean, and free from rubbish. Maintain at least 5 meters distance between the compressor and the work area, especially when sanding or spraying liquids.
- Work Environment: Do not expose to rain or use in damp/wet conditions. Ensure the compressor is level and stable to prevent pump seizure due to lack of lubrication.
- Electric Shock: Avoid body contact with earthed or grounded surfaces.
- Force: Do not force the compressor; use it within its designed duty cycle (75% - 45 seconds ON, 15 seconds OFF). Only use attached tools when the motor is not pumping.
- Right Tool: Use the correct tool for the job; do not use a small compressor for heavy-duty tasks.
- Power Cord: Do not yank or pull the power cord. Keep it away from heat, oil, solvents, and sharp edges. Damaged cords must be replaced by an authorized service facility.
- Extension Cords: This compressor must be plugged directly into a 240V AC wall socket. Do not use extension cords; use a longer air hose if needed.
- Work Piece: Secure work pieces with clamps or a vice.
- Hot Components: Avoid touching hot metal pipes, pump, or motor during use.
- Disconnect: Disconnect from mains supply before servicing, lubricating, adjusting, or changing accessories.
- Adjusting Keys/Wrenches: Ensure all adjusting keys/wrenches are removed before operating.
- Unintentional Starting: Ensure the switch is in the 'OFF' position before plugging into the mains supply.
- Furnishings: Protect furnishings with a dust sheet if using indoors.
- Fire Precautions: Observe general fire precautions. Consult an expert for a suitable fire extinguisher.
- Cleaning: Disconnect from mains power, allow to cool (approx. 1 hour), and clean with a damp soft cloth. Never use liquids or solvents. Repairs should only be carried out by qualified persons using original spare parts.
- Damaged Parts: Check for correct alignment, broken/missing parts, and any other condition affecting operation. Any damaged parts or switches must be repaired/replaced by an authorized service facility. Do not use if the ON/OFF button does not work correctly or if the power point switch is used for operation.
- Personal Safety:
- Clothing: Do not wear loose clothing or jewelry.
- Hair: Tie back long hair.
- Eye Protection: Wear safety goggles (prescription glasses are not sufficient).
- Footwear: Wear suitable non-slip safety footwear.
- Ear Protection: Wear ear protection.
- Respiratory Protection: Wear an approved dust/filter mask when creating dust or spray painting.
- Over Reach: Maintain proper footing and balance; avoid abnormal stances.
- Stay Alert: Use common sense; do not operate when tired, under alcohol/drug influence, or drowsy from medication.
Specific Safety Instructions:
- Do not use in explosive or flammable environments.
- Do not modify the compressor, guards, or accessories.
- Always check the oil level before use.
- Ensure the compressor is level and stable.
- Never run without wheels and rubber stopper correctly fitted.
- Never connect to a generator that does not produce sufficient power (at least 3000W) and pure sine wave output.
- Not designed for industrial/commercial applications or continuous running.
- Avoid touching the hot pump area.
- Always disconnect from mains supply before servicing or changing attachments.
- Use the correct tool type.
- Do not use if any part is damaged; have it serviced by an authorized agent.
- Wear safety eye, ear, and respiratory protection.
- Allow the tank to fill completely before use.
- If unfamiliar sounds or excessive vibrations occur, switch OFF immediately, disconnect, and consult an authorized service facility.
- Move the compressor using the handle and wheels.
- Use on stable ground.
- Designed to compress normal air only; do not compress other gases.
- Never direct air/liquids/gases towards people or animals.
- Not suitable for pharmaceutical, food, or sanitary purposes.
- Not for filling scuba or oxygen tanks.
- Always follow instructions for attached tools.
Troubleshooting:
- Compressor does not start: Check power lead connection, ON/OFF switch, and if the air tank is full (use air tool to decrease pressure).
- Compressor does not build up pressure: Check if tank drain tap is sealed and air tap is closed.
- Compressor smells like burnt oil: Check oil level.
For service, spare parts, or product information, contact Smart Marketing Group Pty. Ltd. (Australia: 1300 660 457, New Zealand: 0800 474 876). Operating hours are Monday to Friday, 8:30 am - 5:30 pm AEST. Do not return the compressor to the place of purchase. Keep the purchase receipt for warranty claims. The warranty covers manufacturing faults or defects for 12 months from the date of purchase, provided the original receipt is kept. It does not cover commercial use, transport damage, negligence, misuse, abuse, accidents, corrosion, incorrect setup, general wear and tear, serial number defacement, unauthorized servicing, lack of purchase receipt, resale, non-servicing, blockages, incorrect accessory fitting, overloading, or damage to attached equipment. Warranty repairs are free of charge, but the owner is responsible for delivering the adequately protected compressor to an authorized service agent.