ENGLISH
6
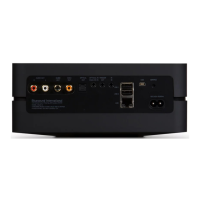
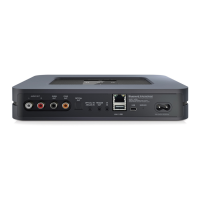
4 LINE/MIC IN
• Ensure that the supplied LINE-MIC IN/LINE OUT terminal
block’s “+, -, GND” are wired accurately to corresponding output
terminals of external analog device or source for locally attached
microphone that requires phantom power.
• Install the wired up LINE-MIC IN/LINE OUT terminal block to
B100S' LINE/MIC IN terminal.
5 SUBWOOFER OUT
• Ensure that the supplied SUBWOOFER OUT terminal block’s “+,
-, GND” are wired accurately to corresponding low level input
terminal of corresponding powered subwoofer.
• Install the wired up SUBWOOFER OUT terminal block to B100S'
SUBW OUT terminal.
6 LINE OUT
• Ensure that the supplied LINE-MIC IN/LINE OUT terminal block’s
“+, -, GND” are wired accurately to corresponding input terminals
of compatible external devices such as amplifiers, receivers or
other applicable devices.
• Install the wired up LINE-MIC IN/LINE OUT terminal block to
corresponding B100S' LINE OUT terminal.
• Audio from selected source (analog or BluOS) will output through
LINE OUT.
7 PHANTOM
• B100S is equipped with switchable Phantom power.
• With LINE/MIC switch set to MIC and Phantom switch at ON
position, +48V Phantom power is supplied to a connected
microphone that requires phantom power for operation. The
adjacent LED is also illuminated red to indicate that +48V
Phantom power is being supplied. Set Phantom switch to OFF
position for microphones that do not require Phantom power.
• Retain default settings of LINE/MIC switch set to LINE and
Phantom switch at OFF position in the absence of microphone
input.
8 SERVICE
• These USB port and tact switch are for servicing purposes only.
Not for consumer use.
9 RESET
• Use the RESET button to switch B100S from operating mode to
standby mode.
Switch from operating mode to standby mode: While at
operating mode, press and hold RESET button until the
illuminated blue LED status indicator turns off. B100S is not
accessible via BluOS app while at standby mode.
Switch from standby mode to operating mode: While at standby
mode, short press RESET button – LED status indicator will turn
red to flashing green if there is no wired internet connection or
turn to red, flashing green and then solid blue with wired internet
connection.
• Use the RESET button to restore B100S to its factory default
settings.
• Factory Reset is recommended if your B100S is not functioning
or internet firmware upgrade has failed. All customization,
configuration, file shares and saved playlists will be lost. They
have to be re-created once factory reset is completed.
FACTORY RESET PROCEDURE
a Disconnect AC power cord’s plug from the mains power outlet.
b Press and hold rear panel RESET button and while doing so
reconnect the AC power cord’s plug to the mains power outlet.
c The front LED indicator turns red, immediately turns green and
then back to red - do not release hold of the RESET button.
d After about 30 seconds of holding down the RESET button, the
front LED indicator blinks red.
e Release the RESET button as soon as the front LED indicator
blinks red.
f Factory reset is completed once the front LED indicator turns
solid blue.
IMPORTANT NOTES
Releasing the RESET button at any time before the front LED
indicator starts flashing red will cancel the factory reset and leave the
B100S at Upgrade Mode. Just start again the procedure for Factory
Reset.
10 +12V TRIGGER IN – ON/OFF
• This dual function switch alternates between sensing a +12V
input as applied through the +12V TRIGGER IN and defeating
+12V TRIGGER IN.
• At ON setting and with the +12V TRIGGER IN of B100S
connected to a compatible external device that is equipped with
a +12V DC trigger output, the B100S can be switched remotely
from standby mode to operating mode and vice-versa. This is
dependent upon the presence or absence of +12V DC supply at
+12V TRIGGER IN (refer also to item about +12V TRIGGER IN).
• With +12V TRIGGER IN – ON/OFF switch set to ON, the B100S
cannot be powered from standby to operating mode and vice-
versa. The function of powering up/down the B100S is handled
by the compatible external device where +12V TRIGGER IN is
connected.
• +12V TRIGGER IN is disabled when +12V TRIGGER IN - ON/OFF
switch is set to OFF. This is the default setting and allows the
B100S to power up normally.
IDENTIFICATION OF CONTROLS
 Loading...