PLA88CS USER MANUAL
www.blustream.com.au | www.blustream-us.com | www.blustream.co.uk04
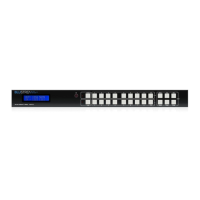
Front Panel Description
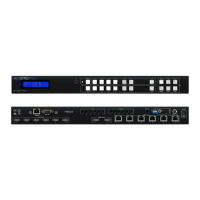
Rear Panel Description
10
1
5 6
7
2
3
4
7
14
16
8
Platinum 4K HDBaseT Matrix with Audio Downmixing
AC100V - 240V
HDMI 7 HDMI 8HDMI 5 HDMI 6
HDBT 4
(24V PoC)
HDBT 3
(24V PoC)
HDBT 2
(24V PoC)
HDBT 1
(24V PoC)
HDMI 8HDMI 7HDMI 6HDMI 5HDMI 4HDMI 3HDMI 2
OPTICAL 1 OPTICAL 2 L/R 3 L/R 4 OPTICAL 1 OPTICAL 2 L/R 2 OPTICAL 3 L/R 3 OPTICAL 4 L/R 4 OPTICAL 5 L/R 5 OPTICAL 6 L/R 6 OPTICAL 7 L/R 7 OPTICAL 8 L/R 8L/R 1
HDMI 1
HDBT 8
(24V PoC)
HDBT 7
(24V PoC)
HDBT 6
(24V PoC)
HDBT 5
(24V PoC)
HDBT 2
(24V PoC)
HDBT 1
(24V PoC)
ETHERNETRS-232INPUT
EDIDRS-232TCP/IP
CONTROLIR INPUTIR OUTPUT
AUDIO INPUT AUDIO OUTPUT
OUTPUT
IR CTRLGLOBAL876543
87654321
21GLOBAL87654321
PLA88CS
RXTX RXTX RXTX RXTX RXTX RXTX RXTX RXTX
RXTX
19 20
91 2 3
6
11 12
15
4
17
5
18
13
1 IR Receiver Window
2 LCD Display – Shows the status of input /
output selection, EDID etc...
3 Menu Button - Press to access Matrix menu
system allowing you to configure EDID
settings, PoC settings, network config and
firmware information
4 Power Button – Press and hold for 3
seconds to power on / o the Matrix
5 Selection Buttons - Multi-use buttons
Primary Use:
First press = HDMI output selection - Press
to select output/s from 1 to 8. Output(s)
selected will be displayed on the Matrix
display. Multiple outputs can be chosen.
Then wait 3 seconds or press ‘SELECT’ to
move to input selection.
Second Press = HDMI input selection -
Press to select the input from 1 - 8. The
Input selected will be displayed on the
Matrix display. Press the Select button to
confirm switch
Secondary Use:
When the MENU button has been pressed
buttons 3, 4, 7 & 8 are used as cursors to
navigate the MENU system
3 = Le
4 = Up
7 = Right
8 = Down
6 Select Button – Press to confirm changes
within the Matrix menu
7 ESC - Press to exit MENU mode
1 IR Outputs - 3.5mm mono connector to
connect to Blustream IR emitter. Used for
local source control
2 IR Global Output - 3.5mm mono connector
to connect to Blustream IR emitter. Used
for global local source control
3 IR Inputs - 3.5mm stereo connector to
connect to Blustream 5V IR receiver or
Control Processor. Used to extend IR from
Matrix to HDBaseT™ Outputs 1-8
4 Optical and Analogue Audio Outputs -
independent audio Matrix with 8 x dual
outputs (Toslink + 3.5mm L/R line level
stereo jack). For connection to 3rd party
audio devices. NOTE: Analogue audio
outputs support 2ch PCM only
5 Ethernet - RJ45 connection to allow
for LAN serving to all connected HDBT
Receivers
6 IR Global Input - 3.5mm stereo connector
to connect to Blustream IR Receiver or
Control Processor. Used for Global IR
control from Matrix to all HDBaseT™
outputs
7 IR Control Input - 3.5mm stereo connector
to connect to Blustream IR receiver for IR
control of the Matrix
8 TCP/IP - RJ45 connector for TCP/IP and
web-GUI control of the Matrix
9 RS-232 - Phoenix connector for RS-232
control of the Matrix (cable included)
q EDID DIP switch – Used for global EDID
settings
w Optical (Toslink) Audio Inputs - Connect to
source device for audio distribution within
the PLA88CS independent audio Matrix
e Analogue Audio Inputs - 3.5mm L/R
stereo jack. Connect to source device for
audio distribution within the PLA88CS
independent audio Matrix
r HDMI / HDBT Inputs - Connect to source
devices. Note only one input type is
available at a time
t HDMI Inputs - Connect to source devices
y Bi-directional RS-232 ports. Connect to
third party control device to extend RS-232
commands to HDBaseT™ Receivers RS-232
port
u HDBaseT™ Outputs - RJ45 HDBaseT™ port
to connect to the HDBaseT™ input port
of the compatible Blustream HDBaseT™
Receiver
i HDMI / HDBaseT™ Outputs - Connect
to display device either via HDMI or
HDBaseT™ Receiver
o Matrix ground screw
p IEC Power Socket - Use supplied IEC power
cable
a Power Switch