EasyManua.ls Logo

boblov 007 - User Manual

boblov 007
12 pages
Print Icon
To Next Page IconTo Next Page
Loading...
BOBLOV
Portable Mini Video Camera
Product Instructions
Model:007
Question and Answer IconNeed help?

Do you have a question about the boblov 007 and is the answer not in the manual?

Summary

Warm Tips Before Using

Format the TF Card

Instructions for formatting the TF card for camera use.

QUICK GUIDE

Functional Keys Instructions

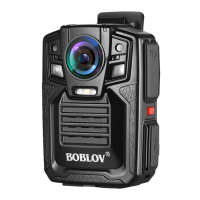
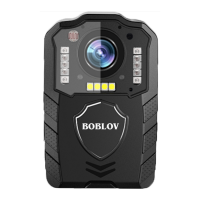
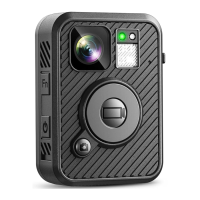
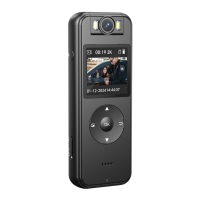
Explanation of the camera's various buttons and their functions.

Install TF Card

Steps for inserting a TF card into the camera.

Using Instructions

How to operate the camera for different functions like recording and photographing.

Product Introduction

Operation of Reset Button

Procedure for resetting the camera when it crashes.

Extra Multiple Functions

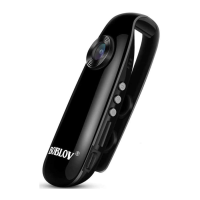
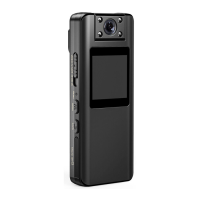
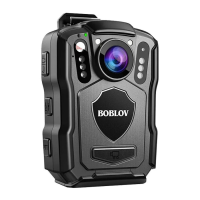
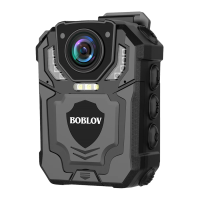
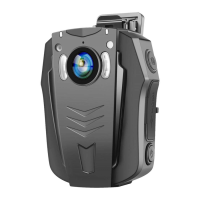
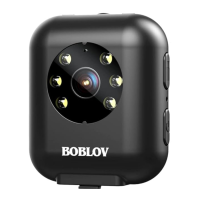
Details on magnetic and clip design features, and mounting options.

Time Settings and Resolution Settings

Setting Time and Resolution

Guide to setting the camera's time and video resolution via text files.

Video Timestamp Settings

Instructions on how to set and display video timestamps.

Safe Caution

Basic Precautions

Safety guidelines regarding battery, environment, and self-repair.

Product Parameters

Technical Specifications

Detailed list of the camera's photograph, audio, video, and system parameters.

Overview

This document outlines the features and operational instructions for the BOBLOV Model:007 Portable Mini Video Camera, a compact device designed for various recording needs.

Function Description

The BOBLOV Model:007 is a versatile mini video camera equipped with a built-in lithium battery, capable of recording video and audio, taking photographs, and featuring motion detection. Its primary function is portable recording, supported by a creative clip design and strong magnetic iron, allowing it to adhere to various surfaces and be used hands-free. The camera supports recording while charging, enhancing its utility for extended use.

Usage Features

Getting Started: Before initial use, it is crucial to charge the camera for approximately one hour. The manufacturer recommends using the original USB cable for charging to ensure accurate LED indicator status, although other USB cables may also work.

TF Card Management: The camera requires a TF card (not included) for storage, supporting capacities up to 64GB. For first-time use, the TF card must be formatted to FAT32 32KB. This process involves inserting the TF card into a card reader, connecting it to a PC, and using the computer's formatting utility to select FAT32 as the file system and 32 kilobytes as the allocation unit size. After formatting, a warning will appear, confirming that all data on the disk will be erased; proceed by clicking OK. Once complete, the camera is ready for use.

Functional Keys: The device features several key controls:

  • Lens (1): The primary optical component for capturing images and video.
  • LED indicator (2): Provides visual feedback on the camera's status.
  • On/Video-recording switch (3): Controls power and initiates/stops video recording.
  • Audio-recording / Indicator switch (4): Manages audio recording and the visibility of the LED indicator.
  • Photographing button / Motion-detection switch (5): Triggers photo capture and activates/deactivates motion detection.
  • TF card slot (6): Where the TF memory card is inserted.
  • USB port (7): Used for charging and connecting to a computer.

Additional Physical Features:

  • Back Clip (1): Facilitates portable attachment to clothing or other objects.
  • Magnet (2, 3): Enables adsorption to metallic surfaces for flexible placement.
  • M6 screw hole (4): Allows for mounting the camera using a screw bracket (not included).
  • Reset hole (5): Used to reset the device in case of a crash.
  • Microphone (6): Captures audio during recording.

Operating Modes:

  • Video Recording:

    • To power on, press the "On/Video-recording switch" for 2 seconds.
    • To start video recording, press the "On/Video-recording switch" for 0.5 seconds; the blue indicator will flash constantly.
    • Video files are saved automatically in 5-minute segments.
    • To stop recording, press the "On/Video-recording switch" for 0.5 seconds; the blue indicator will stay on.
    • To power off, press the "On/Video-recording switch" for 2 seconds.
  • Audio Recording:

    • To power on, press the "On/Video-recording switch" for 2 seconds.
    • To start audio recording, press the "Audio-recording switch" for 0.5 seconds; the chartreuse indicator will flash constantly.
    • Audio files are saved automatically in 5-minute segments.
    • To stop recording, press the "Audio-recording switch" for 0.5 seconds; the blue indicator will stay on.
    • To power off, press the "On/Video-recording switch" for 2 seconds.
  • Photographing:

    • To power on, press the "On/Video-recording switch" for 2 seconds.
    • To take a photo, press the "Photographing button / Motion-detection switch"; the chartreuse indicator will stay on for 3 seconds, then the blue indicator will stay on.
    • Photos are saved automatically, with one photo taken per press.
  • Motion-detection Function:

    • To power on, press the "On/Video-recording switch" for 2 seconds.
    • To activate motion detection, press and hold the "Photographing button / Motion-detection switch" for 3 seconds, then release. The blue indicator will flash constantly, and the camera will record videos for 1 minute.
    • If motion is detected around the lens, recording will continue. If no motion is detected for 1 minute, the camera will stop recording, and the blue indicator will stay on.
  • Hide-indicator Function:

    • While video recording, press the "Audio-recording / Indicator switch" for 3 seconds to turn off the indicator.
    • Press the "Audio-recording / Indicator switch" for 3 seconds again to restart the indicator, which will begin flashing. This operation does not affect the camera's recording status.

Time and Resolution Settings: To set the time and resolution, insert a TF card into the camera, connect it to a PC via USB, and open the disk files. Locate and rename the file "settime" to "settings". Open this file, clear its contents, and input "0 1 1" (without quotes) to configure default settings. Save and exit the file. Record a short video with the camera; the "settings" file will then disappear, indicating the settings have been applied.

  • Resolution: The first number in the "settings" file controls resolution. "0" sets video resolution to 1280x720 at 30 frames per second. "1" sets it to 1920x1080 at 30 frames per second.
  • Loop Recording: The second number controls loop recording. "0" disables loop recording, stopping video recording when the card is full. "1" enables loop recording, allowing the camera to continue recording by overwriting the oldest files when the card is full.
  • Timestamp: The third number controls the timestamp display. "0" hides the timestamp on recorded videos. "1" displays the timestamp in "YY/MM/DD, Hour:Minute:Second" format.

To set a specific timestamp, after the "settime" document is generated (after the first video recording), open it and revise the time number to the desired format (e.g., "2020-12-24, 23:59:59"). Save and disconnect from the computer. The new timestamp will then appear on videos, and the "settime" text document will remain visible.

Maintenance Features

Reset Function: In the event of a camera crash or if it cannot be powered off, use a sharp needle to insert into the reset hole and press the internal reset key. This action will force the camera to power off.

Warm Tips for Operation and Care:

  • Low Power: When the battery is low, the indicator will flash rapidly, and the camera will automatically stop recording video and audio, save files, and power off.
  • No TF Card: If the camera is powered on without a TF card inserted, the blue indicator will flash continuously.
  • Standby Power Off: If left in standby mode for over 3 minutes, the camera will automatically power off to conserve battery.
  • Environmental Conditions: This product uses a lithium battery and should not be exposed to direct sunlight, high temperatures, high humidity, or dusty environments for prolonged periods.
  • Charging Before Use: If the camera has not been used for an extended period, ensure it is charged before use.
  • No Disassembly: Do not attempt to disassemble or repair the product yourself.

boblov 007 Specifications

General IconGeneral
Frame Rate30 fps
Video Resolution1920x1080
Photo FormatJPG
Recording Time90 minutes
Night VisionYes

Related product manuals