32 | English
3 609 929 B34 | (3.4.08) Bosch Power Tools
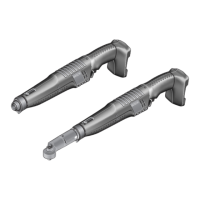
Mount the angled screw head 3 onto the flange
in the requested position and tighten the sleeve
nut with the open-end spanner 4 via the spanner
flats 19. Hold the angled head flange with the
open-end spanner 6 to prevent turning.
On these industrial cordless angle wrenches, a
fitting flat drive has to be mounted first.
Different flat drives are available on the market.
Please inquire for the fitting flat drive at your
specialist shop.
f Observe the mounting instructions of the
flat drive.
Suspension Device
With the utility clip 8, the machine can be at-
tached to a suspension device.
Fasten the utility clip 8 to the machine by engag-
ing it into the fastening slots 15.
f Regularly check the condition of the utility
clip and the hook of the suspension device.
Charging Procedure
Note: Battery charger and battery packs are not
included in the delivery scope.
The power plug shown can vary from the one on
your power tool.
f Please take care, that the charger and the
battery pack are suitable for your country
specific electricity network.
15 Minute Charger AL 15 FC (see figure A)
Plug the power plug 22 of the battery charger 21
into your electrical power supply outlet and in-
sert the battery 11 correctly into the charging
compartment of the battery charger.
f Do not exert any force when inserting/re-
moving the battery. Batteries with APT con-
tact (Akku Pack Top) are designed in such a
manner that they can only be inserted into
the power tool or the charger in the correct
position.
The green LED indicator 23 starts to flash. This
indicates the flow of the charging current. The
charging process automatically stops when the
battery is fully charged.
The charging procedure is over when the green
LED indicator no longer flashes and lights up
uniformly.
An audible signal sounds for approx. 2 seconds
and signals that the battery is fully charged.
Continuous lighting of the red LED indicator 24
signals a charging procedure with reduced
charging current.
When the red LED indicator flashes, charging is
not possible.
1 Hour Charger AL 60 DV (see figure B)
Plug the power plug 22 of the battery charger 21
into your electrical power supply outlet and in-
sert the battery 11 correctly into the charging
compartment of the battery charger.
f Do not exert any force when inserting/re-
moving the battery. Batteries with APT con-
tact (Akku Pack Top) are designed in such a
manner that they can only be inserted into
the power tool or the charger in the correct
position.
The green LED indicator 23 starts to flash. This
indicates the flow of the charging current. The
charging process automatically stops when the
battery is fully charged.
The charging procedure is over when the green
LED indicator no longer flashes and lights up
uniformly.
Continuous lighting of the green LED indicator
23 signals that charging is not possible.
Troubleshooting
– Causes and Corrective
Measures
ANGLE EXACT 14CF | 22CF | 29CF
Cause Corrective Measure
LED indicators do not light up
Mains plug of battery
charger not plugged in
(properly)
Insert mains plug (ful-
ly) into the socket out-
let
Socket outlet, mains
cable or battery
charger defective
Check the mains volt-
age; have the battery
charger checked by an
authorised after-sales
service agent for
Bosch power tools
OBJ_BUCH-412-001.book Page 32 Thursday, April 3, 2008 3:18 PM