36
07 CHARGING
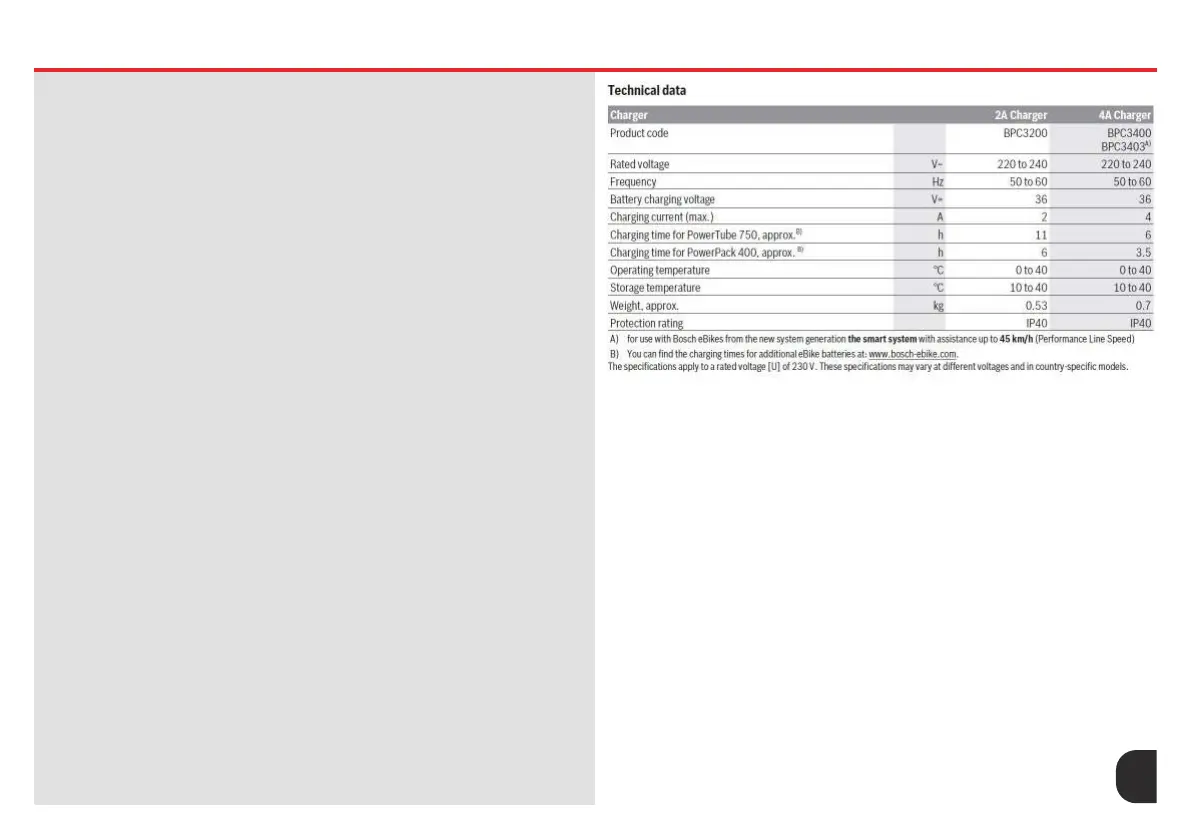
7.3 Start Up & Technical Data
Connecting the Charger to the Power Outlet (see gure A)
- Pay attention to the mains voltage. The voltage of the power source
must match the voltage specied on the rating plate of the charger.
Chargers marked 230 V can also be operated at 220 V.
Plug the device connector (3) of the power cable into the device socket
(2) on the charger. Connect the power cable (country-specic) to the
power outlet.
Charging the Removed eBike Battery (see gures B–F)
Switch the eBike battery off and remove it from its holder on the eBike.
When doing so, read and observe the operating instructions of the eBike
battery.
- Ensure the eBike battery is placed on clean surfaces only. Avoid getting
dirt, e.g. sand or soil, in the charging socket and contacts in particular.
Plug the charging connector (5) of the charger into the charging socket
(6) on the eBike battery.
Charging the eBike Battery on the eBike (see gures G−I)
Switch the eBike battery off. Clean the cover of the charging socket (14).
Avoid getting dirt, e.g. sand or soil, in the charging socket and contacts in
particular. Lift the cover of the charging socket (14) and plug the charging
connector (5) into the charging socket (6).
- There is a risk of re due to the charger heating up during charging.
Ensure the eBike battery on the eBike is completely dry and placed on a
reproof surface before charging. If this is not possible, remove the eBike
battery from the holder and charge it in a more suitable location. When
doing so, read and observe the operating instructions of the eBike battery.
Charging process - The charging process begins as soon as the charger
is connected to the eBike battery or charging socket on the eBike and to
the power outlet.
Note: The charging process is only possible when the temperature of the
eBike battery is within the permitted charging temperature range.
Note: The drive unit is deactivated during the charging process.
The eBike battery can be charged with or without the on-board computer.
When charging without the on-board computer, the charging procedure
can be observed on the battery charge indicator (7) and, where
applicable, on the operating unit.
When the on-board computer is connected, a charging notication
appears on the display. The state of charge is displayed by the battery
charge indicator (7) on the eBike battery, the operating unit and, where
applicable, the on-board computer.
The LEDs on the eBike battery charge indicator (7) ash during the
charging process. Each continuously lit LED represents approximately
20% of the charging capacity. The ashing LED indicates the next 20%
currently charging. Once the eBike battery is fully charged, the LEDs go
out immediately and the on-board computer is switched off. The charging
process is terminated. The state of charge can be displayed for 5 seconds
by pressing the on/off button (8) on the eBike battery. Disconnect the
charger from the power outlet and the eBike battery from the charger.
When the battery is disconnected from the charger, the eBike battery
is automatically switched off. Note: If you have charged the battery on
the eBike, carefully close the charging socket (6) with the cover (14)
after charging, so that no dirt or water can get in. If the charger is not
disconnected from the eBike battery after charging, after a few hours the
charger will switch itself back on, check the state of charge of the eBike
battery and begin the charging procedure again if necessary.




 To Next Page