Balance the system so that the specified temperature difference
is obtained. Shut the radiators and adjust the bypass until the
same temperature difference is obtained. Refer to Fig 41.
Set the room thermostat to minimum and check that the burner
goes out and comes back on after a period of about three
minutes after the room thermostat is reset to maximum. Switch
the burner off by setting the CH temperature control knob to off.
12.21. Turn off the electricity to the appliance. Drain the heating
system as described in Section 15.3.1. Refill and re-pressurise as
described in Section 12.4-8 adding a suitable proprietary
inhibitor if necessary. Further information is available from WHS
Technical Information Department, Telephone 0990 266241.
12.22.
Completion of Commissioning: Disconnect the pressure
gauge and tighten the test point screw. Restart the appliance and
check for gas soundness around the test point screw.
Refer to Fig 40.
12.23. Refit the cabinet front panel.
12.24. If the appliance is to be passed over to the user
immediately then set the controls to the users requirements.
Refer to Section 13.
12.25. If the appliance is to be left inoperative in frosty
conditions then check that the programmer, if fitted, is set to Off.
The appliance will operate under the control of the integral frost
protection facility. Do not switch the electricity supply off.
12.26. If there is any possibility of the appliance and the system
being left totally unused in freezing conditions then switch off
the gas and electricity and drain the appliance and the system.
Refer to Fig 41.
13.1. Handover the User Booklet.
13.2. Explain how to operate the appliance safely and efficiently.
13.3. Tell the user what to do if the appliance is not going to be
used in very cold conditions.
13.4. Tell the user what to do if the system pressure falls.
13.5. Explain that regular servicing will maintain safe and
efficient operation and extend the life of the appliance. WHS can
offer a comprehensive maintenance contract
13.6. Tell the user that any work on the appliance must only be
carried-out by a competent, CORGI registered, person.
14.1 The extent of the service required is determined by the
operating condition of the appliance when tested by a
competent person.
It is the law that any service work is carried-out by a competent
CORGI registered person.
14.2.
Inspection
14.2.1 Check that the flue terminal and the terminal guard, if
fitted, are clear and undamaged.
14.2.2 If the appliance is in a compartment or cupboard, check
that the service space around the appliance is clear. Refer to
Fig 3.
14.2.3 Check all the joints and connections in the system and re-
make any that show signs of leakage. Refill and re-pressurise as
described in Section 12.4-8 - Commissioning.
14.2.4 Operate the appliance and take note of any irregularities.
Refer to Section 18, Fault Finding for rectification procedures.
Check the combustion performance. Remove the screw at the
sample point, on top of the appliance. Connect the sampling
meter. Refer to Fig 17. With the appliance at maximum rate and
stable in the DHW mode expect readings of
4.5 - 6.5 % CO and
0.0025-0.009% CO. Refit and tighten the screw after the test.
These figures cover all the flue lengths.
14.2.5
Disconnect the electrical supply at the mains and turn
off the gas supply at the gas service cock on the appliance
before starting any service procedures
.
14.2.6 Always test for gas soundness after the service has been
completed.
14.3
Component Access
14.3.1 To service the appliance it may be necessary to remove
some or all of the following parts to gain access to components
which may need to be checked or replaced.
14.3.1.1 Cabinet front panel. Lift and pull away.
14.3.1.2 Facia/Control box. Unscrew the two screws and lower.
Refer to Fig 21.
14.3.1.3 Inner casing cover. Unscrew the four screws and
remove. Refer to Fig 21.
14.3.1.4 Combustion chamber cover. Unscrew the four screws,
slacken the flue hood J-bolts and remove. Refer to Fig 42.
14.3.1.5 Fan. Carefully pull off the electrical connections, pull off
the tubes from the air flow sensor and flue sample tube, unscrew
the assembly fixing screw. Unscrew the flue duct clamp to
release the flue duct and slide the fan assembly out. Refer to Fig
22, 23 and 35.
14.3.1.6 Flue hood. Remove the fan. Unscrew the two J-bolts and
remove. Refer to Fig 42.
14.3.1.7 Burner blade assembly. Remove the spark and sensing
electrodes and the support brackets. Refer to Section 15.4.2/3.
Unscrew the blade assembly fixing screws and loosen the two
locating screws. Lift the blade assembly from the appliance.
Refer to Fig 43, 44, 45.
14.3.1.8 Cabinet bottom panel. Unscrew the two screws and
remove. Refer to Fig 28.
14.4
Component Cleaning
Only use a non-metallic brush to clean components.
14.4.1 Clean the fan, taking care not to block the air flow
detector.
14.4.2 Clean the burner blade assembly to ensure that all the
ports are clear.
14.4.3 Clean the electrodes. Replace if there is any deterioration
of an electrode.
14.4.4 Clean the burner manifold. Inspect the burner manifold
and remove any deposits. Do not use any metal probes to clean
the injectors.
19
14. Inspection and Servicing
13. User Information
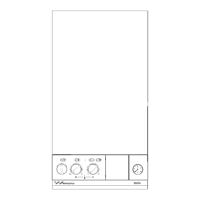
Fig 41-Bypass Adjuster and Drain Point
9
10
7
8
6
1
2
3
4
5
Pipework Connections
1. Relief Valve Discharge 6. Gas Inlet
2. Central Heating Return 7. Bypass Adjuster
3. Central Heating Flow 8. Drain Point
4. Cold Water inlet 9. Facia Panel
5. Domestic Hot Water Flow 10. Bottom Panel
2