EasyManua.ls Logo

Boss ES-8 User Manual

Boss ES-8
22 pages
To Next Page IconTo Next Page
Page #1 background imageLoading...
Page #1 background image
Owners Manual
Before using this unit, carefully read “USING THE UNIT SAFELY” and “IMPORTANT NOTES” (leaet “USING THE UNIT SAFELY” and Owner’s Manual (p.
21)). After reading, keep the document(s) including those sections where it will be available for immediate reference.
Copyright © 2015 ROLAND CORPORATION
Contents
Panel Descriptions . . . . . . . . . . . . . . . . . . . . . . . . . . . . . . . . . . . . . . . . 2
Rear Panel (Connecting Your Equipment) . . . . . . . . . . . . . . . . . . . 2
Top Panel . . . . . . . . . . . . . . . . . . . . . . . . . . . . . . . . . . . . . . . . . . . . . . . 4
Attaching the Rubber Feet . . . . . . . . . . . . . . . . . . . . . . . . . . . . . . . . 5
Installing the ES-8 in a Pedalboard . . . . . . . . . . . . . . . . . . . . . . . . . 5
Turning the Power On and O . . . . . . . . . . . . . . . . . . . . . . . . . . . . 5
Switching the Play Screen . . . . . . . . . . . . . . . . . . . . . . . . . . . . . . . . 5
Saving/Recalling a Combination of Eect Units
(Memory Mode) . . . . . . . . . . . . . . . . . . . . . . . . . . . . . . . . . . . . . . . . . . 6
Patch Structure . . . . . . . . . . . . . . . . . . . . . . . . . . . . . . . . . . . . . . . . . . 6
Switching Between Memory and Manual Modes . . . . . . . . . . . . 6
Saving a Patch (Patch Write) . . . . . . . . . . . . . . . . . . . . . . . . . . . . . . 6
Recalling a Patch (Patch Change) . . . . . . . . . . . . . . . . . . . . . . . . . . 6
Creating a Patch . . . . . . . . . . . . . . . . . . . . . . . . . . . . . . . . . . . . . . . . . . 7
Block Diagram . . . . . . . . . . . . . . . . . . . . . . . . . . . . . . . . . . . . . . . . . . 7
Tips for Creating Patches (Sounds) . . . . . . . . . . . . . . . . . . . . . . . . . 7
Changing the Eect Loop Settings . . . . . . . . . . . . . . . . . . . . . . . . . 8
Changing the Eect Loop Connection Order. . . . . . . . . . . 8
Making a Parallel Connection . . . . . . . . . . . . . . . . . . . . . . . . 8
Specifying Carry Over . . . . . . . . . . . . . . . . . . . . . . . . . . . . . . . 8
Editing the Settings of a Patch (Memory Edit Mode) . . . . . . . . . 9
Quick Edit . . . . . . . . . . . . . . . . . . . . . . . . . . . . . . . . . . . . . . . . . 9
Basic Operation . . . . . . . . . . . . . . . . . . . . . . . . . . . . . . . . . . . . 9
Parameter List . . . . . . . . . . . . . . . . . . . . . . . . . . . . . . . . . . . . . 9
Making Global Settings (System Setting) . . . . . . . . . . . . . . . . . 12
List of Parameters . . . . . . . . . . . . . . . . . . . . . . . . . . . . . . . . . . . . . . . 12
Patch/Data Operations (Utility) . . . . . . . . . . . . . . . . . . . . . . . . . . . 13
Copying a Patch (Patch Copy) . . . . . . . . . . . . . . . . . . . . . . . . . . . . . 13
Exchanging Patches (Patch Exchange). . . . . . . . . . . . . . . . . . . . . . 13
Initializing a Patch (Patch Init) . . . . . . . . . . . . . . . . . . . . . . . . . . . . . 13
Copying a Bank (Bank Copy) . . . . . . . . . . . . . . . . . . . . . . . . . . . . . . 13
Exchanging Banks (Bank Exchange) . . . . . . . . . . . . . . . . . . . . . . . . 13
Transmitting Data to an External MIDI Device (Bulk Dump) . . . 13
Restoring the Factory Settings (Factory Reset) . . . . . . . . . . . . . . . 13
Advanced Applications . . . . . . . . . . . . . . . . . . . . . . . . . . . . . . . . . . . 14
Adjusting the Level of Each Patch . . . . . . . . . . . . . . . . . . . . . . . . . . 14
Switching Between Two Guitars . . . . . . . . . . . . . . . . . . . . . . . . . . . 14
Switching Between Two Amps . . . . . . . . . . . . . . . . . . . . . . . . . . . . 15
Switching the Amps Channels . . . . . . . . . . . . . . . . . . . . . . . . . . . . 15
Connecting with the Four-Cable Method / Also Switching the
Amps Channels . . . . . . . . . . . . . . . . . . . . . . . . . . . . . . . . . . . . . . . . . 15
Reducing Hum . . . . . . . . . . . . . . . . . . . . . . . . . . . . . . . . . . . . . 15
Changing the BOSS PH-3’s Rate for Each Patch . . . . . . . . . . . . . . 16
Using an Expression Pedal to Control the BOSS PH-3’s Rate . . . 16
Using the [BANK
H
] Switch to Turn Delay On/O . . . . . . . . . . . . 17
Using Number Switch [7] to Change the Delay Time . . . . . . . . . 17
Using Tap Tempo to Set the Delay Time of Each Patch . . . . . . . . 18
Applying Chorus Only While the Currently Selected Number
Switch Is Held Down . . . . . . . . . . . . . . . . . . . . . . . . . . . . . . . . . . . . . 18
Using CC (Control Change) to Control a MIDI-Equipped Eect
Unit When the Patch Changes . . . . . . . . . . . . . . . . . . . . . . . . . . . . . 19
Connecting a Wah or Fuzz (Input Buer O) . . . . . . . . . . . . . . . . 19
Appendix . . . . . . . . . . . . . . . . . . . . . . . . . . . . . . . . . . . . . . . . . . . . . . . . . 20
Troubleshooting . . . . . . . . . . . . . . . . . . . . . . . . . . . . . . . . . . . . . . . . 20
Error Messages . . . . . . . . . . . . . . . . . . . . . . . . . . . . . . . . . . . . . . . . . . 20
Main Specications . . . . . . . . . . . . . . . . . . . . . . . . . . . . . . . . . . . . . . 21
USING THE UNIT SAFELY . . . . . . . . . . . . . . . . . . . . . . . . . . . . . . . . . . 21
IMPORTANT NOTES . . . . . . . . . . . . . . . . . . . . . . . . . . . . . . . . . . . . . . . 21
Main features
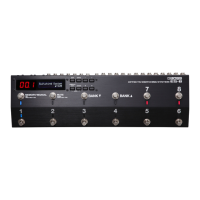
The ES-8 is a switching system that lets you connect eect pedals
and other eect units, and then store and recall up to 800 dierent
combinations of them.
5 It provides dedicated jacks for connecting stereo-in/out eect units
and volume pedals.
5 It also provides a wide variety of external control functions for
controlling your amp and eects in real time.

Table of Contents

Questions and Answers:

Boss ES-8 Specifications

General IconGeneral
Product typeFootswitch/controller
Product colorBlack
Output impedance1000 Ω
Number of footswitches-
Power source typeAC
AC adapter includedYes
Display typeLED
Weight and Dimensions IconWeight and Dimensions
Depth137 mm
Width439 mm
Height65 mm
Weight2500 g

Summary

Main features

Panel Descriptions

Rear Panel (Connecting Your Equipment)

Details the rear panel connections, including SEND/RTN jacks, IN/OUT jacks, and TUNER/SEND VOL jacks for equipment.

IN, 2 jacks

Jacks for connecting guitars or basses, with settings determining input selection.

TUNER jack

Jack for connecting an external tuner, outputs selected input signal even when mute is on.

SEND VOL, RTN VOL jacks

Jacks for connecting a volume pedal or for preamp send/return.

OUT 1/L, 2/R jacks

Output jacks that can be turned on/off independently; MUTE switch mutes output.

Panel Descriptions

EXT CTL jacks

Control jacks for latch or momentary operation, used for switching amp channels or turning effects on/off.

EXP 1, 2 jacks

Jacks for connecting an expression pedal to control effect units or ES-8 parameters.

CTL IN jacks

Jacks to control effect units or amps connected to EXT CTL jacks, or for expression pedals.

MIDI connectors

Connect external MIDI devices to transmit and receive MIDI messages.

DC IN jack

Jack for connecting the included AC adaptor to power the unit.

Panel Descriptions

Top Panel

Details the top panel buttons, display, and their functions like EDIT, WRITE, DISPLAY/EXIT, ENTER, and +/- buttons.

Lock function

Disables all buttons to prevent accidental changes when simultaneously pressing DISPLAY/EXIT and ENTER.

Display

Shows various information, including bank/number and synchronization with tempo.

What is an effect loop?

A connection where an effect device is linked via send and return jacks; the ES-8 has eight effect loops.

What is memory mode?

Mode for selecting 'patches,' combinations of effect loops and settings, from 800 available patches.

What is manual mode?

Mode for turning effect loops (1-8) on/off individually using switches.

Panel Descriptions

Attaching the Rubber Feet

Instructions on how to attach the included rubber feet to the unit for stability.

Installing the ES-8 in a Pedalboard

Guidance on fastening the ES-8 to a pedalboard using the included screws.

Turning the Power On and Off

Procedure for powering the unit on and off, emphasizing correct order to prevent damage.

Switching the Play Screen

How to cycle through different display screens (play screens) using the DISPLAY/EXIT button.

Saving/Recalling a Combination of Effect Units (Memory Mode)

Patch Structure

Defines a patch as a combination of effect loops and parameters, organized by bank and number.

Switching Between Memory and Manual Modes

Explains how to switch between memory mode and manual mode using the MEMORY/MANUAL switch.

Saving a Patch (Patch Write)

Step-by-step guide on how to save a created patch to a specific destination.

Recalling a Patch (Patch Change)

Instructions on how to select and recall saved patches using bank and number switches.

Creating a Patch

Block Diagram

Visual representation of the ES-8's analog switch array, mixers, and signal flow.

Carry Over

Function that preserves sound by cutting only input during patch changes, allowing delayed sounds to remain.

Tips for Creating Patches (Sounds)

Advice on using internal mixers for parallel connections and Carry Over to create diverse sounds.

Parallel connection

Method for connecting effect units in parallel using the internal mixers for unique sound creation.

Using the Carry Over function

How to preserve sound, like delay, when switching between patches by enabling Carry Over.

Creating a Patch

Changing the Effect Loop Settings

Allows modification of loop connection order, parallel connections, and Carry Over specifications.

Loop Structure screen

Screen displaying loop connections, volume loop, and Carry Over status; navigable with buttons.

Specifying mono/stereo return for effect loops 7 and 8

System setting to select mono-return or stereo-return for effect loops 7 and 8.

Making a Parallel Connection

Step-by-step guide to creating parallel connections between effect loops using the Loop Structure screen.

Cancelling a Parallel Connection

Procedure to remove a parallel connection by navigating the Loop Structure screen and pressing ENTER.

Changing the Effect Loop Connection Order

How to reorder effect loops or the volume loop within the Loop Structure screen.

Specifying Carry Over

Instructions on how to specify Carry Over for a particular effect loop using the Loop Structure screen.

Creating a Patch

Editing the Settings of a Patch (Memory Edit Mode)

Detailed process for editing effect loop on/off status and saving changes via switches.

Quick Edit

Method for turning effect loops on/off and saving settings rapidly using only the switches.

Basic Operation

Steps for recalling a patch, entering edit mode, selecting categories, and editing parameters.

Parameter List

Detailed list of patch parameters, their values, and explanations for settings like Patch Name and Loop On/Off.

Creating a Patch

Patch MIDI 1-8

Specifies transmit channel and bank select message transmission for MIDI messages.

LSB

Option to transmit bank select messages, only possible with Bank LSB enabled.

MSB

Option to transmit bank select messages in conjunction with program change.

PC

Specifies whether program change messages are transmitted when switching patches.

Ctl1-2 CC#

Specifies whether control change messages are transmitted and the control change number.

Ctl1-2 Val

Sets the value for the control change message.

CTL/EXP

Defines functions for switches and expression pedals connected to CTL IN and EXP jacks.

Assign (A) 1-12

Allows assignment of functions (Sw, Src, Mod, Assign 1, etc.) to control jacks and pedals.

Parameter

Parameters for assigning functions: Category, Target, Min/Max, Act L/Act H, Trig, Tim, Crv, Rate, Form.

Creating a Patch

*3 Form

Selects the waveform (SAW, TRI, SINE) for the wave pedal's cyclical parameter modification.

Target List

Comprehensive list mapping targets (LOOP, E.CTL, InOut, MODE, MIDI, BPM, LED) to their available parameters and values.

Making Global Settings (System Setting)

Category: Play Option

Sets timing for bank/patch changes, patch switching behavior, and EXT CTL jack operations.

Switch Mode

Determines if bank/patch changes occur when a switch is pressed or released.

Bank Chg Mode

Sets whether bank changes are immediate or require a number switch press.

CTL1-6

Configures the operation of EXT CTL CTL 1/2-5/6 jacks, including latch, pulse, and tap tempo.

Bank Extent Min, Max

Defines the selectable range of banks for bank selection.

Patch Chg Time

Sets the mute time that occurs when switching patches.

Category: Preference

Determines if input/output parameters use patch-specific or system-wide settings.

Input Sel, Input Buf, Output Sel, Output Buf

Sets whether input/output parameters follow patch settings or system settings.

Loop 7 Return, Loop 8 Return

Specifies mono-return or stereo-return for effect loops 7 and 8.

Vol Loop Lift

Option to lift the SEND VOL jack's ground connection to reduce hum.

Category: MIDI Setting

Configures MIDI OUT/THRU operation, MIDI channel, and device ID for MIDI communication.

MIDI Out Mode

Sets the MIDI OUT connector to operate as OUT or THRU.

RxCh

Specifies the MIDI channel on which the ES-8 receives MIDI messages.

Dev ID

Sets the device ID for transmitting and receiving exclusive MIDI messages.

Sync

Determines timing synchronization basis for tempo and time-based parameters (INT, AUTO).

Clock Out

Specifies whether MIDI clock messages are transmitted.

Category: PC Map

Allows mapping of program change messages to specific patches.

LCD Contrast

Adjusts the contrast (brightness) of the unit's display.

Pol Exp 1, 2

Sets the polarity for expression pedals connected to CTL IN EXP 1 and EXP 2 jacks.

Pol C1-C4

Sets the polarity for footswitches connected to CTL IN CTL 1/2-3/4 jacks.

Patch/Data Operations (Utility)

Copying a Patch (Patch Copy)

Copies a source patch to a destination patch, overwriting the destination.

Exchanging Patches (Patch Exchange)

Swaps the contents of two specified patches.

Initializing a Patch (Patch Init)

Resets a selected patch to its default state.

Copying a Bank (Bank Copy)

Copies all patches from a source bank to a destination bank, overwriting the destination.

Exchanging Banks (Bank Exchange)

Swaps the contents of two specified banks.

Transmitting Data to an External MIDI Device (Bulk Dump)

Transmits system and patch data to MIDI sequencers or other ES-8 units via MIDI.

Restoring the Factory Settings (Factory Reset)

Resets the unit to its original factory settings, losing all user data.

Advanced Applications

Adjusting the Level of Each Patch

How to adjust output buffer and output gain parameters for each patch.

Switching Between Two Guitars

Configuration for using two guitars simultaneously by selecting different inputs for each output.

Advanced Applications

Switching Between Two Amps

Setting up the unit to control output selection for two different amplifiers.

Switching the Amp's Channels

Using CTL1-6 and Play Option settings to control amp channel switching.

Connecting with the Four-Cable Method / Also Switching the Amp's Channels

Detailed setup for the four-cable method, including amp channel switching.

Reducing Hum

Using the Vol Loop Lift system setting to minimize hum caused by ground loops.

Advanced Applications

Changing the BOSS PH-3's Rate for Each Patch

Assigning the EXP1 parameter to control the rate of a BOSS PH-3 effect unit.

Using an Expression Pedal to Control the BOSS PH-3's Rate

Connecting an expression pedal to control the rate of a BOSS PH-3 effect unit.

Advanced Applications

Using the [BANK ▲] Switch to Turn Delay On/Off

Assigning the BANK UP switch to toggle a delay effect on and off.

Using Number Switch [7] to Change the Delay Time

Assigning Number Switch [7] to control the delay time of a connected delay unit.

Advanced Applications

Using Tap Tempo to Set the Delay Time of Each Patch

Configuring CTL1 for tap tempo input to set delay time based on Master BPM.

Applying Chorus Only While the Currently Selected Number Switch Is Held Down

Assigning a chorus effect to loop L5 to activate only when a number switch is held.

Advanced Applications

Using CC (Control Change) to Control a MIDI-Equipped Effect Unit When the Patch Changes

Controlling MIDI effect units with Control Change messages when patches are changed.

Connecting a Wah or Fuzz (Input Buffer Off)

Disabling the input buffer to avoid sound changes when connecting wah or fuzz units.

Appendix

Troubleshooting

Lists common problems, items to check, and actions to resolve issues like no sound or looping.

Error Messages

Explains error messages such as MIDI BUFFER FULL, MIDI OFFLINE, DATA WRITE ERROR, and their solutions.

USING THE UNIT SAFELY

Main Specifications

Detailed technical specifications of the ES-8, including loops, memory, inputs/outputs, and connectors.

WARNING

Essential warnings regarding power supply, voltage, and handling small parts.

CAUTION

Important cautions for children's safety, handling the ground terminal, and suitable/unsuitable connection places.

IMPORTANT NOTES

Notes on repairs, data backup, handling the display, and using specific pedals.

Related product manuals