58
20. The old Cord should be against the Low-Tension, Floating Pulley. Using
a #2 Phillips screwdriver, remove the appropriate Pulley from the Low-
Tension, Floating Pulley to release it.
Note: Be sure to note the routing of the rope before removing the Pulley.
21. Route the new elastic cord through and re-assemble the Low-Tension,
Floating Pulley.
22. Continue the previous steps removing and replacing the Cord until
the tension on the old Cord is slack. When slack, remove the old Cord by
releasing the Elastic Cord Stopper. Route the new Cord following the path
of the old Cord, and secure it with the Elastic Cord Stopper into the Lower
Pulley Retainer.
23.ConrmtheElasticCordiscorrectlyroutedbytryingtheLoweror
Middle Hand Grips.
24. Re-assemble the machine in the reverse order of when the parts were
removed.
25. Final Inspection
Inspect your machine to ensure that all hardware is tight and components
are properly assembled.
Do not use until the machine has been fully assembled and
inspected for correct performance in accordance with the
Owner’s Manual.
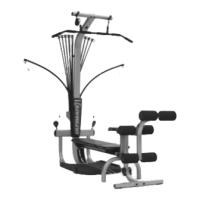
Note: These images show the removal of the Load-Bearing, Floating Pulley The assembly is similar to the Low-Tension, Floating Pulleys except for
hardware.