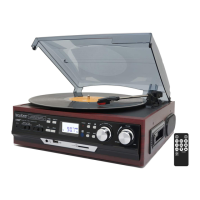
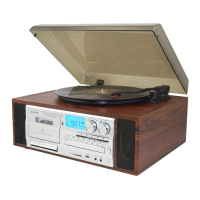
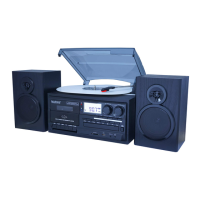
The Boytone BT-17DJM is a versatile audio system that combines a turntable, cassette player, USB/SD playback and recording capabilities, and an AM/FM radio. This instruction manual provides essential safety guidelines, installation procedures, a detailed parts list, and operational instructions for each function, ensuring users can maximize their experience with the device.
General Safety Instructions and Installation:
Before operating the BT-17DJM, it is crucial to read and understand all safety instructions to prevent fire, electric shock, and injury. Key electrical safety points include ensuring the outlet voltage matches the appliance rating, avoiding opening the equipment to prevent contact with high-voltage components, and properly aligning the plug. Users should only use the supplied cord and plug and avoid overloading power outlets. The manual explicitly warns against using the equipment if the power cord is damaged and advises contacting after-sales support for replacement. It also cautions against exposing the unit to rain or moisture, using it near water, or touching the power plug with wet hands. In case of liquid ingress, the unit should be immediately unplugged, dried, and checked by a qualified technician. Self-repair is discouraged, with all servicing to be handled by qualified personnel. The unit should be unplugged during electrical storms or prolonged periods of disuse. Cord handling instructions include preventing it from hanging over edges, resting on hot surfaces, or being stepped on. It also advises against running the cord near heat-producing appliances to prevent insulation melting and exposure of live wires. When disconnecting, users should always grasp the plug, not the cord, to avoid internal wire damage.
For installation, the unit should be placed away from heat sources, high temperatures, high humidity, direct sunlight, and excessive dirt and dust. It should also be kept away from open windows to prevent water ingress. Adequate air circulation is vital, with at least 10cm clearance around the unit, and it should not be placed on thick carpets or beds where ventilation holes could be obstructed. The mains socket must always be readily accessible.
Usage Conditions and Restrictions:
Ventilation openings on the cabinet should not be covered by items like newspapers, tablecloths, or curtains. Heavy objects should not be placed on top of the equipment, nor should users step on it. Objects filled with water, such as vases, or naked flame sources like lit candles, incense sticks, or cigarettes, should not be placed on the unit. The equipment is not intended for use by individuals with reduced physical, sensory, or mental capabilities, or lack of experience and knowledge, unless supervised or instructed by a responsible person. Young children should be supervised to ensure they do not play with the equipment. Cleaning should only be done with a dry, clean cloth after unplugging the unit, avoiding liquid or aerosol cleaners. The manufacturer disclaims liability for damage caused by non-compliance with instructions or improper use.
Features:
The Boytone BT-17DJM boasts a comprehensive set of features:
- Turntable: Variable speeds (33, 45, 78 rpm) with automatic/manual stop control and a belt-driven system. A 45 rpm adaptor is included.
- Encoding: Direct USB/SD encoding for both turntable and auxiliary input, allowing conversion of analog audio to digital MP3 format.
- Auxiliary Input: Connects other devices like CD players or MP3 players.
- USB/SD Slot: Supports MP3/WMA playback, copying files/tracks from USB to SD, and deleting files/tracks on USB and SD.
- Radio: Digital read-out analog AM/FM radio with an LCD display and blue backlight.
- Output: RCA line-out for external amplification.
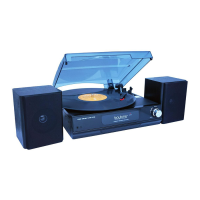
- Speakers: Built-in speakers with 2 x 1.5W output.
- Headphone Socket: 3.5mm headphone socket for private listening.
Parts List (Key Components):
The manual includes a detailed diagram and list of parts, including:
- Dust cover
- Mode (USB/SD) button
- Record button
- Radio band selector (AM/FM/FM-Stereo)
- Function selector
- Auxiliary input
- Delete button
- 3.5mm headphone socket
- Program button
- USB port
- LC display
- Power LED indicator
- Play/Pause button
- Stop button
- Volume knob
- Tuning knob
- Skip up/down buttons
- SD/MMC card slot
- 45 rpm adaptor
- Lift lever
- Auto stop control
- Speed selector (33/45/78 rpm)
- Tone arm
- Line out sockets
- FM wire antenna
- AC power cord
Instructions for Use:
Listening to Radio:
- Turn the volume knob clockwise to power on.
- Select TUNER mode using the function selector.
- Choose the desired band (AM, FM, or FM-Stereo) with the radio band selector.
- Turn and hold the tuning knob to automatically search for a station; release when found.
- Adjust volume.
- For AM reception, rotate or reposition the unit to improve signal.
- For FM reception, unravel and extend the FM wire antenna at the rear.
- Turn the volume knob counterclockwise to switch off.
- FM Mode: Mono reception, useful when stereo signal is weak.
- FM-Stereo Mode: Select FM-ST for stereo programs; ST icon lights up when a stereo signal is received.
Playing a Record:
- Open the dust cover and turn the volume knob clockwise to power on.
- Select PHONO mode.
- Set the speed selector (33, 45, or 78 rpm) according to the record.
- Set auto stop control to ON if you want the turntable to stop at the end of the record; OFF for continuous rotation.
- Place the record on the turntable (use 45 rpm adaptor if needed).
- Remove the stylus protector and unclip the tone arm lock.
- Move the lift lever back to raise the tone arm, then slowly move the arm to the record. The turntable will start rotating.
- Move the lift lever forward to gently lower the tone arm onto the record and begin playback.
- To stop playback, move the lift lever back to raise the tone arm. The turntable will still rotate, but the record will stop playing.
- Adjust volume.
- At the end of the record, raise the tone arm with the lift lever, move it back to the arm park, and lower it onto its rest. Alternatively, return it manually.
- Engage the tone arm lock after use.
- Turn the volume knob counterclockwise to switch off.
- NOTE: If a record stops prematurely, set auto stop control to OFF. Manually stop turntable rotation and return the tone arm to rest.
Phono Encoding (Recording from Turntable):
- Set function button to PHONO mode and insert a USB drive, SD, or MMC card.
- Place the record on the turntable.
- Press the REC button (takes 3-4 seconds to read memory device); USB or SD icon will flash.
- Use skip up/down buttons to select USB or SD for encoding, then press REC again to confirm. (Skip if only one device is inserted).
- Encoding starts after a few seconds.
- Lower the tone arm to start record playback. USB or SD icon will flash during encoding.
- Press the stop button to finish encoding. Display shows "END" and returns to PHONO mode.
- NOTE: Recording speed is 1:1. Format is preset to MP3 128 kbps.
Listening to an External Device:
- Turn the volume knob clockwise to power on.
- Select AUX mode.
- Connect the external audio device (e.g., CD player) to the AUX IN socket at the front. Audio will play through the system.
- Auxiliary device playback takes priority over cassette playback if connected.
- Select AUX mode and insert a USB drive, SD, or MMC card.
- Press the REC button (takes 3-4 seconds to read memory device); USB or SD icon will flash.
- Use skip up/down buttons to select USB or SD for encoding, then press REC again to confirm.
- Encoding starts after a few seconds. USB or SD icon will flash during encoding.
- Press the stop button to finish encoding. Display shows "END" and returns to AUX mode.
- NOTE: Recording speed is 1:1. Format is preset to MP3 128 kbps.
USB Port and SD Card Slot (MP3/WMA Playback):
The system plays MP3/WMA files from USB or SD/MMC cards.
- Turn the volume knob clockwise to power on.
- Insert a USB device face up into the USB port or a memory card in the direction of the arrow into the SD/MMC card slot. Ensure correct orientation to avoid damage.
- Set the function selector to USB/SD mode. If both devices are inserted, press MODE to toggle between USB and SD. The system will read the storage medium, display total folders and files, and begin playback automatically.
Playback Controls (USB/SD):
- PLAY/PAUSE: Press once to stop, press again to continue.
- STOP: Stops playback, displays total MP3/WMA files.
- SKIP UP: Plays next file; press and hold for fast forward.
- SKIP DOWN: Plays previous file; press and hold for fast reverse.
- TUNING KNOB: Searches folders backward or forward.
- MODE: Toggles between USB and SD Card mode.
Important Notes (USB/SD):
- Only MP3/WMA formats are supported.
- Some MP3 players may not be compatible due to encoding format variations.
- Compatibility with all USB and SD devices from every brand is not guaranteed.
- Supports SD cards up to 8GB.
- MP3/WMA track format requirements: MP3 bit rate 32-256 kbps; WMA bit rate 32-320 kbps.
Programming Tracks for Playback (USB/SD):
Up to 64 tracks can be programmed in any order. Ensure the system is in STOP mode.
- Set function selector to USB/SD mode, then press STOP.
- Press PROG button; "MEM" flashes, indicating program number and digits for the track.
- Use SKIP UP/DOWN to select a track.
- Press PROG to store the track.
- Repeat steps 3 and 4 for additional tracks.
- Press PLAY/PAUSE to play programmed tracks.
- To cancel programming, move the function selector to another mode.
Copying MP3/WMA Files (USB to SD or Vice Versa):
The system allows copying single files/tracks, folders, or all files/tracks.
Copying a Single File/Track:
- Insert USB and SD/MMC card, select USB/SD mode.
- During playback of the desired track, press REC; "ONE" flashes. Press REC again to confirm.
- USB or SD icon flashes during copying.
- Unit stops playback automatically when done; "END" shows, and system reverts to USB/SD mode.
Copying a Folder:
- Insert USB and SD card, select USB/SD mode. Press STOP when device is recognized.
- Turn TUNING KNOB to select the desired folder.
- Press REC; "ONE" flashes. Use SKIP UP/DOWN to select "FOL" (folder). Press REC again to confirm.
- USB or SD icon flashes during copying.
- Icon stops flashing when done.
Copying All Files/Tracks:
- Insert USB and SD card, select USB/SD mode. Press STOP when device is recognized.
- Press REC; "ONE" flashes. Use SKIP UP/DOWN to select "ALL". Press REC again to confirm.
- USB or SD icon flashes during copying.
- Icon stops flashing when done.
- NOTE: Pressing REC during playback in USB or SD mode copies the current file from USB to SD or vice versa.
Deleting Files from USB Device / SD Card:
The system can erase single files/tracks, folders, or all files/tracks.
Deleting a Single File/Track:
- Insert USB or SD card, select USB/SD mode.
- During playback of the desired track, press DEL; "ONE" flashes. Press DEL again to confirm.
- "DEL" shows during deletion until complete.
Deleting a Folder:
- Insert USB or SD card, select USB/SD mode. Press STOP when device is recognized.
- Turn TUNING KNOB to select the desired folder.
- Press DEL; "ONE" flashes. Use SKIP UP/DOWN to select "DIR" (directory). Press DEL again to confirm.
- "DEL" shows during deletion until complete.
Deleting All Files/Tracks:
- Insert USB or SD card, select USB/SD mode. Press STOP when device is recognized.
- Press DEL; "ONE" flashes. Use SKIP UP/DOWN to select "ALL". Press DEL again to confirm.
- USB or SD icon flashes during deletion until complete.
- NOTE: Pressing DEL completely deletes all files/tracks on the USB device or SD card.
Removing the USB Device / SD Card:
- Move the function selector to another mode (tuner, phono) and turn the volume knob counterclockwise to power off.
- To remove a USB device, pull it out.
- To remove a memory card, press it inwards and release; the card will partially eject for removal.
FAQs (Troubleshooting):
The manual provides a troubleshooting section for common issues. If problems persist, users are advised to contact after-sales support and avoid self-repair.
Problems with Sound:
- Increase volume with the power/volume knob.
- Check power cord connection and wall socket.
- Ensure function switch is set to the desired mode (PHONO, USB/SD, TUNER, AUX).
- For records, ensure correct speed (33, 45, or 78 rpm) is selected.
- For AUX IN, ensure cable is firmly connected, CD player controls are set, disc tray is closed, and disc is clean.
- For USB/SD, ensure memory device is properly inserted and correct MODE is selected.
Problems with Radio Reception:
- Ensure you are in an area with signal.
- For weak AM reception, rotate or reposition the unit.
- For weak FM reception:
- Completely unravel the FM wire aerial at the back.
- Slightly move the aerial for better reception.
- If stereo reception doesn't improve, try the same station on FM (mono) band.
- Try moving the radio to an alternative location.
- Check for other electrical equipment nearby causing interference.