7 Installer Guide
All System Types
Additional Wiring Options
NOTE: Additional options are configured in the Installer Settings section.
S1 IndoororOutdoorRemoteSensor[note 1]
S2 IndoororOutdoorRemoteSensor[note 1]
A/D* EconomizerControl(6300,6400only)/
DehumidierOutput(6400only)[note 2]
H HumidierOutput(6400only)[note 3]
*ThisterminalappearsasAonthe6300andA/Donthe6400.
NOTES - Additional Wiring Options
[1]TheseterminalscanbeusedtoconnectaBraeburn
®
indoororoutdoorremotesensor.
[2]Thisterminalcanbeusedeitherforoutsideaircontrol(6300and6400)ortoconnecttoanexternal
dehumidier(6400only).
[3]Thisterminalcanbeusedtoconnectanexternalhumidier(6400only).
Attaching the thermostat to the sub-base
1) Lineupthethermostatbodywiththesub-base.
2) Carefullypushthethermostatbodyagainstthe
sub-baseuntilitsnapsinplace.
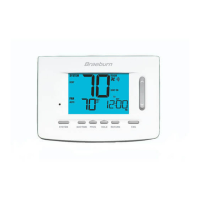
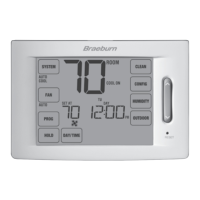
NOTE: This thermostat ships configured as a 1H/1C conventional
thermostat. Confirm installer settings. See page 10.
UP
UP
S1
S2
G
Y1
Y2
A
H
L
C
W1/E
/AUX1
W2/
AUX2
W3/
O/B
RH
RC
 Loading...