NOTE: See the wireless remote sensor manual for complete installation and use instructions.
Compatible Wireless Remote Sensors
WirelessRemoteIndoorSensor(s)–4sensorsmaximum
WirelessRemoteOutdoorSensor–1sensormaximum
WirelessRemoteHumiditySensor–1sensormaximum
NOTE: No more than 4 wireless remote sensors can be connected.
Pairing Wireless Remote Sensors
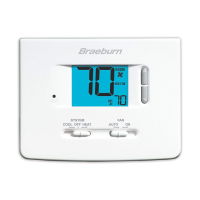
1 PressandholdtheCONFIGandDAY/TIMEbuttonsfor3seconds.
2PressNEXT untilthewordSENSappearsinthedisplayandthesymbolashes.
3 Aftertheremotesensorispowered,pressandholdtheCONNECTbuttonatthesensorfor3seconds.
4 Theremotesensorwillenterpairingmodefor60seconds.DuringthistimetheblueLEDonthewireless
remotesensorwillashonceevery2seconds.
5Thethermostatdisplaywillchangeandindicatewhichremotesensorhasbeenpaired(seeTable1).The
symbolwillstopashingandtheblueLEDontheremotesensorwillturnonfor60seconds.
6 Topairanotherwirelessremotesensor,pressNEXTandrepeatsteps3-5.
7PressRETURNatanytimetoexit.
NOTE: Sensors that have already been paired will appear in the thermostat display first, with a solid symbol.
Using Wired Remote Sensors
OnewiredindoororwiredoutdoorremotesensorcanalsobeconnectedtothethermostatsS1andS2terminals
using2-wirethermostatcable.
Youcannotmixwiredandwirelessremotesensorsofthesametype(i.e.mixinganindoorwirelessremote
sensorandanindoorwiredremotesensor).
Replacing a Thermostat
Ifyouarereplacingathermostatthatispairedwithanexistingwirelesssensor,youwillneedtocleartheremote
sensorandpairitagainwiththenewlyinstalledthermostat.
1 Installthenewthermostat.
2 Onthewirelessremotesensoryouwanttoclear,pressandholdtheCONNECTbuttonfor10secondsuntilthe
redLEDturnsonsolid.
3ReleasetheCONNECTbuttonandtheblueandredLEDwilleachashoncetoindicatethesensorwas
successfullycleared.
4 Pairtheremotesensoragain.
Replacing a Sensor
Ifyouarereplacingawirelessremotesensorthatispairedwithanexistingthermostat,youwillneedtoclearthe
thermostat’sremotesensorsettingsbeforepairingthenewwirelessremotesensor.
1 Installthenewwirelessremotesensor.
2 ThermostatremotesensorsettingsareclearedbyadjustingInstallerSetting31toCLR1(seepages9-10).
Thissettingclearsalltheremotesensorspairedwiththethermostat.
NOTE: Be careful not to select CLR2 unless you want to clear all the thermostat settings.
3Oncetheremotesensorsettingsareclearedyouwillneedtopairyournewwirelessremotesensor.Youwill
alsoneedtopairanyotherexistingwirelessremotesensorsthatwerepreviouslyconnected.
5
Wireless Remote Sensors
Installer Guide 14
IDS1, IDS2, IDS3orIDS4 RemoteIndoorSensor1-4
HMS RemoteHumiditySensor
ODS RemoteOutdoorSensor
Table 1

 Loading...