5
4
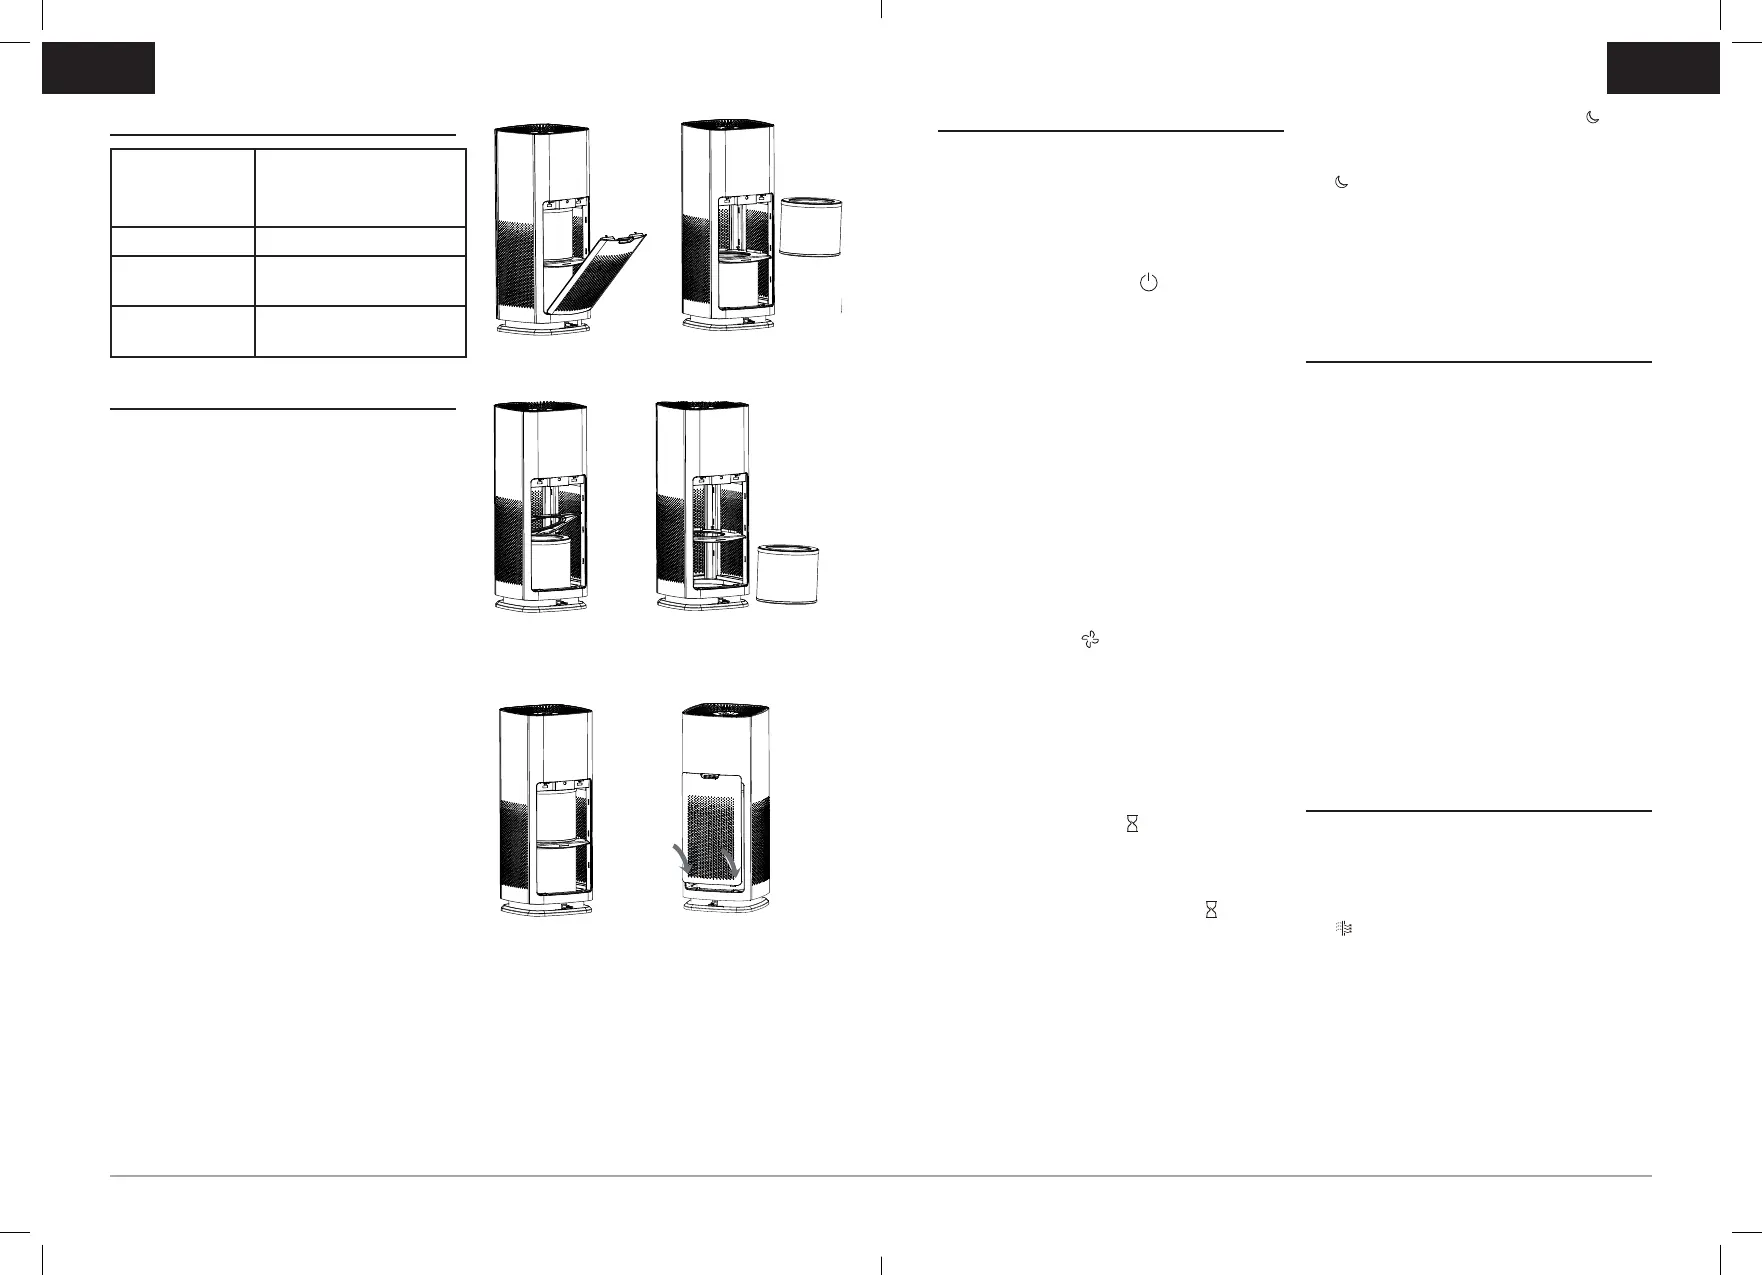
PRODUCT SPECIFICATIONS
CADR
Smoke 329m
3
/h/ 194 CFM
Dust 339 m
3
/h / 200 CFM
Pollen 343 m
3
/h / 202 CFM
Fan speeds 4
Noise level on
high speed
55 dB max
Power
consumption
42 W
GETTING STARTED
Installing the True HEPA lters
1. Ensure the unit is unplugged and not
turned ON.
2. Pull the top part of the back panel
cover towards you to release it from the
appliance (Figure 1).
3. Remove the top True HEPA lters from
the appliance (Figure 2).
4. Once removed the lter separation
plate will spring up to give access to
the lower lter. The plate can be rotated
upwards for better access (Figure 3).
5. Remove the lower True HEPA lter
(Figure 4).
6. Remove the plastic bag from the lters.
7. Insert True HEPA lters back into the
appliance. Insert the bottom lter rst,
then insert the top lter (Figure 5).
8. To reattach the back panel cover, align
and mount the cover into the base of
the appliance rst, and then push the
top of the panel against the appliance
(Figure 6).
9. Plug the unit in and turn ON the power.
Your unit is equipped with two 3-in-1
True HEPA lters that lasts up to 12
months depending on usage.
EN
OPERATING INSTRUCTIONS
1. Place the unit on a dry, stable, and rm
surface. Make sure not to block the top
air outlet vent and air intake grille.
2. Plug the unit into a power supply
socket.
3. Tap the power button to turn the unit
ON.
4. When the appliance is starting up, the
digital displays on the screen and the
air quality LED indicator will initially
illuminate red and then change to
yellow.
5. After measuring the particulate matter
in the air for approximately 20 seconds,
the appliance will display the particle
count and air quality colour. The
appliance will operate in auto mode
by default and change the fan speed
accordingly.
6. To select a desired fan speed, tap
the fan button to cycle through the
speeds auto, 4 (high), 3, 2, 1 (low) until
the desired speed setting is illuminated.
Note: Auto mode will automatically
adjust the fan speed setting when
a change in the room’s air quality is
detected.
7. To set the timer for 2, 4 or 8 hours,
tap the timer button until the desired
setting is illuminated. When the set
time has elapsed, the appliance will
automatically switch off. To deactivate
the timer, tap the timer button
repeatedly until the timer setting lights
are turned off.
8. To turn night mode ON, tap the
button once until the white LED light
next to the button is illuminated. Tap the
button again to turn night mode OFF.
Note: Night mode will maintain your
previous fan speed setting and turn the
display lights OFF.
9. Important: Always turn OFF and
unplug the unit when not in use.
CARE AND MAINTENANCE
• Before cleaning the air purier, always
turn OFF and unplug the unit.
• Clean the exterior surface with a clean,
damp cloth.
• The top air outlet vent can be cleaned
of dust with a small, soft brush.
• If you would like to clean the inside of
your lter compartment, ONLY use a
dry, soft cloth to wipe it down.
WARNING: Do not allow moisture to come
into contact with the main housing of the
air purier. NEVER use detergents, glass
cleaner, furniture polish, paint thinner, or
other household solvents to clean any part
of the appliance.
HOW TO REPLACE THE TRUE HEPA
FILTER
It is recommended to replace the 3-in-
1 True HEPA lters every 12 months
depending on usage.
10. The lter replacement indicator light
will illuminate red when it is time to
replace the lter.
11. Turn the unit OFF and unplug the air
purier.
12. Pull the top part of the back panel
cover towards you to release it from the
appliance (Figure 1).
13. Remove and discard the top True HEPA
lters from the appliance (Figure 2).
EN
(Figure 1) (Figure 2)
(Figure 3)
(Figure 4)
(Figure 5) (Figure 6)
BAP009X_21MLM2 (EMEA).indd 4-5BAP009X_21MLM2 (EMEA).indd 4-5 2022/1/27 3:17 PM2022/1/27 3:17 PM
 Loading...