EasyManua.ls Logo

Brinsea ChickSafe - Troubleshoot Manual

Brinsea ChickSafe
5 pages
Print Icon
To Next Page IconTo Next Page
Loading...
1
ChickSafe Advance Troubleshooting
Important installation notes:
The door must be attached to the opener BEFORE installing the batteries.
The door must be lifted and held in the open position before attaching the cord. The
ChickSafe is supplied with the cord wound in ready to be attached to the open door. It will
return to this position each time it opens.
When attaching the cord to the open door, make sure the cord is taut.
The door must have some free travel left above it (25mm/1 inch) when it is installed in its
open position. The ChickSafe has its own internal end-stop detection for when it is fully
open. It is supplied in the fully open position from the factory.
The door must stop against a solid surface at its closed position. The ChickSafe detects when
the weight of the door is no longer being supported on the cord and that lets the control
know the door is closed.
The distance the door moves between its closed position and open position must be no
greater than the maximum stated in the operating instructions. This is 400mm (15 inches) or
500mm (19 inches) depending on model. Check the installation instructions supplied with
your ChickSafe to ensure the stated distance is not exceeded. If the door moves down
through a greater distance the cord will wind back in again and the door will be open even
when the ChickSafe shows it is closed (double flashes of the LED light).
If the ChickSafe has been operated without the door fitted, or the cord has come free from
the door at any time it must be reset to the factory open position again before the open
door is attached to the cord.
Do not remove the knot in the cord that was tied there at the factory. This knot operates the
sensing device to stop the ChickSafe in the open position.
The door must be free to slide up and down with no obstructions. It must slide all the way
down under its own weight. The ChickSafe uses gravity to close the door.
Question and Answer IconNeed help?

Do you have a question about the Brinsea ChickSafe and is the answer not in the manual?

Summary

ChickSafe Advance Troubleshooting Guide

ChickSafe Cord Reset Procedure

Step-by-step instructions to reset the ChickSafe cord to its factory open position.

Troubleshooting: RESET Display and Flashing Light

Diagnosing 'RESET' errors during installation, including cord attachment and free travel.

Troubleshooting: No Power or Motor Movement

Resolving issues with no light, motor movement, or display response when buttons are pressed.

Troubleshooting: Low Battery Warning (Flashing Every 10 Seconds)

Identifying and resolving low battery indicators and associated issues.

Troubleshooting: Flat Battery Warning (BAT > LOW!)

Addressing flat battery warnings and ensuring proper battery contact and seating.

Troubleshooting: Door Blocked Error

Resolving 'DOOR IS BLOCKED' errors, checking cord attachment and door runner smoothness.

Troubleshooting: Door Partially Opened or Not Opening

Diagnosing issues where the door fails to open fully or at all, checking setup and cord tension.

Troubleshooting: Door Fails to Open in Morning

Resolving morning opening failures, checking light/time settings and potential obstructions.

Troubleshooting: Door Fails to Close in Evening (Flashing Twice)

Addressing evening closing failures with a double-flashing light, checking obstructions.

Troubleshooting: Door Fails to Close in Evening (Flashing Once)

Resolving evening closing failures with a single-flashing light, adjusting light sensitivity.

Troubleshooting: Unexpected Door Operation Times

Correcting door opening or closing at unintended times by checking clock settings.

Troubleshooting: Door Not Opening or Closing Automatically

Resolving issues where automatic opening/closing is disabled due to Manual Override Mode.

Overview

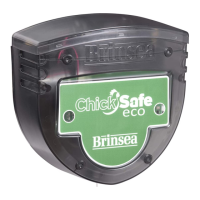
The Brinsea ChickSafe Advance is an automated chicken coop door opener designed to provide convenience and security for poultry keepers. Its primary function is to automatically open and close a chicken coop door, offering protection for chickens from predators and ensuring they are let out and secured at appropriate times.

Function Description

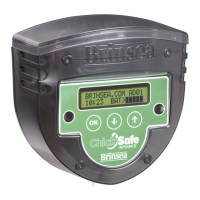
The ChickSafe Advance operates by winding a cord to raise and lower a chicken coop door. It can be configured to open and close based on either a 24-hour clock time setting or ambient light levels, providing flexibility to suit various environments and routines. The device incorporates internal end-stop detection to recognize when the door is fully open and senses when the door's weight is no longer supported on the cord to confirm it is closed. This intelligent detection system helps prevent motor damage and ensures proper door operation. For safety, if the unit detects a flat battery, it will keep the door closed. It also includes a "Manual Override Mode" which allows users to temporarily disable automatic operation for manual control when needed.

Usage Features

  • Flexible Operation Modes: Users can choose between "Light" mode, where the door opens and closes based on daylight and darkness, or "Time" mode, allowing for specific opening and closing times to be set on a 24-hour clock.
  • Adjustable Light Sensitivity: In "Light" mode, the closing light level can be adjusted via the main menu, enabling fine-tuning to match the specific dusk conditions of the coop's location. A built-in 5 to 6-minute delay prevents the door from closing prematurely due to temporary shadows or brief light changes.
  • Battery Status Indicators: The device provides clear indications of battery status. A light flashing every 10 seconds signals a low battery warning, while a "BAT > LOW!" message on the display, accompanied by a light flashing every second, indicates a flat battery requiring immediate replacement.
  • Error Detection and Display: The ChickSafe Advance is equipped with error detection capabilities. If the door is blocked during operation, the display will show "DOOR IS BLOCKED," prompting the user to check for obstructions. It also indicates if the door has not opened or closed as expected, with specific light flashing patterns (e.g., twice every 30 seconds for a closed door when it should be open, or once every 30 seconds for an open door when it should be closed).
  • Cord Reset Function: A "cord reset" procedure is available to return the unit to its factory open position, which is crucial for correct installation or re-attaching the cord after it has come loose or if the unit has been operated without the door. This involves a sequence of disconnecting and reconnecting the battery holder while maintaining tension on the cord.
  • Manual Override: The "Manual Override Mode" allows users to temporarily disable automatic opening and closing. This feature is useful for specific situations, such as when cleaning the coop or performing maintenance, and can be easily toggled on and off by pressing and holding the OK button.
  • Installation Guidance: The manual emphasizes important installation notes, such as attaching the door to the opener before installing batteries, ensuring the cord is taut, and leaving free travel for the door in its open position. It also highlights the importance of the door stopping against a solid surface in its closed position for proper operation. The factory-tied knot in the cord is essential for the sensing device that stops the ChickSafe in the open position and should not be removed.

Maintenance Features

  • Battery Replacement: Regular checks and replacement of batteries are a key maintenance task. The device provides warnings for low and flat batteries, guiding users on when to replace them. Instructions are provided to ensure batteries are fitted correctly and the battery box connector is securely attached.
  • Door Obstruction Checks: Users are advised to regularly check that the door is free to slide up and down without obstructions and that it slides all the way down under its own weight, as the ChickSafe relies on gravity for closing. If the door is blocked, clearing the obstacle is necessary for proper function.
  • Cord and Knot Integrity: The integrity of the cord and the factory-tied knot is vital. Users are instructed not to remove the knot, as it operates the sensing device for the open position. If the cord comes free, the "cord reset" procedure should be followed.
  • Door Travel Distance Verification: It is important to ensure the door's travel distance between its closed and open positions does not exceed the maximum specified in the operating instructions. This prevents the cord from winding in the wrong direction, which could lead to incorrect opening and closing times.
  • Door Runner Adjustment: If the door gets stuck in its runners, the channels can be adjusted by loosening screws or adding packing pieces to ensure smooth movement. This helps prevent the motor from locking and potential damage.
  • Time and Day Setting: After battery replacement or a reset, users are reminded to set the correct time and day to ensure accurate operation, especially when using the "Time" mode.

Brinsea ChickSafe Specifications

General IconGeneral
Control TypeTimer and Light Sensor
Manual OverrideYes
Power Supply12V
Weather ResistanceYes
Power SourceMains or battery
OperationAutomatic
TimerYes
MaterialPlastic

Related product manuals