EasyManua.ls Logo

Brother HL-2032 User Manual

Brother HL-2032
242 pages
To Next Page IconTo Next Page
Page #1 background imageLoading...
Page #1 background image
Confidential
î›§
Brother Laser Printer
SERVICE MANUAL
MODEL:
HL-2030/2040/2070N
Read this manual thoroughly before maintenance work.
Keep this manual in a convenient place for quick and easy reference at all times.
November 2004
SM-PRN054

Table of Contents

Question and Answer IconNeed help?

Do you have a question about the Brother HL-2032 and is the answer not in the manual?
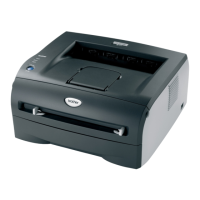
Brother HL-2032 Specifications

General IconGeneral
Print TechnologyLaser
Printer TypeMonochrome Laser Printer
Print SpeedUp to 20 ppm
Print Resolution2400 x 600 dpi
Monthly Duty Cycle10, 000 pages
ConnectivityUSB 2.0
Paper Capacity250 sheets
Memory8 MB
Supported Operating SystemsWindows, Mac OS, Linux
Paper SizeA4, Letter

Summary

Brother Laser Printer Service Manual

Supported Models

Specifies the printer models covered by the service manual.

Preface

Manual Contents Overview

Provides an introduction to the service manual's content and structure.

Chapter 1 General

1. Features

Details the main features of the Brother laser printer.

2. Overview

Gives a general overview of the printer's components and design.

3. Specifications

Lists detailed technical specifications for printing, functions, and hardware.

3.1 Printing Specifications

Covers printing method, laser specifications, and resolution.

3.2 Printer Functions

Details CPU, emulation, printer drivers, and interfaces.

3.3 Electronics and Mechanics Specifications

Describes power source, consumption, noise, temp, humidity, dimensions, weight.

3.4 Key Service Information

Provides key service info like machine life, MTBF, MTTR, and monthly volume.

3.5 Network Connectivity Features

Outlines network protocols, management tools, and supplied software.

3.6 Paper Handling Specifications

Details feedable paper types, sizes, specs, and recommended papers.

3.6.1 Feedable Paper Types and Sizes

Specifies paper types and sizes that can be used with the printer.

3.6.2 Paper Tray Capacity

States the paper capacity for the paper tray and manual feed slot.

3.6.3 Print Delivery Method

Describes how printed pages are delivered to the output tray.

3.7 Printable Area Specifications

Shows the printable area for PCL5e/EPSON/IBM and PCL6 emulation.

3.7.1 Printable Area: PCL5e/EPSON/IBM Emulation

Illustrates printable areas for PCL5e/EPSON/IBM emulation in portrait mode.

3.7.2 Printable Area: PCL6 Emulation

Notes the printable area restriction for PCL6 emulation.

3.8 Print Speed Variations

Details print speeds based on media type and paper size.

3.9 Toner Cartridge Weight and Yield

Provides approximate weights of toner cartridges and estimated page yields.

4. Serial Number Interpretation

Explains how to interpret serial numbers for printers and parts.

Regulation

Laser Safety (100-120V Model)

Details laser safety compliance for 100-120V models.

FDA Regulations (100-120V Model)

Explains FDA regulations for laser products marketed in the US.

IEC 60825 (220-240V Model)

Covers IEC 60825 specifications for laser products (220-240V).

Safety Information

Laser Product Cautions

Provides critical cautions regarding laser product servicing and exposure.

Additional Safety Guidance

Offers additional guidance on handling the printer's optical system safely.

Definitions of Warnings and Notes

Explains the conventions used for warnings, cautions, and notes in the manual.

Chapter 2 Installation and Basic Operation

1. Installation Conditions

Specifies power supply and environmental conditions for printer setup.

1.1 Power Supply Requirements

Details voltage requirements, power cord length, and circuit sharing guidelines.

1.2 Environmental Requirements

Lists required room temperature, humidity, and placement guidelines.

1.3 System Requirements for Printer Solution

Lists required PC specifications for installing the printer solution.

2. Printer Unpacking

Guides on checking carton contents and identifying included components.

3. Printer Installation Procedure

Details hardware setup and driver installation for different operating systems.

3.1 Installation for All Users

Provides general installation steps for Windows and Macintosh users.

3.1.1 Drum Unit Assembly Installation

Step-by-step instructions for installing the drum unit assembly.

3.1.2 Loading Paper into the Tray

Instructions on how to load paper into the paper tray correctly.

3.1.3 Printing a Test Page

Describes how to print a test page using the control panel button or driver.

3.2 Windows Driver Installation

Detailed instructions for installing drivers on Windows operating systems.

Parallel Cable Connection and Driver Install

Steps for installing drivers using a parallel interface cable.

Network Connection and Driver Install

Instructions for network setup and administrator configuration.

1. For the Administrator

Details installing and configuring the BRAdmin Professional utility.

Setting Printer Network Parameters

Guide on setting IP address, subnet mask, and gateway for the printer.

2. Network Driver Installation

Steps for installing drivers for network connections.

3. For Network Shared Printer Users

How to install drivers for shared network printers.

4. LPR Network Printer Configuration

Configuration steps for LPR port setup for network printing.

5. NetBIOS Network Printer Setup

Configuration steps for NetBIOS port setup for network printing.

3.3 Macintosh Driver Installation

Instructions for installing drivers and connecting printers on Macintosh systems.

Macintosh USB Connection and Driver Install

Steps for connecting and installing the printer via USB on Macintosh.

Macintosh Network Connection and Driver Install

Steps for connecting the printer and installing the BR-Script PPD file on Macintosh.

Chapter 3 Theory of Operation

1. Printer Electronics Overview

Explains the electronic components and systems of the printer.

1.1 General Electronics Block Diagram

Shows a general block diagram of the printer's electronic systems.

1.2 Main PCB Block Diagram

Provides a block diagram of the main Printed Circuit Board (PCB).

1.3 Main PCB Component Details

Details the components and functions of the main PCB.

1.3.1 CPU Specifications

Describes the Central Processing Unit (CPU) and its specifications.

1.3.2 USB Interface Functionality

Explains the function and data transmission speed of the USB interface.

1.3.3 IEEE1284 Interface Functionality

Details the parallel interface functionality for data reception and communication.

1.3.4 Network Interface Controller

Describes the network controller and its associated LEDs.

1.3.5 ROM Specifications

Specifies the type and capacity of the Read-Only Memory (ROM) used.

1.3.6 SDRAM Specifications

Details the Synchronous Dynamic Random-Access Memory (SDRAM) used.

1.3.7 EEPROM Specifications

Describes the Electrically Erasable Programmable Read-Only Memory (EEPROM) configuration.

1.3.8 Reset Circuit Description

Explains the function and specifications of the reset circuit IC.

1.3.9 Panel Interface (I/O)

Details the interface between the panel board and the ASIC.

1.3.10 Video Signal Output

Explains the direct output of the video signal from the ASIC.

1.3.11 Internal Power Supply Voltages

Describes the power supply voltages and their uses within the printer.

1.4 Power Supply System Overview

Details the low-voltage power supply system and its regulated outputs.

1.4.1 Low-Voltage Power Supply Operation

Explains the switching regulation system for generating DC power.

1.4.2 High-Voltage Power Supply Operation

Describes the high-voltage power supply for charging, development, and transfer.

2. Printer Mechanics Overview

Explains the mechanical systems and their functions.

2.1 Printing Mechanism Components

Provides an overview of the printer's printing mechanism and its components.

2.2 Paper Transfer Process

Details the paper transfer process from the tray to the separation roller.

2.2.1 Paper Supply Mechanism

Explains how the feed roller picks up and feeds paper to the separation roller.

2.2.2 Paper Tray Push-up Function

Describes how the pressure plate in the paper tray is lifted by the motor.

2.2.3 Paper Registration Process

Explains paper registration using actuators and rollers for skew adjustment.

2.2.4 Paper Ejection Process

Describes the paper ejection process after fixing and through the output tray.

2.3 Drum Unit Components and Function

Details the components and functions of the drum unit.

2.3.1 Exposure Drum Function

Explains how the exposure drum generates the latent electrostatic image.

2.3.2 Primary Charger Function

Describes the formation of uniform charge on the drum surface.

2.3.3 Transfer Roller Function

Explains the transfer of toner image from the drum to the paper.

2.3.4 Drum Unit Cleaner Function

Describes the removal of paper dust or dirt from the exposure drum.

2.4 Toner Cartridge Function

Explains how the toner cartridge develops the electrostatic latent image.

2.4.1 Toner Life End Indication

Details the indication of toner life end and its causes.

2.4.2 New Toner Detection System

Describes the mechanism for detecting new toner cartridge installation.

2.4.3 Toner Life End Counter Reset

Explains counter resetting methods based on toner life end causes.

2.5 Detailed Print Process Steps

Outlines the steps involved in the printing process.

2.5.1 Charging Stage

Explains the charging of the drum using the primary charger.

2.5.2 Exposure Stage

Describes the exposure of the charged drum by the laser unit.

2.5.3 Developing Stage

Details how toner is attracted to the electrostatic image on the drum.

2.5.4 Transfer Stage

Explains the transfer of the toner image to the paper via static electricity.

2.5.5 Fixing Stage

Describes how heat and pressure fix the toner onto the paper.

2.6 Printer Sensors and Locations

Lists various sensors and their locations within the printer.

Chapter 4 Disassembly and Re-Assembly

1. Disassembly Safety Precautions

Provides essential safety precautions before performing disassembly.

2. Disassembly Procedure Flowchart

Presents a flowchart of the disassembly and re-assembly procedures.

3. Component Disassembly Steps

Details the step-by-step procedures for disassembling printer components.

3.1 AC Cord Removal

Instructions for disconnecting the AC power cord from the printer.

3.2 Drum/Toner Assembly Removal

Steps for removing the drum/toner assembly from the printer.

3.3 Paper Tray Disassembly

Procedures for removing the paper tray and its components.

3.4 Rear Cover Removal

Instructions for removing the rear cover of the printer.

3.5 Rear Chute Cover Removal

Steps for removing the rear chute cover and its associated parts.

3.6 Left Side Cover Removal

Instructions for removing the left side cover of the printer.

3.7 Right Side Cover Removal

Instructions for removing the right side cover of the printer.

3.8 Top Cover and Paper Stopper Removal

Procedures for removing the top cover and paper stopper components.

3.9 Front Cover Removal

Steps for removing the front cover of the printer.

3.10 Pickup Roller Holder Assembly Removal

Procedures for removing the pickup roller holder assembly.

3.11 Fixing Unit Disassembly

Detailed steps for removing the fixing unit and its sub-components.

3.12 High-Voltage PS PCB Assembly Removal

Instructions for removing the high-voltage power supply PCB assembly.

3.13 Main PCB Removal (HL-2030/2040)

Steps for removing the main PCB assembly for HL-2030/2040.

3.13 Main PCB Removal (HL-2070N)

Steps for removing the main PCB assembly for HL-2070N.

3.14 SW Key and Panel PCB Removal

Procedures for removing the SW key and the panel PCB.

3.15 PS PCB Unit Removal

Instructions for removing the power supply PCB unit.

3.16 Laser Unit Disassembly

Steps for removing the laser unit and associated components.

3.17 Sub Chute Assembly Removal

Instructions for removing the sub chute assembly.

3.18 Link Lever Removal

Procedures for removing the link lever.

3.19 Tail Edge Actuator Removal

Steps for removing the tail edge actuator and spring.

3.20 Regist Front Actuator and Spring Removal

Procedures for removing the regist front actuator and spring.

3.21 Regist Sensor PCB Assembly Removal

Instructions for removing the regist sensor PCB assembly.

3.22 Regist Rear Actuator and Spring Removal

Steps for removing the regist rear actuator and spring.

3.23 Fan Motor 60 Unit Removal

Procedures for removing the fan motor unit.

3.24 Toner LED PCB Assembly and Holder Removal

Steps for removing the toner LED PCB assembly and LED holder.

3.25 New Toner Actuator and Spring Removal

Procedures for removing the new toner actuator and spring.

3.26 New Toner Sensor Removal

Steps for removing the new toner sensor.

3.27 Cover Sensor Removal

Procedures for removing the cover sensor.

3.28 Toner Sensor PCB Assembly Removal

Steps for removing the toner sensor PCB assembly.

3.29 Main Motor Assembly Removal

Procedures for removing the main motor assembly.

3.30 Develop Joint Removal

Steps for removing the develop joint.

3.31 P/R Solenoid Assembly Removal

Procedures for removing the P/R solenoid assembly and related parts.

3.32 F/R Solenoid Assembly Removal

Steps for removing the F/R solenoid assembly and related parts.

3.33 Main Frame L Removal

Instructions for removing the main frame L.

3.34 Main Frame R Removal

Instructions for removing the main frame R.

4. Printer Packing Procedure

Illustrates the printer's packaging components for shipping.

5. Mechanical Lubrication Points

Shows locations requiring lubrication for mechanical parts.

6. Lead-Free Solder Guidelines for Repair

Provides guidelines for using lead-free solder during PCB repair.

7. Screw Torque Specifications

Lists screw types, sizes, and their specified tightening torques.

8. Wire Harness Routing Diagrams

Illustrates the routing of various harnesses within the printer.

Chapter 5 Periodic Maintenance

1. Consumable Parts Identification

Identifies parts subject to deterioration and requiring replacement.

1.1 Drum Unit Details and Life Expectancy

Details the life expectancy and replacement of the drum unit.

Drum Unit Replacement Steps

Step-by-step guide for replacing the drum unit.

1.2 Toner Cartridge Details and Life Expectancy

Details the life expectancy and replacement of the toner cartridge.

Toner Cartridge Replacement Steps

Step-by-step guide for replacing the toner cartridge.

2. Periodical Replacement Parts Information

States that there are no periodical replacement parts for quality maintenance.

3. Printer Cleaning Procedures

Provides instructions for cleaning the printer's interior and components.

3.1 Cleaning Printer Interior

Detailed steps for cleaning the printer's internal surfaces.

3.2 Corona Wire Cleaning

Instructions for cleaning the corona wire to resolve print quality issues.

3.3 Scanner Window Cleaning

Steps for cleaning the scanner window when replacing drum or toner.

3.4 Electrical Terminals Cleaning

Instructions for cleaning electrical terminals for optimal print performance.

Chapter 6 Adjustments and Settings Updates

1. Main PCB Replacement Procedures

Details ROM types and operations needed after main PCB replacement.

Main PCB Replacement Preparations

Lists necessary items and files for updating firmware and settings.

Firmware Rewriting Procedure

Step-by-step guide for rewriting the printer's firmware.

Default Paper Size Setting (HL-2070N)

Instructions for setting the default paper size on HL-2070N.

Serial Number Setting

Guide for entering the printer's serial number using the maintenance utility.

Laser Scanner Adjusted Value Input

Instructions for inputting laser scanner adjusted values.

Starter Toner Cartridge Setting

How to set the starter toner cartridge status for proper density control.

Chapter 7 Troubleshooting

1. Introduction

Introduces troubleshooting steps and initial checks for printer problems.

1.1 Initial Check

Guides on performing initial checks of the operating environment and print paper.

1.2 Troubleshooting Safety Warnings

Provides safety warnings to be followed during maintenance procedures.

1.3 Problem Identification Flowchart

Provides a chart to identify printer errors and directs to appropriate sections.

2. Operator Calls & Service Calls

Details printer errors indicated by LEDs and user-recoverable actions.

2.1 Operator Calls

Lists operator-recoverable errors, their LED indications, and remedies.

2.2 Service Calls

Explains service call indications and initial recovery steps.

3. Printer Error Messages

Lists error messages and their corresponding descriptions.

3.1 Error Code List and Descriptions

Provides a comprehensive list of error codes and their meanings.

3.2 Error Message in Status Monitor

Details error messages reported by the Status Monitor and their corrective actions.

3.3 Printable Error Messages

Lists error messages that the printer may print out.

4. Paper Problems

Addresses issues related to paper feeding and loading.

4.1 Paper Loading Problems

Details problems related to incorrect paper loading and their remedies.

4.2 Paper Jam Clearing Procedures

Provides instructions for clearing paper jams from various printer locations.

4.2.1 Steps to Clear Jammed Paper

Step-by-step guide for removing jammed paper.

4.2.2 Paper Jam Causes and Remedies

Lists causes and countermeasures for paper jams based on their location.

4.3 Paper Feeding Troubleshooting

Addresses problems like double feeding, wrinkles, and page skew.

Paper Feed Issues

Covers common paper feeding issues like double feed, wrinkles, skew, curl, and pickup problems.

5. Software and Driver Setting Issues

Addresses issues arising from incorrect software or driver settings.

S-1 Software Error Message: Port Write Error

Details an error message related to writing to printer ports.

S-2 USB Driver Problems (Win 98/Me)

Troubleshoots problems with USB driver installation and port detection.

S-3 Mac OS Printer Detection Issues

Guides on troubleshooting printer detection issues on Macintosh OS.

Chapter 8 Service Support Software

1. Control Panel Modes and LEDs

Explains the functions of the control panel buttons and LEDs.

1.1 User Mode Functions

Details the procedures and functions available in User Mode.

1.2 User Maintenance Mode Operations

Describes user actions for replacing consumable parts and resetting counters.

1.3 Service Mode Access and Functions

Explains how to access and use various service modes.

Service Mode Specific Functions

Details various functions available in Service Mode, like inspection and printing tests.

2. Using Printer Self-Diagnostics Tools

Explains how to use the printer's self-diagnostic tools.

2.1 Diagnostics Tool Usage

Guides on using the Diagnostics tool for troubleshooting print issues.

2.2 Printer Information Tool Usage

Explains how to retrieve printer information like version and page counter.

3. NVRAM Default Settings

Lists the default values for main items set in NVRAM.

Appendix

Appendix 1. Main PCB Circuit Diagram, HL-2030/2040 (1/3)

Provides the first part of the main PCB circuit diagram for HL-2030/2040.

Appendix 2. Main PCB Circuit Diagram, HL-2030/2040 (2/3)

Provides the second part of the main PCB circuit diagram for HL-2030/2040.

Appendix 3. Main PCB Circuit Diagram, HL-2030/2040 (3/3)

Provides the third part of the main PCB circuit diagram for HL-2030/2040.

Appendix 4. Main PCB Circuit Diagram, HL-2070N (1/3)

Provides the first part of the main PCB circuit diagram for HL-2070N.

Appendix 5. Main PCB Circuit Diagram, HL-2070N (2/3)

Provides the second part of the main PCB circuit diagram for HL-2070N.

Appendix 6. Main PCB Circuit Diagram, HL-2070N (3/3)

Provides the third part of the main PCB circuit diagram for HL-2070N.

Appendix 7. Point to Point Connection Diagram

Illustrates the point-to-point connections between printer components.

Appendix 8. Low-Voltage Power Supply PCB Circuit Diagram (100V)

Shows the circuit diagram for the 100V low-voltage power supply PCB.

Appendix 9. Low-Voltage Power Supply PCB Circuit Diagram (200V)

Shows the circuit diagram for the 200V low-voltage power supply PCB.

Appendix 10. High-Voltage Power Supply Circuit Diagram

Provides the circuit diagram for the high-voltage power supply.

Appendix 11. Pinch Spring Replacement

Details the replacement procedure for pinch springs to correct paper skew.

Appendix 12. Cover Sponge Location

Shows the location of cover sponges for replacement.

Related product manuals