Applications manual
| 7
Logamatic 2107 Controls
Applications Manual
Logamatic 2107 Controls applications manual | 06.2018 Technical specifi cations are subject to change without prior notice
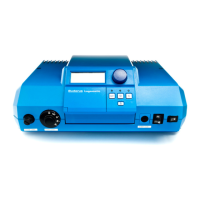
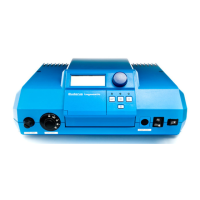
3 Control Programming
The following will allow access to the service side of the control:
1. Push and hold the turn page button " " while inserting
a pen or wire into the hole "
" on the display.
2. The word AMERICAN will be displayed.
3. Turn blue dial once to the right, BLR TEMP will be displayed.
This is a main category.
4. Push and release return button to access sub menu.
FREEZE TEMP will be displayed. If the outdoor
temperature drops beneath the frost protection limit, the
heating system pump (contacts 61/63) will be started.
Factory default: 41°F (5°C).
5. Turn blue dial one more time and BUILD RESP will be
displayed. The current setting will be 2, change that to 1 by
holding the "
" button and turning the blue dial until
you get to the number 1 and release. This will let the boiler
respond faster to outside air temp changes.
6. Turn the dial one more time and PUMPLOGIC will be
displayed. The current setting is 104°F (40°C). This will not
let the burners and the pump run at the same time below
104°F (40°C) to protect from condensation.
7. Turn the dial one more time and MAXTEMP1 will be
displayed. The current setting for this is 176°F (80°C). To
change this to 194°F (90°C), hold down the "
" button
and turn the blue dial until 194°F (90°C) appears, then
release. (this may not be necessary unless under radiated)
8. Now push the return button "
" once.
9. Now you are back to the main categories. Turn the blue dial
once to the right and it will read CIRCUIT1.
10. Push and release the "
" button and REF TEMP will
be displayed which represents the boiler water temperature
at 14°F (-10°C). Default is 167°F (75°C). Refer to page 20
in the service manual for graphing REF TEMP changes.
11. Turn the blue dial one more time and REMOTE1 will appear.
The factory setting is off, and the only time you have to turn
this on is if you are using a BFU room sensor. Use a BFU
room sensor for constant circulation on one zone and power
the pump off of 61 and 63.
Once REMOTE1 setting is turned „on“, the ROOM COMP
parameter will be displayed. Use ROOM COMP to adjust the
room influence on the heating curve.
12. Turn the blue dial one more time and OASETBACK will
appear. Hold the "
" and turn the blue dial to
SETBACK. On the OASETBACK mode, the pumps will
turn off in the night setback mode if the temp outside is
above the freezetemp. In the SETBACK mode the curve
will drop back for fuel savings. If you have a room sensor
and want to do the temp set back by it, you will need to
change it to RMSETBACK.
13. Turn the blue dial one more time and OFFSET will appear.
The setting will be at 0°F (0°C) and is okay with normal
radiation, but if you have an air handler, you will need to
raise the offset to 9°F (5°C). This will raise the beginning of
the curve and supply enough temperature on milder days.
14. Push and release the return button "
" again.
15. Turn the blue dial one more time and DHW PROD will
appear. The factory setting is ON. If no DHW tank is
installed, hold down the "
" button and turn until it says
OFF and release.
16. Turn the blue dial one more time and RECIRPUMP will
appear. The setting is 2, it can be changed to OFF,
1,2,4,5,6,ON. The pump will run 3 minute cycles depending
on the number of cycles you choose per hour. If you do not
have a recirc pump turn it to OFF.
17. Turn the blue dial one more time and HTG CURVE1 will
appear. Hold the "
" button and turn the blue dial. It
will show you three points on the curve so you can see what
the water temp will be at 3 different points, then release.
18. Turn the blue dial one more time and RELAYS will appear.
This will allow you to test all the components that are wired
to the 2107 control.
19. Push the "
" button and BURNER will appear. Hold
the "
" button and turn the blue dial and the LCD will
read ON, release and the burner will start. Hold the "
"
button and turn the blue dial and the LCD will read OFF,
release and the burner will turn OFF.
20. Test the Heating Pump (constant circulation pump),
DHW Tank Pump, and DHW Recirc Pump the same way.
21. When you are done with the RELAY tests push the return
button "
" .
22. Turn the blue dial one more time and LCD-TEST will
appear. To test the LCD display, hold the "
" button
and turn the blue dial, release and it should read
LCD-TEST.
23. Turn the blue dial one more time and RESET should
appear. To reset the control back to factory settings, hold
the "
" button until all of the 8‘s disappear and release.
The first thing you will need to do is go back to the language
and it will read DEUTSCH. Hold the "
" button and
turn the blue dial until you read AMERICAN on the LCD.
The control is now back to factory setting.
Now push the AUT button and you will be back in Automatic
mode.
 Loading...