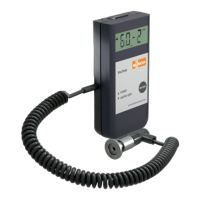
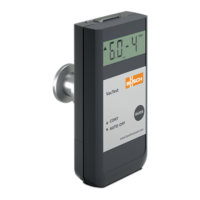
Installation
Instruction Manual VACTEST PPP 700 D_EN_en 7 | 44
● Remove the protective cover (is required again during maintenance work!).
● Make vacuum connection via ISO KF small flange or thread connector.
● For small flange connection use clamps that can be opened and closed with appropriate tools on-
ly, use sealing rings with a centering ring.
● Make sure that the sensor flange is connected to ground, e.g. by having electrical contact to
grounded vacuum chamber (use metallic clamps).
The device may be mounted in any orientation. Mounting with the flange to the top, however, can
lead to early contamination and malfunction. An upright orientation with flange to the bottom is to
be preferred in order to keep particles and condensates out of the sensor cell. Further the device is
adjusted in the upright position ex works.
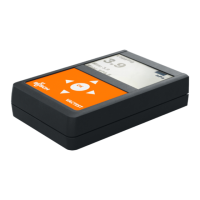
3.3 USB Interface
WARNING
Improper supply voltage can damage the device!
NOTE
To recharge the device, commercially available USB-C charging adapters as well as accessory
mains adapter can be used.
The vacuum meter has a serial USB 2.0 interface with a corresponding USB-C socket located at the
top of the device. In combination with PC Software VACTEST Explorer live measurements or stored
data can be uploaded to a PC, further the device settings can be adjusted on PC.
If device settings are made accordingly the VACTEST PPP 700 D will act as USB Mass-Storage- Device.
The USB connection is also used to recharge the internal battery. The charging process will be start-
ed as soon as the device is connected to a PC or a suitable charging adapter.
3.4 Bluetooth® Interface
The VACTEST PPP 700 D is equipped with a Bluetooth® Low Energy interface. It can be used for wire-
less upload of measurements or stored measurement data.