Do you have a question about the Bush BIFF7030 and is the answer not in the manual?
Specifies intended home use and prohibits alterations for safety.
Instructions for checking transport damage before connecting the appliance.
Details on R600a refrigerant, its flammability, and handling precautions.
Guidelines for keeping children away from packaging and controls.
Covers electrical safety, outdoor use, cleaning, ventilation, and appliance placement.
Advises against self-repair and suggests contacting the Advice Line.
Provides height, width, and depth measurements of the appliance.
Specifies required dimensions for installation aperture, with a note for details.
Details gross and net capacities for fridge and freezer sections in litres.
States the energy efficiency rating of the appliance.
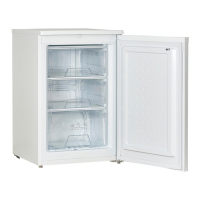
Identifies the control panel's location and its components.
Lists fridge light, shelves, and crisper drawers.
Locates the drawers within the freezer compartment.
Details shelves on the fridge door, including upper, half-width, and bottle shelves.
Describes the green neon light indicating power status.
Identifies the dial for controlling the fridge temperature.
Explains the orange indicator for freezer temperature.
Details the red neon light for warning alarms.
Identifies the button to silence the audible alarm.
Describes the yellow neon light for the Super Frost setting.
Identifies the button to activate/deactivate Super Frost.
Explains placement and removal of adjustable glass shelves.
Describes the channel and outlet for defrost water and clog prevention.
Details the function of crisper drawers and their cover for preserving produce.
Describes the suitability of door shelves for various items and warns against overloading.
States the net capacity of the freezer compartment.
Instructions for installation, initial cleaning, and settling refrigerant.
Guidance on setting thermostat, initial compressor run, and avoiding door openings.
Details how to connect, use thermostat dials, and understand temperature settings.
Advises against storing warm items due to humidity increase.
Recommends wrapping food to preserve flavour and prevent contamination.
Suggests removing excessive packaging to optimize fridge space.
Recommends storing perishable items at the back for colder temperatures.
Warns against food touching the back wall to prevent issues.
Ensures the door can close properly by arranging items, especially bottles.
Notes that certain food components can damage plastic parts.
Advises minimizing door openings to maintain temperature.
Specific guidance on storing meat, recommending placement above salad drawers.
Guidance on storing cooked food, recommending covering and placement on any shelf.
Instructions for cleaning and storing fruit and vegetables in crisper drawers.
Advice on storing cheese and butter in airtight containers or wrapped.
Guidance on storing milk bottles, recommending caps and door shelf placement.
Specifies that garlic, potatoes, onions, bananas require airtight containers.
States that the freezer must reach -18°C or lower before storing food.
Details the maximum amount of fresh food that can be frozen in 24 hours.
Advises cooling warm food before freezing to prevent ice formation and power use.
Recommends following manufacturer guidance for maximum storage times.
Warns against refreezing thawed foods.
Informs about food safety during power outages and minimizing door openings.
Follow 'Freezing using the super frost setting' for maximum capacity.
Follow 'Freezing using the super frost setting' for smaller amounts.
Recommends airtight containers/packaging to maintain flavour and prevent drying.
Advise placing food at the base, avoiding contact with already frozen items.
How to check if food is frozen and turn off Super Frost.
Warns against prolonged Super Frost use due to overworking and freezing.
Lists suitable materials like bags, wraps, and foil for frozen foods.
Suggests compressing air from bags for easier freezing.
Notes that flat packages freeze more easily.
Advises not to fill liquid containers to the brim and warns about bottles bursting.
Instructions for filling, placing, and dispensing ice cubes from the tray.
Switch on Super Frost a few hours before freezing maximum food quantity.
Switch on Super Frost 1 hour prior to freezing smaller food quantities.
Describes pressing the button, indicator neon, and temperature decrease.
Instructions for placing food in the freezer once Super Frost is active.
Guidance on when and how to turn off Super Frost once food is frozen.
Warns against prolonged Super Frost use due to overworking and freezing.
Explains that sensors monitor fridge and freezer temperatures.
Details when the alarm neon lights up due to temperature or open doors.
How to silence the audible alarm using the off button.
Advice on what to do if the warning alarm stays lit.
Tips on positioning for cool location and correct ventilation for energy efficiency.
Advice on cleaning condenser coils, defrosting, and door gasket maintenance.
Tips on minimizing door openings to save energy.
Explains how thermostat settings impact energy consumption.
Specifies optimal operating temperatures for fridge and freezer sections.
Advises cooling food before storage to save energy.
Suggests scattering packages for efficient freezing.
Instructions for shutting down and cleaning the appliance when away.
Advice on storing an unused second appliance.
Crucial warning to disconnect power before cleaning.
Advises against pouring water or spraying and suggests using bicarbonate of soda.
Instructions for cleaning removable parts separately, not in a dishwasher.
Discourages the use of abrasive cleaners, detergents, or soaps.
Steps for wiping with a damp cloth and drying thoroughly.
Reminds to dry hands and reconnect the plug after cleaning.
Explains automatic defrosting and water collection by the evaporating tray.
Recommends periodic cleaning to prevent water buildup.
Warning about not leaving the cleaner permanently in place.
Suggests pouring water to clean the defrost drainage channel.
Warns against food touching the back wall, which can disrupt defrosting.
Recommends using bicarbonate of soda solution for the tray.
Clarifies that ice droplets on the back wall are normal and not a fault.
Recommends defrosting at least twice a year, depending on usage.
Switch on Super Frost the day before defrosting.
How to remove and store food during defrosting.
Critical warning against refreezing partially thawed food.
Instruction to disconnect from the mains supply before defrosting.
Suggests using a bowl of warm water to speed up the process.
Instructions for using the drainage tube and bottom drawer.
Checking water flow into the drawer and monitoring for overflow.
Importance of thoroughly drying the interior to prevent immediate ice build-up.
Instructions for reconnecting the appliance after drying.
Advise on switching on Super Frost for 24 hours before refreezing.
Turn off Super Frost after the 24-hour period.
Warnings against using electrical devices or sharp metal objects.
Critical warning to disconnect power before replacing the bulb.
Step-by-step guide on how to remove the light bulb cover.
Instructions for replacing the bulb with a new one, specifying wattage.
Steps for refitting the cover and reconnecting power after replacement.
Check voltage and frequency against the rating plate before installation.
Details on intended installation type and recommended qualified electrician.
Explains the wire colours (Brown, Blue, Green/Yellow) and their terminal connections.
Advises on location based on ambient temperature classification (SN, N).
Warns against placing the appliance in direct sunlight or near heat sources.
Ensures the door can open completely and freely.
Situating the appliance for easy access to stored food.
Checking for accessible electrical socket availability after installation.
Emphasizes reversing doors before installing into a housing unit.
Warning to hold the door when unscrewing hinges to prevent falling.
Advise keeping removed parts for later use.
Lists necessary tools: grip pliers, bladed screwdriver, Philips screwdriver.
Instructions for removing the upper support plate by unscrewing.
Guide on lifting off the hinge cover.
Instructions for unscrewing and removing the top hinge.
Procedure for lifting the refrigerator door off the middle hinge and placing it safely.
Instructions for unscrewing and removing the central hinge.
Procedure for lifting the freezer door off the lower hinge.
Instructions for unscrewing and removing the lower hinge.
Instructions for refitting the lower hinge on the opposite side, including hinge pin position.
Guide on using a screwdriver to remove screw caps.
Instructions for removing screw hole covers and retaining them.
Reinstalling the middle hinge and ensuring the hinge pin is correctly positioned.
Refitting the refrigerator door and installing the new hinge bracket.
Shows the new left side top hinge and mentions reusing the hinge pin.
Instructions for refitting the upper support bracket.
Crucial check for correct door opening and closing without fouling.
Ensuring the door seal is not creased or crushed for a proper seal.
Methods to fix a non-adhering door seal using a damp cloth or hairdryer.
Warning against overheating the door seal to prevent damage.
Mandatory wait time before switching on after reversing doors.
Specifies the required height, depth, and width for the appliance aperture.
Confirms the exact required height for the aperture.
Suggests using filler shelves for additional space in the aperture.
Critical requirement for a minimum of 200 cm² free air flow for ventilation.
Illustrates the minimum ventilation area required.
Install appliance towards the left, leaving a 5 mm gap.
Secure appliance to the top shelf for vertical alignment.
Ensures appliance stays vertically parallel with décor doors.
Measure 40 mm gap between housing unit and appliance front edge.
Secure the appliance into its final position.
Trim and insert side gasket into the 5 mm gap.
Instructions to remove screw caps and screws.
Attach the supplied bracket into position.
Attach the flat bracket on the opposite side, behind the central hinge.
Insert flat bracket behind central hinge by loosening middle screw.
Attach slider guides to appliance doors and mark position.
Secure sliders into position with screws.
Verify furniture doors open/close correctly without fouling.
Ensure appliance doors and seals shut properly against the cabinet.
Indicates the completion of the installation process.
Advise contacting the Advice Line if the appliance is not operating correctly.
Check plug, mains supply, and thermostat settings for power issues.
Check for overloading, thermostat setting, door closure, and ventilation.
Investigate refrigerant gas noise and ensure appliance is level and stable.
Check food contact with back wall; ice droplets are normal.
Refer to 'The defrost drain hole' section for water issues.
Strong warning against attempting self-repair; contact Advice Line.
Note on potential charges if the fault is not an appliance defect.
Requirement for appliance accessibility and potential refusal of repair if obstructed.
Refer to warranty card for guarantee conditions.
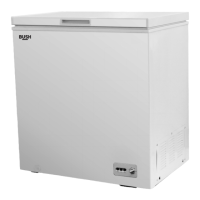
| Brand | Bush |
|---|---|
| Model | BIFF7030 |
| Category | Freezer |
| Energy Efficiency Class | F |
| Installation | Freestanding |
| Energy Rating | F |
| Defrost System | Manual |
| Number of Shelves | 3 |
| Color | White |