1
2
4
3
1 2
3
4
5 76 8 9 3 10
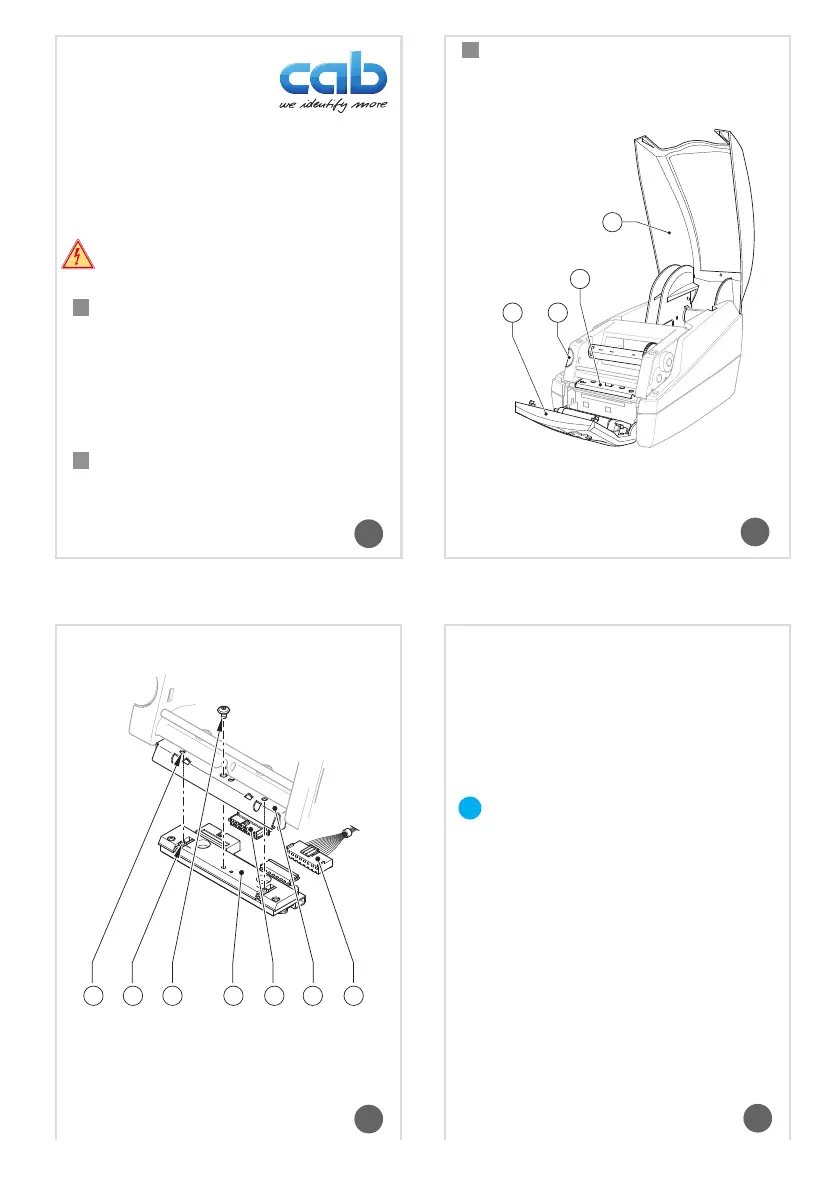
1. Open the cover (4) and hinge down the control panel
(1), press the release button (2) and hinge the print
module with the printhead mounting (3) up.
2. Remove labels and transfer ribbon from the printer.
3. Disengage the printhead (8) from the printhead
mounting (3) by unscrewing the screw (7).
4. Remove the printhead cables (9) and (10) from the
printhead (8).
5. After exchanging the printhead (8), attach the print-
head cables (9) and (10) to the new printhead.
6. Attach the printhead (8) to the printhead mounting (3)
by the screw (7).
Notice!
Ensure that the pins (6) at the printhead reach
into the holes (5) of the printhead mounting.
7. Reload labels and transfer ribbon, hinge the print
module down and press evenly on the two marked
surfaces so that the unit snaps in on both sides.
8. Close the control panel and the cover.
Printhead Replacement
Safety Precautions
Disconnect the power plug from the electrical
power supply before starting!
Protect printhead against damage by electrostatic
discharge!
Put the printer on to a grounded conductive
Ground yourself during printhead replacement
for example using a grounded wrist-strap!
Do not touch the connector pins of the print
Make sure that the glass surface on the
printhead is not touched by sharp and hard
objects or your hand!
English
Fig. 1
Part.-No. 9008603 Edition 05/14
Fig. 2
Attention !
If it will be a wrong print quality after printhead
replacement it’s necessary to make a printhead
adjustment.
Service Manual of the printer
Replacement
1
2
4
3
1 2
3
4
5 76 8 9 3 10
1. Open the cover (4) and hinge down the control panel
(1), press the release button (2) and hinge the print
module with the printhead mounting (3) up.
2. Remove labels and transfer ribbon from the printer.
3. Disengage the printhead (8) from the printhead
mounting (3) by unscrewing the screw (7).
4. Remove the printhead cables (9) and (10) from the
printhead (8).
5. After exchanging the printhead (8), attach the print-
head cables (9) and (10) to the new printhead.
6. Attach the printhead (8) to the printhead mounting (3)
by the screw (7).
Notice!
Ensure that the pins (6) at the printhead reach
into the holes (5) of the printhead mounting.
7. Reload labels and transfer ribbon, hinge the print
module down and press evenly on the two marked
surfaces so that the unit snaps in on both sides.
8. Close the control panel and the cover.
Transfer Printer MACH4
Printhead Replacement
Safety Precautions
Danger !
► Disconnect the power plug from the electrical
power supply before starting!
Attention !
Protect printhead against damage by electrostatic
discharge!
► Put the printer on to a grounded conductive
surface!
► Ground yourself during printhead replacement
for example using a grounded wrist-strap!
► Do not touch the connector pins of the print-
head by ngers!
Attention !
► Make sure that the glass surface on the
printhead is not touched by sharp and hard
objects or your hand!
English
Fig. 1
Part.-No. 9008603 Edition 05/14
Fig. 2
Attention !
If it will be a wrong print quality after printhead
replacement it’s necessary to make a printhead
adjustment.
Service Manual of the printer
Replacement
 Loading...