214 CHAPTER 7 The Stereo Data Maker (SDM)
zoom out, navigate to the right image, zoom in again, and half-press the
shutter button. Working in this way, you can control the registration of
images very precisely.
Note: this display function does not work on all cameras. On some
cameras, the odd/even position of the images in the browsing sequence
can prevent the creation of the anaglyph. If this is the case, you should
shoot a spare image before shooting the stereo pair. If the anaglyph
creation fails, you can delete the spare image and try again.
While the above method works well for mid-range shots, a closer analysis
is required for close-up work. If you register both shots for a very close ob-
ject, the deviation for far objects may become too large. (Above, we allowed
for a maximum on-screen deviation of 2 mm.) When you look at the com-
posite image later, your brain may be unable to cope with such a large de-
viation and both images will fall apart.
To help you with the problem of determining the right deviation, the
SDM offers a tool for computing the maximum acceptable deviation be-
tween the positions of the farthest objects. The following method is based
on measuring the exact distance of near and far objects. This is done at the
telephoto position of the zoom lens in order to obtain precise readings.
From the measured distances, the maximum deviation value is computed
and visualized on the display.
f
Set the camera’s AF mode to Center.
f
Under ALT > MENU > Stereo > Camera Spacing, dial in the distance that
you want the camera to shift between both pictures. Typical values here
are 60–70 mm for mid-range work and 10–20 mm for close-up work.
f
In the same menu, set the Twin-Cam position to L (left) and the Cam
orientation to H (horizontal) or V (vertical), depending on the camera
orientation.
f
By repeatedly pressing ALT > LEFT or ALT > RIGHT, browse the SDM OSD
pages until you reach a screen entitled “SINGLE CAMERA”. Press
ALT
again to leave the <Alt> mode.
f
Zoom to the longest telephoto position (do not use digital zoom). This
is mandatory! Focus on the nearest object and half-press the shutter
button. The entry “Near” in the OSD screen will be updated. It will turn
red if the subject distance is below the near limit. This near limit is a
result of multiplying the values dialed in under Near-subject factor
4
and
Camera Spacing. The Near-subject factor specifies how much perspec-
tive distortion is acceptable to you when the camera viewpoint changes
(Figure 7-7). The smaller this value, the better the quality of the
compound image, but the larger the near limit will be.
4 Typical values are 30 for mid-range work and 15 for close-up work.
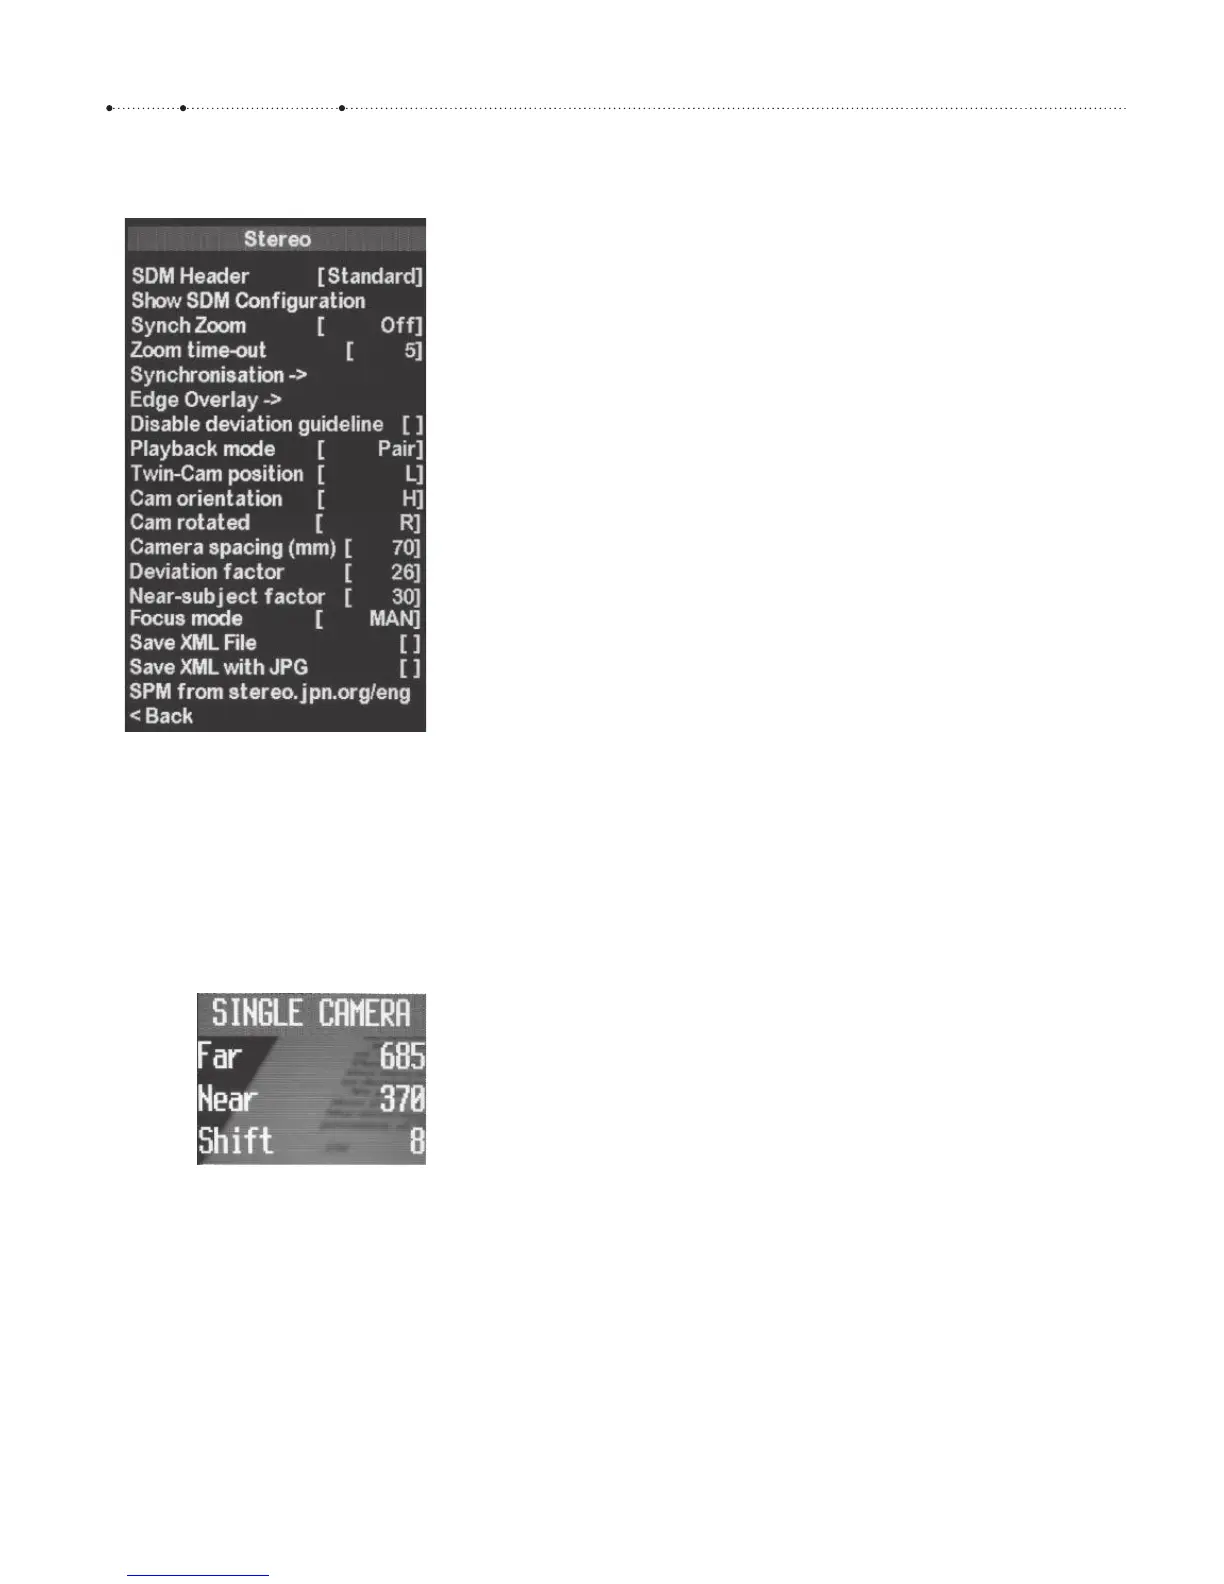
Figure 7-5
The SDM Stereo submenu combines
the settings relevant to stereo
photography. It includes submenus for
Camera Synchronization (Figure 7-3)
and Edge Overlay.
Figure 7-6
The Single Camera OSD allows
capturing both far and near distance,
and computes a shift value that must
be entered under Deviation factor in
the Stereo submenu. Here, the value is
too small (the minimum deviation
factor is 10) because the lens is still in
telephoto position. Zooming out will
make the “Shift” value bigger.