13Instruction manual WMi3001 & WMi3006Please keep this instruction manual for future reference
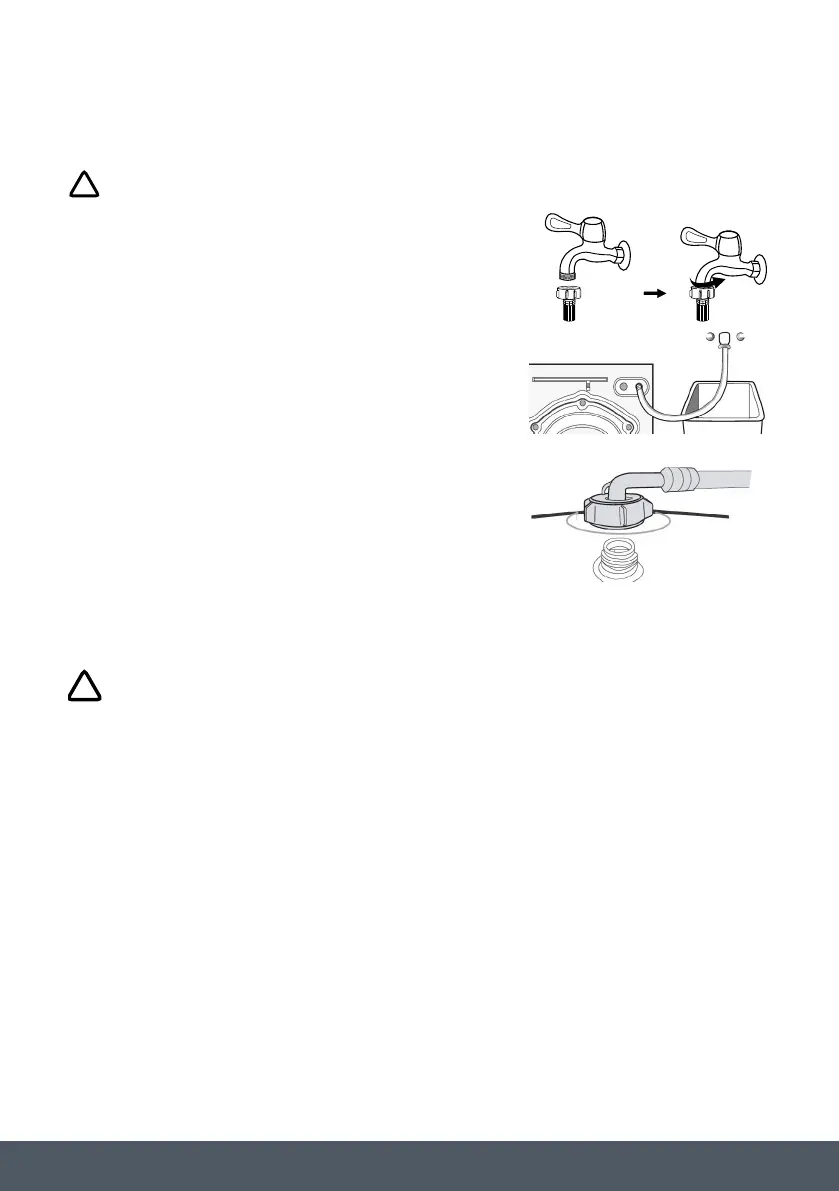
CONNECT INLET PIPE
WARNING
› To prevent leakage or water damage, follow the
instructions in this chapter.
› Do not kink, crush, modify or sever water inlet hose. The
washing machine should be installed in its final position
such that the inlet pipe is not trapped.
1. Connect the inlet pipe to the water supply tap. Only use
the pipe supplied with the appliance (do not reuse old
pipe-sets).
2. Connect the other end of the inlet pipe to the inlet valve
at the back of the washing machine and fasten the pipe
tightly clockwise.
NOTE:
If there is any leakage with the hose, repeat these steps to connect the inlet hose.
CONNECT OUTLET HOSE
WARNING
› Do not kink or trap the drain hose.
› Position drain hose properly, otherwise damage might result of water leakage.
› When installing drain hose, fix it properly.
› If drain hose is too long, do not force it into the washing machine as it will cause abnormal
noises.
The drain hose should be inserted into suitable drain pipe of between 60cm and 100cm height
above the floor using the curved drain hose support.
The drain hose can be connected in three different ways:
1. Connect it to a drain pipe
2. Attach it to a sink
3. Connect it to the sink drain pipe
Please keep this instruction manual for future reference Instruction manual TDI4000 15
Mount the furniture door to the front
PLINTH VENTILATION
The plinth must have ventilation slots (min side/diameter 127mm hole) according to the
dimensions on the fixing template. If the plinth is not high enough to accommodate the entire
hole, cut only part of it.
» Place the template onto the reverse of the
plinth. Mark the screw hole positions, then
drill them out.
» Fix the plinth to the kick plate using 6
screws provided. (J)
NOTE:
This is only possible with some types of kick plate (e.g. wood or plastic). We suggest to check with
the kitchen suppliers.
J
Min. Ø127mm
105mm
93mm
machine using the hinges. Fix the spacers (1) in
place with the 2 screws (2) and then fix the hinges
screws (3).
of the dryer using the hinges.
Fix the spacers (1) in place with the 2
screws (2) and then fix the hinges with 2
TDI4000 Instruction Manual Intergrated Tumble Dryer.indd 15TDI4000 Instruction Manual Intergrated Tumble Dryer.indd 15 07/04/2020 10:3007/04/2020 10:30
CONNEC T IN LET PIPE
1. Connect the inlet pipe to the water supply tap.
Only use the pipe supplied with the appliance (do
not reuse old pipe-sets).
CONNECT OUTLET HOSE
The drain hose should be inserted into suitable drain pipe of between 60cm and 100cm height
above the floor using the curved drain hose support. Care must be taken to avoid kinking or
trapping the drain hose.
The drain hose can be connected in three different ways:
1. Connect it to a drain pipe
2. Attach it to a sink
3. Connect it to the sink drain pipe
NOTE:
The washer dryer should be installed in its final
position such that the inlet pipe is not kinked or
trapped. If there is any leakage with the hose,
repeat the steps to connect inlet hose.
2. Connect the other end of the inlet pipe to the
inlet valve at the back of the washing machine and
fasten the pipe tightly clockwise.
9
10
INSTALLATION
1.Check if the legs are closely attached to the cabinet. If not, please turn them to
their original positions tighten the nuts.
2.Loosen the lock nut turn the feet until it closely contacts with the floor.
3.Adjust the legs and lock them with a spanner, make sure the machine is steady.
Levelling the washer dryer
• The lock nuts on all four feet must be screwed tightly against the housing.
Connect Water Supply Hose
Connect the inlet pipe as indicated, There are two ways to connect the inlet pipe.
1.Connection between ordinary tap and inlet hose.
• To prevent leakage or water damage, follow the instructions in this chapter
Do not kink, crush, modify or sever .
!
• water inlet hose
• For the model equips hot valve,connect it to hot water tap with hot water supply
hose. Energy consumption will decrease automatically for some program.
2
3
4
1
Raise
Lower
Lock nut
foot
Warning!
!
Warning!
!!
Loosen clamp nut and
four bolts
Tighten clamp nut Press slide bushing,
insert inlet hose into
connecting base
slide bushing
2
3
41
Connection finished
clamp nut
Tap with threads and inlet hose
Special tap for washer dryer
2.Connection between screw tap and inlet hose.
slide bushing
Please keep this instruction manual for future reference Instruction manual TDI4000 15
Mount the furniture door to the front
PLINTH VENTILATION
The plinth must have ventilation slots (min side/diameter 127mm hole) according to the
dimensions on the fixing template. If the plinth is not high enough to accommodate the entire
hole, cut only part of it.
» Place the template onto the reverse of the
plinth. Mark the screw hole positions, then
drill them out.
» Fix the plinth to the kick plate using 6
screws provided. (J)
NOTE:
This is only possible with some types of kick plate (e.g. wood or plastic). We suggest to check with
the kitchen suppliers.
J
Min. Ø127mm
105mm
93mm
machine using the hinges. Fix the spacers (1) in
place with the 2 screws (2) and then fix the hinges
screws (3).
of the dryer using the hinges.
Fix the spacers (1) in place with the 2
screws (2) and then fix the hinges with 2
TDI4000 Instruction Manual Intergrated Tumble Dryer.indd 15TDI4000 Instruction Manual Intergrated Tumble Dryer.indd 15 07/04/2020 10:3007/04/2020 10:30
CONNEC T IN LET PIPE
1. Connect the inlet pipe to the water supply tap.
Only use the pipe supplied with the appliance (do
not reuse old pipe-sets).
CONNECT OUTLET HOSE
The drain hose should be inserted into suitable drain pipe of between 60cm and 100cm height
above the floor using the curved drain hose support. Care must be taken to avoid kinking or
trapping the drain hose.
The drain hose can be connected in three different ways:
1. Connect it to a drain pipe
2. Attach it to a sink
3. Connect it to the sink drain pipe
NOTE:
The washer dryer should be installed in its final
position such that the inlet pipe is not kinked or
trapped. If there is any leakage with the hose,
repeat the steps to connect inlet hose.
2. Connect the other end of the inlet pipe to the
inlet valve at the back of the washing machine and
fasten the pipe tightly clockwise.
 Loading...