3
Proofed by: Date:
Dimensions checked: Copy checked:
S
uggested Placement Procedure
P
roper medical and surgical procedures are the
r
esponsibility of the physician. The appropriateness
o
f any procedure must be based upon the needs of
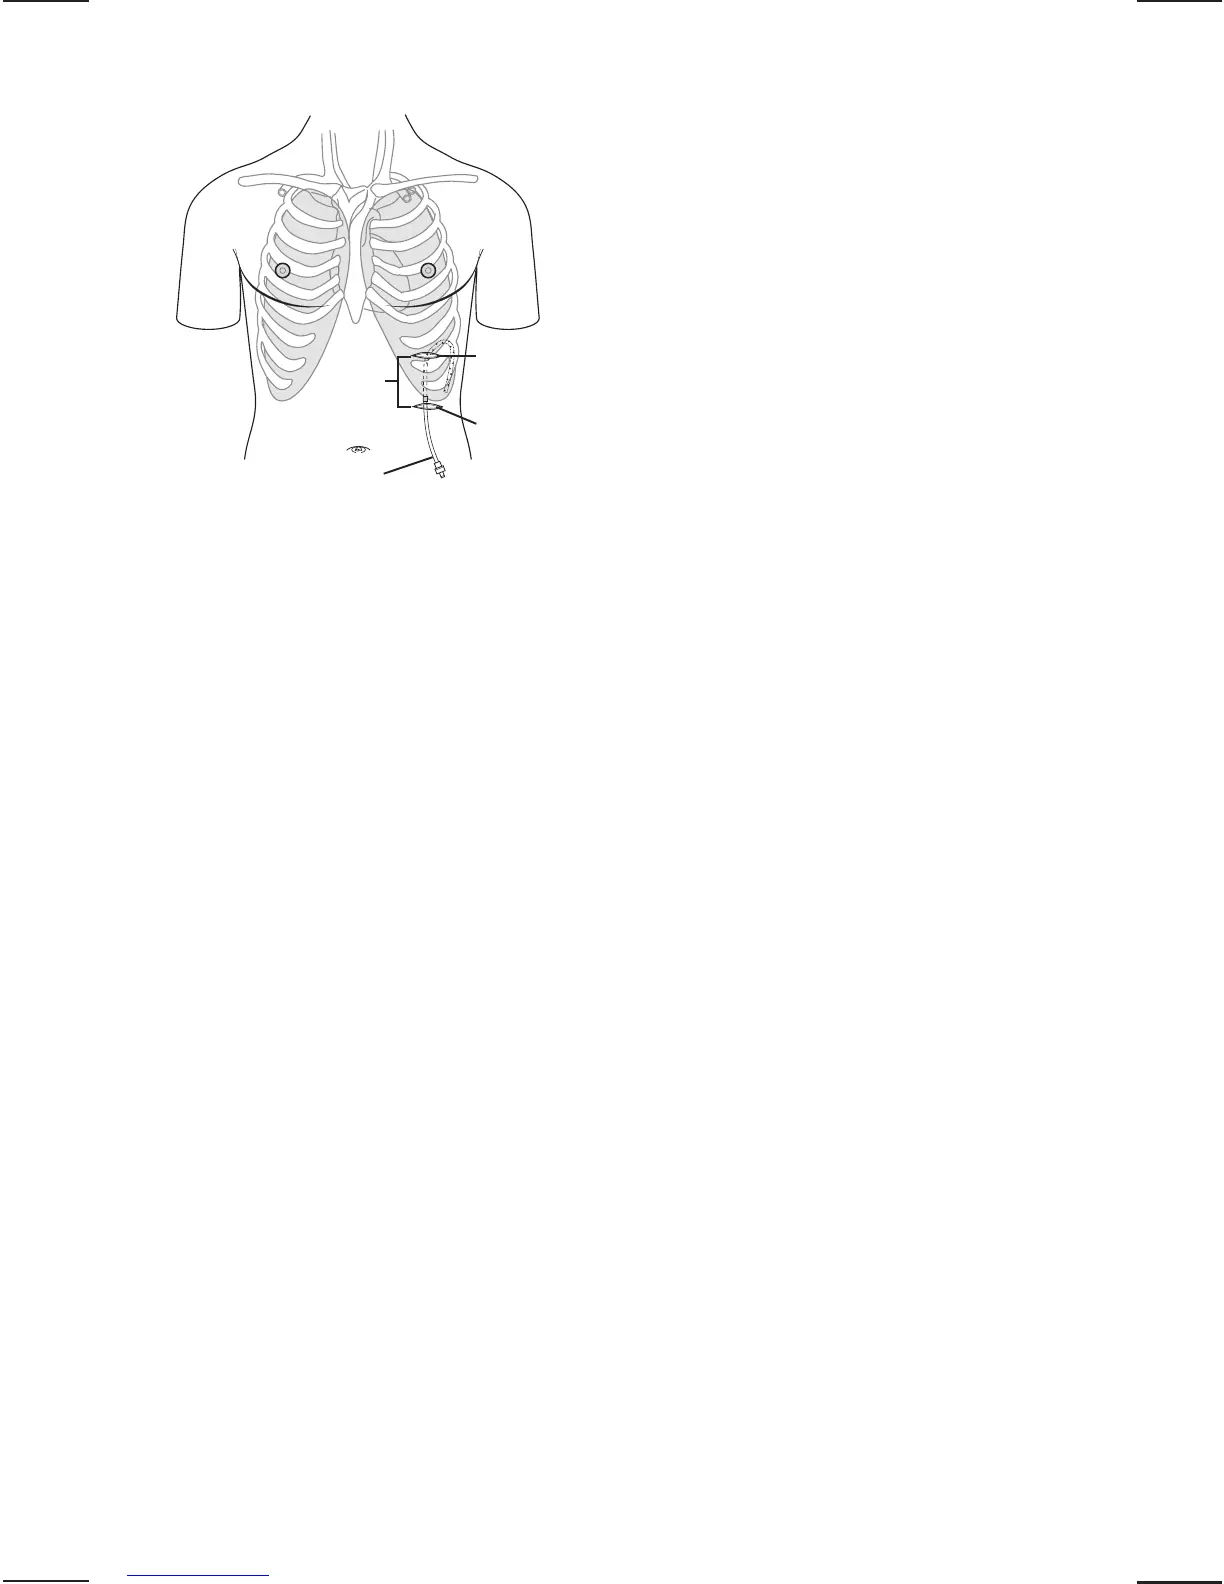
the patient. Diagram (3) illustrates the placement of
the PleurX Pleural Catheter, as described in the
following procedure.
1. Position the patient appropriately to access the
desired guidewire insertion site.
2. Identify the appropriate intercostal space for
guidewire placement. The guidewire is typically
placed in the sixth or seventh intercostal space.
Ultrasound can be used to confirm the guidewire
insertion site.
3. Identify the location of the catheter exit site,
which is usually approximately 5 cm inferior and
lateral to the guidewire insertion site.
4. Surgically prep both sites utilizing the
Chloraprep
®
applicators. Refer to the
Chloraprep insert for further information.
5. Place the fenestrated drape with the opening
located over the planned insertion and tunneling
sites.
Caution: Use the filter straw for aspiration only. Do
not use for injection.
Note: Utilize a filter straw when aspirating Lidocaine
into the syringe.
6. Aspirate the Lidocaine HCl 1% into a syringe.
Attach the 25 Ga. needle to the syringe and raise
a skin wheal. Aspirate additional Lidocaine into
the syringe and use the 22 Ga. needle to
complete infiltration of the access site and tunnel
track. Refer to Addendum for additional product
information.
Caution: Care must be taken when inserting the
guidewire introducer needle to avoid puncturing or
lacerating the lung or liver.
7
. Insert the guidewire introducer with needle,
attached to a syringe, through the desired
i
ntercostal space and just over the lower rib.
8
. Ensure free aspiration of pleural fluid, then
r
emove the needle and syringe, leaving the
g
uidewire introducer in place.
9
. Insert the guidewire through the introducer,
advancing it well into the pleural cavity.
10.Remove the introducer, leaving the guidewire in
p
lace.
C
aution: If the needle is left in place with the
g
uidewire introducer, damage to the guidewire may
result if withdrawn through the needle.
11.Make a 1 cm incision at the guidewire insertion
site.
12.Make a second 1-2 cm incision approximately
5
cm inferior and lateral to the guidewire
i
nsertion site. This incision will be the catheter
exit site. Consider the patient’s ease of access in
determining its location. See Diagram (3).
Note: A smaller incision may provide better security
o
f the catheter.
N
ote: Take care to ensure that the tunnel track has
b
een anesthetized.
13.Attach the fenestrated end of the catheter onto
the tunneler.
Caution: Exercise care when placing the catheter to
prevent it from coming into contact with surfaces
such as drapes or towels. Silicone rubber is highly
electrostatic and attracts airborne particles and
surface contaminates.
Caution: Use rubber-shod instruments when
handling the catheter. Possible cuts or tears can
occur if rubber-shod instruments are not used.
14.Pass the tunneler (A) and catheter (B)
subcutaneously from the second incision up to
and out through the first incision at the
guidewire insertion site. See Diagram (4).
Continue to draw the catheter through the tunnel
until the polyester cuff lies inside the tunnel,
about 1 cm (C) from the second incision.
See Diagram (5). Disconnect the tunneler from
the catheter.
Note: If the cuff is advanced further into the tunnel,
it can make later removal of the catheter difficult.
15.Dilate the insertion site over the guidewire
utilizing the 8 Fr. and 12 Fr. dilators.
16.Thread the 16 Fr. peel-away introducer sheath
over the guidewire into the pleural cavity.
17.Remove the guidewire and dilator as a unit,
leaving the 16 Fr. peel-away introducer sheath in
place.
Caution: Place a thumb over the end of the sheath
as the dilator is removed to avoid air entering the
pleural cavity. Care must be taken not to bend or
kink the sheath. Damage to the sheath may prevent
passage of the catheter.
RC041264
McGaw Park, IL
Richard Cisneroz
04-05-12
361-26801
External portion
of catheter
T
unneled
portion of
catheter
S
econd
Incision:
Catheter
e
xit site
First Incision:
G
uidewire
Insertion Site
(
3)
 Loading...