5
1
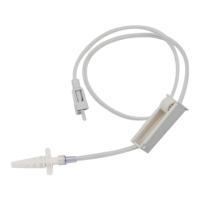
1.Ensure the drainage line has been unlocked. With
the drainage line in one hand and the catheter
v
alve in the other hand, pull the lockable access
t
ip out of the valve in a firm, smooth motion.
S
ee Diagram (12)
1
2.Clean the catheter valve with an alcohol pad. Do
not try to push anything through the valve as
d
amage to the valve may occur. See Diagram (13).
C
aution: The alcohol pads are flammable. Do not
e
xpose the pads to an open flame.
W
arning: Do not put anything except the access tip
of the lockable drainage line or PleurX Vacuum
Bottles into the PleurX Catheter valve since this
c
ould damage the valve. A damaged valve may allow
a
ir into the body or let fluid leak out through the
valve when not draining.
13.Place the valve cap over the catheter valve and
twist it clockwise until it clicks into the locked
p
osition. See Diagram (14)
1
4.Clean around the catheter site.
1
5.Place the foam catheter pad around the catheter.
1
6.Wind the catheter into loops and place it over the
f
oam pad.
1
7.Cover the catheter with gauze pads and secure
with the self-adhesive dressing.
18.Disconnect the drainage line from the glass
vacuum bottle or suction source. Dispose of the
used drainage line and/or used vacuum bottles in
accordance with applicable local, state, and
federal regulations. Used product may present a
potential biohazard.
Spontaneous Pleurodesis with the PleurX
Patients who drain regularly every day or every other
day may achieve pleurodesis. In a multi-center
clinical trial, drainage of the effusion at least once
every other day resulted in approximately half of the
patients achieving spontaneous pleurodesis with a
mean time to catheter removal of 29 days. ¹
S
ubsequent Drainage Procedures
Subsequent drainage procedures are to be
p
erformed using the PleurX Drainage Line, PleurX
V
acuum Bottle, or the PleurX Drainage Kits. Each
d
rainage kit contains the necessary drainage line,
vacuum bottle, and other necessary items to
p
erform the drainage procedure.
Catheter Removal Procedure
It may be appropriate and/or necessary at a later
d
ate to remove the PleurX Pleural Catheter. Three
successive attempts to drain fluid that result in less
than 50 ml of fluid removed may indicate one of the
following:
• pleurodesis has been achieved
• the catheter is loculated away from the fluid
• the catheter is occluded
1. Place the patient appropriately to access the
catheter insertion site.
2. Aseptically clean the patient’s chest around the
catheter insertion site.
3. Anesthetize the site.
4. Remove any remaining sutures securing the
catheter.
5. Using forceps, dissect around the cuff to free it
from the ingrowth. Ensure that the cuff is
completely free within the tunnel.
6. Grasp the catheter in one hand and pull with a
firm, constant pressure.
7. Cover the site as appropriate.
Contains Phthalates. The benefit of treatment
outweighs the remote possibility of exposure to
phthalates.
1
Putnam JB Jr, Light RW, Rodriguez RM, et al. A
Randomized Comparison of Indwelling Pleural Catheter and
Doxycycline Pleurodesis in the Management of Malignant
Pleural Effusions. Cancer 1999; 86; 1992-1999.
I
t is vital that patients and/or caregivers are
c
arefully instructed on how to use the kit to
drain the pleural cavity. The person(s)
responsible for drainage must be able to
d
emonstrate they are capable of performing
t
he procedure.
I
f the patient/caregiver is not able or willing
to perform the drainage, a medical
professional should perform the drainage.
It is recommended that the patient is
p
eriodically contacted or seen by a clinician
to evaluate treatment regimen and evaluate
catheter’s functional status.
Proofed by: Date:
Dimensions checked: Copy checked:
RC041264
McGaw Park, IL
Richard Cisneroz
04-05-12
361-26801