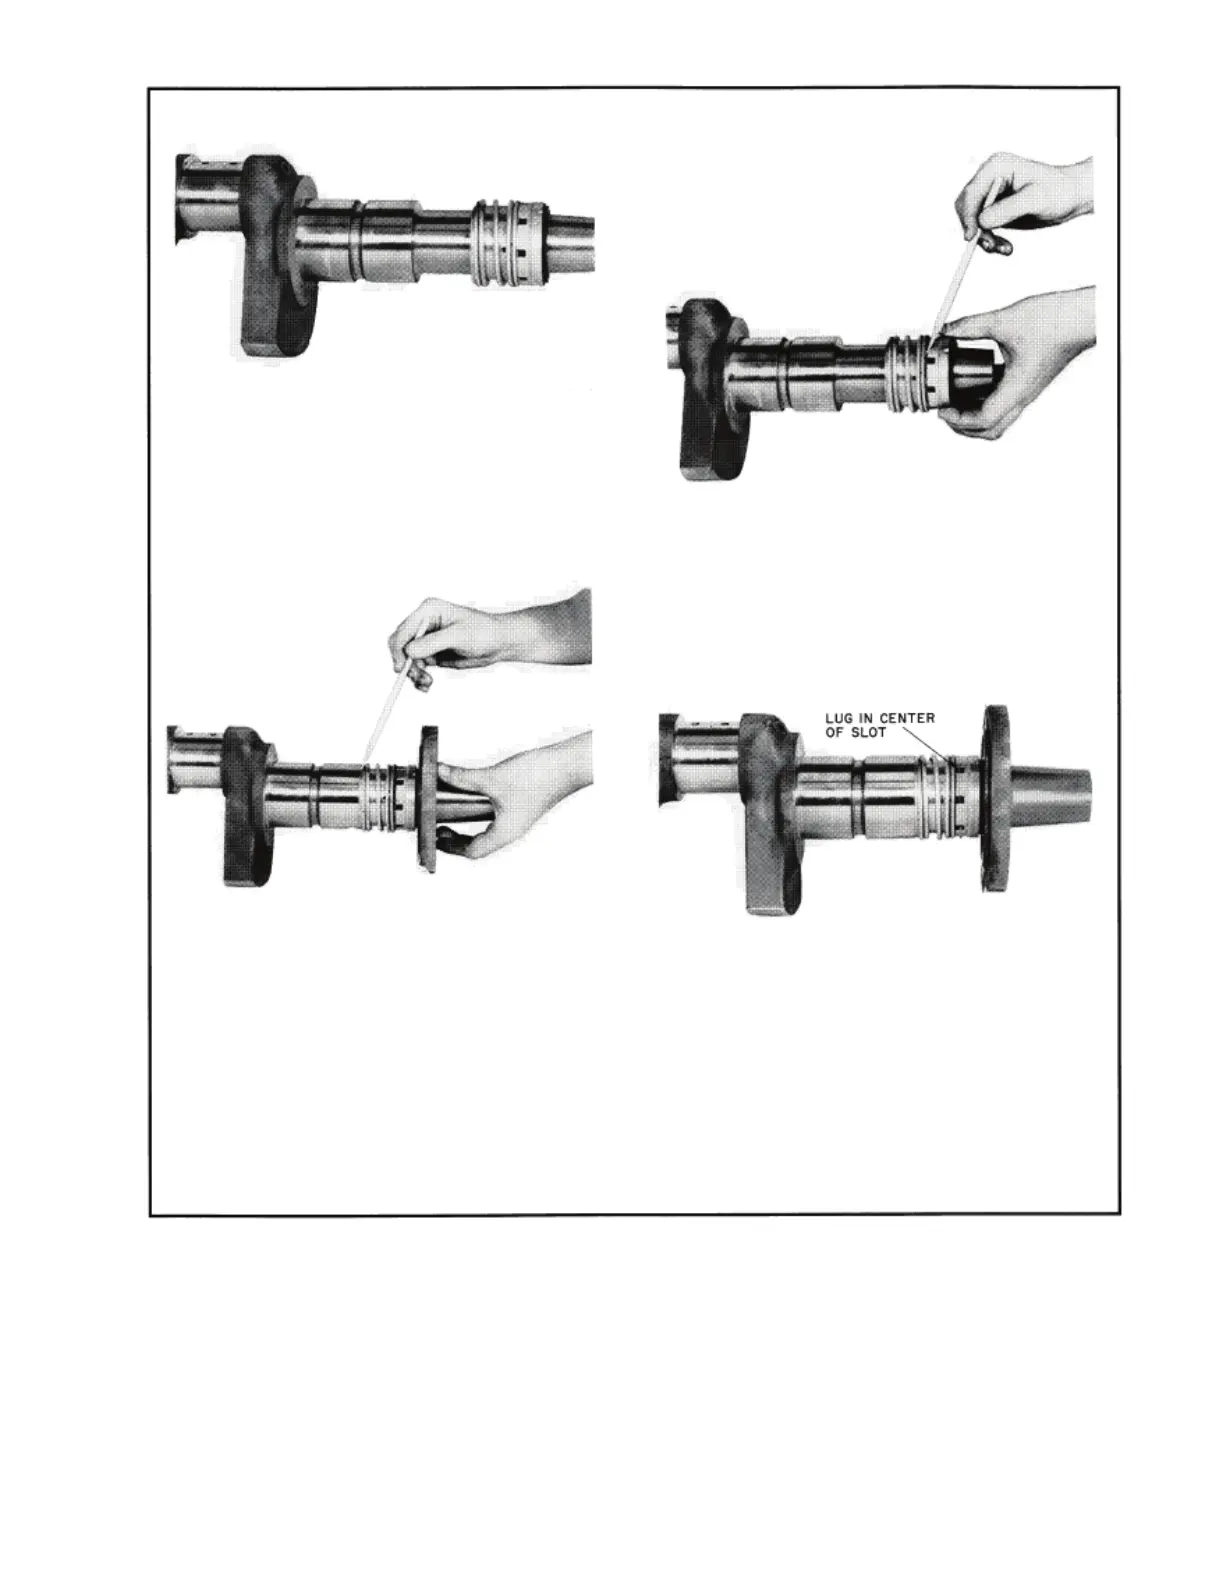
Fig. 30 — Installation of Sleeve-Type Rotary Seal
Step 1 - Lubricate the shaft and the neoprene bellows where it comes in contact with the shaft. Slide the seal assembly,
as it is shipped from the factory, onto the shaft until the neoprene just starts to grasp the shaft.
Step 2 - Holding the sleeve and spring assembly, pull forward on the seal nose assembly at the same time, turning it so
that the lugs on the driving band are out of the slots in the retainer shell and rest on the surface of the retainer shell as
shown by the pencil. (This does not apply to the 5H120 Type II seal.Lugs are permanently fixed.)
Step 3 - Using the seal cover plate, push the seal assembly into its proper location on the shaft. DO NOT use cover
plate bolts to push seal into position. The spring guide should be tight against the shaft shoulder as shown by the pencil.
Remove the cover plate, being careful not to damage the carbon washer. GRASP THE SEAL NOSE ASSEMBLY AND
TURN IT UNTIL THE LUGS ON THE DRIVING BAND DROPBACK INTO THE SLOTS IN THE RETAINER
SHELL.
Step 4- Lubricate the carbon seal washer and seal seat. Reinstall the seal cover plate, drawing the bolts down evenly to
prevent damage to the carbon seal nose. This view shoes the lugs of the driving band properly positioned m the center of
the slots in the seal retainer shell. This is the correct position during operation. This prevents the seal from being used as a
thrust washer under all operating conditions.
NOTE: The seal may leak slightly immediately after installation, but a short period of operation will correct the condi-
tion.
Step 1 - Lubricate the shaft and the neoprene bellows where it comes in
contact with the shaft. Slide the seal assembly, as it is shipped from the
factory, onto the shaft until the neoprene just starts to grasp the shaft.
Step 2 - Holding the sleeve and spring assembly, pull forward on the
seal nose assembly at the same time, turning it so that the lugs on the
driving band are out of the slots in the retainer shell and rest on the
surface of the retainer shell as shown by the pencil. (This does not
apply to the 5H120 Type II seal. Lugs are permanently fixed.)
Step 3 - Using the seal cover plate, push the seal assembly into its
proper location on the shaft. DO NOT use cover plate bolts to push
seal into position. The spring guide should be tight against the shaft
shoulder as shown by the pencil. Remove the cover plate, being
careful not to damage the carbon washer. GRASP THE SEAL NOSE
ASSEMBLY AND TURN IT UNTIL THE LUGS ON THE DRIVING
BAND DROPBACK INTO THE SLOTS IN THE RETAINER SHELL.
Step 4- Lubricate the carbon seal washer and seal seat. Reinstall the
seal cover plate, drawing the bolts down evenly to prevent damage to
the carbon seal nose. This view shoes the lugs of the driving band
properly positioned m the center of the slots in the seal retainer shell.
This is the correct position during operation. This prevents the seal
from being used as a thrust washer under all operating conditions.
NOTE: The seal may leak slightly immediately after installation, but a short period of operation will correct the condition.
 Loading...