3
Table 1 — Thermostat Wiring Terminations
(4-Pipe Systems)
Table 2 — Thermostat Wiring Terminations
(2-Pipe Systems)
Changeover Sensor — If the thermostat is being used
with a two-pipe system, a changeover sensor (33CSWCO-FC)
may be used to provide automatic heat/cool mode changeover.
Set Clock — The Set Clock function allows the user to
change the time and day displayed on the thermostat. Press and
hold the Mode and Fan buttons at the same time for 2 seconds until
the display changes. The display will show the Setup annunciator.
The current time will blink on and off. Press the UP ARROW and
DOWN ARROW buttons until the correct time is shown. Hold
down the buttons to quickly move through the time display. The
AM and PM annunciators will automatically change. To scroll
through by hours instead of minutes, hold down the Fan button
while pressing UP ARROW or DOWN ARROW. To ensure the
schedules are properly followed, make sure that AM or PM is cor-
rect for the time chosen. When the correct time is shown, press the
Mode button to modify the day of the week. The current day will
blink on and off. Press the UP ARROW and DOWN ARROW
buttons until the correct day is shown. Press and hold the Mode
and Fan buttons simultaneously to exit the Set Clock mode.
Configure Advanced Setup — To enter the advanced
setup screens of the thermostat, press the Mode and Fan
buttons simultaneously for 10 seconds. Set thermostat mode to
OFF before configuring the thermostat.
NOTE: The display will change after 2 seconds. This is a
quick configuration to set the clock only. Continue to hold
down the Mode and Fan buttons for 10 seconds to enter
Advanced Setup mode.
The display will change. If only Advanced Setup Steps 1
and 2 are accessible, then the buttons were not held down long
enough. The Advanced Setup Step number is shown in the top
right corner of the thermostat screen. Use the Mode button to
advance through the steps. There are 15 Advanced Setup Steps.
Use the UP and DOWN ARROW buttons to change the
settings. See Table 3. Press the Mode and Fan buttons at the
same time to exit the Advanced Setup mode.
NOTE: Refer to the Set Clock section for Advanced Setup
Steps 1 and 2.
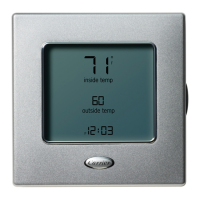
DISPLAY CONFIGURATION (Step 3) — The Display con-
figuration is used to select what the thermostat will display
when it is not being used. If the configuration is set to ON, the
thermostat will display mode, fan operation, set points, and
room temperature. If the configuration is set to OFF, the thermo-
stat will only display the time. If any button is pressed, the
thermostat screen will return to full display. The default is ON.
SINGLE OR DUAL SET POINT CONFIGURATION (Step
4) — Step 4 is used to configure the thermostat for single or
dual set point operation. The configuration can be set to 1 or 2.
The default is 2. When the configuration is set to 1, then there
is only one set point which is used for both heating and cooling.
When the configuration is set to 2, then there are two set points
(one for heating, one for cooling).
TWO OR FOUR PIPE SYSTEM CONFIGURATION
(Step 5) — Step 5 is used to configure the thermostat for use in
a 2-pipe or 4-pipe system. When the configuration is set to 2,
the thermostat will be configured for use with a 2-pipe system.
When the configuration is set to 4, the thermostat will be
configured for use with a 4-pipe system. The default is 4.
NOTE: Advanced Setup Step 6 will only be shown if Step 5 is
set to 2.
TWO-PIPE SYSTEM OPERATION (Step 6) — Step 6 is
used to configure the thermostat for use in a 2-pipe system.
The configuration can be set to 1, 2, 3, 4, or 5. The default is 3.
When the Two-Pipe Operation configuration is set to 1, the
two-pipe system will function as a Heat-Only system. When
the Two-Pipe Operation configuration is set to 2, the two-pipe
system will function as a Cool-Only system. When the Two-
Pipe Operation configuration is set to 3, the two-pipe system
will function as a Heat/Cool Auto-Changeover system. When
the Two-Pipe Operation configuration is set to 4, the two-pipe
system will function as a Heat/Cool system with auxiliary elec-
tric heat (lockout electric heat when hot water is available).
When the Two-Pipe Operation configuration is set to 5, the
two-pipe system will function as a Heat/Cool system with total
electric heat (no hot water heat).
FAN OPERATION (Step 7) — If the fan operation is set to
ON, the fan will operate at continuous low speed. If the fan
operation is set to OFF, the fan will cycle off and will only be
energized during a heating or cooling cycle (AUTO mode). The
default is ON.
NOTE: When a remote temperature sensor is used, the choice
should be Fan ON.
DEADBAND (Step 8) — The deadband is the difference in
temperature above the cooling set point or below the heating
set point that the thermostat will wait before turning on the first
stage of heating or cooling. For example, if the cooling set
point is 82 F (28 C) and the deadband is 2 degrees, the first
stage of cooling will not be energized until the temperature
reaches 84 F (29 C). The range of values is 1 to 6 degrees. The
default is 2 degrees.
EXISTING WIRE
DESIGNATION
FUNCTION
TERMINAL
CONNECTION
Y1, Y, or C Cooling Y1
W1, W, or H Heating W1
Rh,R,M,Vr,orA Power R
C Common C
G, F, or LOW Low Fan Speed G
MED Medium Fan Speed G2
HIGH High Fan Speed G3
EXISTING WIRE
DESIGNATION
FUNCTION
TERMINAL
CONNECTION
Y1, Y, or C Water Valve Y1
W1, W, or H Strip Heater W1
Rh,R,M,Vr,orA Power R
C Common C
G, F, or LOW Low Fan Speed G
MED Medium Fan Speed G2
HIGH High Fan Speed G3
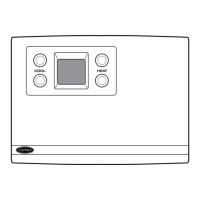
4 1/4”
4 1/4”
3 1/8”
3 1/8”
Fig. 2B — Plastic Mounting Plate Dimensions

 Loading...