AIR CONDITIONER OR HEAT PUMP SELECTION
(SWITCH A) — Use switch A to select between air condi-
tioning and heat pump applications. A heat pump applica-
tion uses a reversing valve. Set switch A to OFF for air-
conditioning applications (no reversing valve). Set switch A
to ON for heat pump applications (O is used to energize the
reversing valve). The factory setting is OFF.
COMPRESSOR STAGE SELECTION (SWITCH B) —
Switch B is used to select between a single-stage and a 2-stage
unit. Set switch B to OFF for a single-stage unit. Set switch B
to ON for a 2-stage unit. The factory setting is OFF.
OUTDOOR AIR OR REMOTE ROOM SENSOR
(SWITCH C) — Switch C is used to configure the thermo-
stat to work with either a outdoor air sensor or a remote room
sensor. The sensor for the application must be connected to
terminals S1 and S2 of the thermostat. Set switch C to OFF
for a outdoor air sensor. Set switch C to ON for a remote
room sensor. The factory setting is OFF.
AVERAGING OF SENSORS (SWITCH D) — Switch D is
used if a remote room sensor is being used (switch C set to
ON). The remote room sensor reading can be averaged with
the sensor reading of the thermostat. Set switch D to OFF if
averaging is not required. Whenever a remote room sensor
or an outdoor air sensor is not used, or averaging is not
required, the factory defaults (switch C set to off, switch D
set to off) are used for temperature scanning. To average the
readings of the thermostat and one remote room sensor, set
switch D to ON. The factory setting is OFF. See Space Tem-
perature Averaging section for wiring information.
Step 3 — Install Thermostat
Before installing thermostat, turn off all power to the
unit. There may be more than one power disconnect.
Electrical shock can cause injury or death.
1. Turn off all power to unit.
2. If an existing thermostat is being replaced:
a. Remove existing thermostat from the wall.
b. Disconnect wires from existing thermostat. Do not
allow wires to fall back into the wall. As each wire
is disconnected, record wire color and terminal con-
nection.
c. Discard or recycle old thermostat.
NOTE: Mercury is a hazardous waste and must be
disposed of properly.
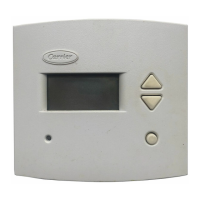
3. Open thermostat rear door (mounting base) to expose
mounting holes. See Fig. 1.
4. Route thermostat wires through large hole in mounting
base. Remove outer sheath from wires for added flex-
ibility. Standard solid or multi-conductor thermostat wire
should be used from the thermostat to the unit. Size and
length considerations are as follows: for a maximum run
length of 36 ft, use 22 AWG (American Wire Gage) wire;
for a maximum run length of 100 ft, use 18 AWG wire.
NOTE: When a remote room sensor or outdoor-air sen-
sor is used, an additional conductor should be provided
for grounding of the shield.
If averaging of sensors is required, see Space Tempera-
ture Averaging section for more information.
Terminals S2 and C are internally connected. Do
not ground shield to terminal C of thermostat.
5. Level mounting base against wall and mark wall through
the 2 mounting holes in base.
6. Drill two
3
⁄
16
-in. mounting holes in wall where marked.
Be careful not to drill into wiring in wall. Electri-
cal shock could result.
7. Secure mounting base to wall with 2 screws and an-
chors provided. Ensure all wires exit through hole in mount-
ing base.
8. Adjust wire length and routing to allow proper closure
of the thermostat. Strip each wire at the end no more
than
1
⁄
4
-in. to prevent adjacent wires from shorting to-
gether. Match and connect wires to terminals on the ther-
mostat. See Fig. 2-9.
Improper wiring or installation may cause damage
to the thermostat. Check to ensure wiring is cor-
rect before proceeding with installation of unit.
9. Push excess wiring into wall. Seal hole in wall to pre-
vent drafts.
10. Close thermostat door.
11. Turn on power to unit. The thermostat will receive power
from the unit. The thermostat will be powered by 24 v,
nominal (18 to 30 vac). Terminal R (+ 24 v) and ter-
minal C (common) will always be connected. Power con-
sumption is 5 va at 24 vac.
On power up the thermostat display shows the selected
setup mode (AC — Air Conditioner, Single-Stage; HP —
Heat Pump, Single-Stage; A2 — Air Conditioner, 2-Stage;
H2 — Heat Pump, 2-Stage) for a few seconds, depending on
DIP switch settings.
Step 4 — Space Temperature Averaging —
Applications that require averaging using multiple space tem-
perature sensors can be satisfied using either 4 or 9 sensors
as shown in Fig. 10. For single space temperature sensor wir-
ing, refer to the base unit installation instructions. Tempera-
ture sensor calibration can be checked by measuring actual
resistance at a temperature with an ohmmeter and compar-
ing to the values listed in Table 1.
NOTE: Only Carrier sensors may be used for standard space
temperature sensor averaging. Sensors must be used singly
or in multiples of 4 and 9, with total sensor wiring not to
exceed 1000 feet.
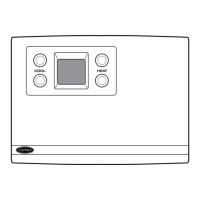
Step 5 — Set Thermostat Configuration — Con-
figuration options, like DIP switch settings, are intended to
be selected at installation and are not normally modified by
the user. See Fig. 9. These options are not discussed in the
owner’s manual and must be done as part of the installation.
A special procedure for the thermostat allows entry into the
configuration mode. To enter configuration mode, press and
hold the Fan button for approximately 10 seconds. The room
temperature display will disappear and dashes (--) will be
displayed on the thermostat screen. The thermostat will
automatically exit configuration mode if no button is pressed
for 10 seconds. Seven different configurations can be set in
configuration mode.
NOTE: When setting the configuration on the thermostat,
the configuration ‘‘on’’ is displayed as ON, and the configu-
ration ‘‘off’’ is displayed as OF.
Text continued on page 9.
2