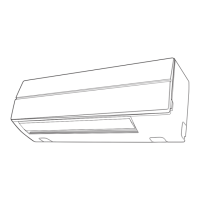
High Wall Type
Installation Manual
–19–
Wire Connection
REQUIREMENT
• Connect the wires matching the terminal
numbers.
Incorrect connection causes a trouble.
• The low-voltage circuit is provided for the wired
remote control and control wire.
(Do not connect the high-voltage circuit)
1. Remove the air inlet grille.
Open the air inlet grille upward and pull it
toward you.
2. Remove the front panel.
3. Remove the terminal cover and the clamp
base.
4. Insert the control wire fully into the wired
remote control/control terminal block,
,
,
and secure then tightly with screws.
• Cover of control wires (2-core shielded
wire) should be removed up to 5.9”
(150mm)
▼ To use optional wired remote control
Insert the wired remote control wire fully
into the wired remote control/control
terminal block,
, , and secure then
tightly with screws.
• Strip off the wire approx. 0.4” (9 mm) to
connect.
Remote control wire and control wire
L1
L2
Clamp base
Terminal
Cover
Cord clamp
Screw
Ground screw
Screw
Screw
Terminal block for
wired remote control/
control wiring
Power supply terminal block
L1 L2
Cover
Shield wire
0.4” (9)
5.5” (140)
5.9” (150)
AU2 U1 B
L1 L2
Terminal block
for wired remote
control/control
wiring
Ground
screw for
shielded wire
Hole for power supply
wire and ground wire
Hole for control and
remote control wires
Ground wire for
shielded wire
Cord clamp
Control
wire
<Connecting control wire>
A B
AU2 U1 B
L1 L2
Terminal block for
wired remote
control/control
wiring
Cord clamp
Hole for power supply
wire and ground wire
Hole for control and
remote control wires
Wired remote
control wire
Insert the control
wire and remote
control wire
Conduit Cover
Conduit hole
(dia. 7/8” (22.2 mm))
19-EN
+001111053901_00Ta.book Page 19 Monday, January 17, 2011 11:35 AM
 Loading...