PG92MSA: Installation, Start-up, Operating and Service and Maintenance Instructions
Manufacturer reserves the right to change, at any time, specifications and designs without notice and without obligations.
62
A11584
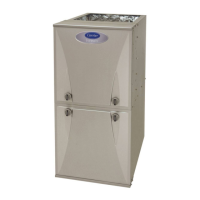
Fig. 67 – Blower Assembly
Cleaning Burners and Flame Sensor
The following items must be performed by a qualified service
technician. If the burners develop an accumulation of light dirt or dust,
they may be cleaned by using the following procedure:
NOTE: Use a back-up wrench on the gas valve to prevent the valve
from rotating on the manifold or damaging the mounting to the burner
assembly.
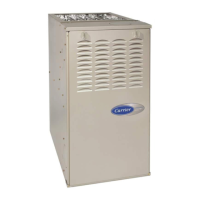
Refer to Fig. 68.
1. Disconnect power at external disconnect, fuse or circuit breaker.
2. Turn off gas at external shut-off or gas meter.
3. Remove control door and set aside.
4. Turn electric switch on gas valve to OFF.
5. Disconnect the gas pipe from gas valve and remove pipe from the
furnace casing.
6. Remove individual wires from terminals on gas valve.
7. Disconnect Hot Surface Igniter (HSI) wires from HSI.
8. Disconnect Flame Sensor wire from Flame Sensor.
9. Support the manifold and remove the 4 screws that secure the
manifold assembly to the burner assembly and set aside. Note the
location of the green/yellow wire and ground terminal.
10. Inspect the orifices in the manifold assembly for blockages or
obstructions. Remove orifice and clean or replace orifice.
11. Remove the four screws that attach the top plate of the casing to the
furnace.
12. Raise top plate up slightly and prop it up with a small piece of wood
or folded cardboard.
13. Support the burner assembly and remove the screws that attach the
burner assembly to the heat exchanger cell panel.
14. Remove wires from both rollout switches.
15. Slide one-piece burner out of slots on sides of burner assembly.
16. Remove the flame sensor from the burner assembly.
17. (Optional) Remove the Hot Surface Igniter (HSI) and bracket from
the burner assembly.
18. Check igniter resistance. Nominal resistance is 40 to 70 ohms at
room temperature and is stable over the life of the igniter.
19. Clean burner with a brush and a vacuum.
20. Clean the flame sensor with fine steel wool (0000 grade). Do not
use sand paper or emery cloth.
A11403
Fig. 68 – Burner Assembly
To reinstall burner assembly:
1. Install the Hot Surface Igniter (HSI) and bracket in burner
assembly.
2. Install flame sensor on burner.
3. Align the edges of the one-piece burner with the slots in the burner
assembly and slide the burners forward until they are fully seated in
the burner assembly.
4. Align the orifices in the manifold assembly with the support rings
on the end of the burner.
5. Insert the orifices in the support rings of the burners.
NOTE: If manifold does not fit flush against the burner, do not force the
manifold on the burner assembly. The burners are not fully seated
forward in the burner assembly. Remove the manifold and check burner
positioning in the burner assembly before re-installing the manifold.
6. Attach the green/yellow wire and ground terminal to one of the
manifold mounting screws.
7. Install the remaining manifold mounting screws.
8. Check the igniter alignment. See Fig. 68, Fig. 69, and Fig. 70.
9. Attach the wires to the roll-out switches.
10. Align the burner assembly with the openings in the primary cell
inlet panel and attach the burner assembly to the cell panel.
11. Connect the wire for the flame sensor.
12. Connect the wire for the Hot Surface Igniter.
NOTE: Use propane-resistant pipe dope to prevent leaks. Do not use
PTFE thread-seal tape.
13. Install the gas pipe to the gas valve.
14. Check for gas leaks with a commercially available soap solution
made specifically for the detection of leaks.
WARNING
!
ELECTRICAL SHOCK AND FIRE HAZARD
Failure to follow this warning could result in personal injury, death,
and/or property damage.
Turn off the gas and electrical supplies to the furnace and install lockout
tag before performing any maintenance or service. Follow the operating
instructions on the label attached to the furnace.
FLAME SENSOR
(BELOW BURNER)
FLAME ROLLOUT
SWITCH
BRACKET, IGNITER
IGNITER
BURNER SUPT. ASSY
BURNER ASSY
 Loading...