Do you have a question about the Carrier WeatherMaker 48TC Series and is the answer not in the manual?
Cautionary notes regarding potential injuries from sharp metal parts and handling equipment.
Warnings about using oxygen for leak testing or non-certified refrigerants, which can cause explosions.
Warning about R-410A refrigerant systems operating at higher pressures than R-22 systems.
Caution against using high-velocity water or air for coil cleaning, which can bend fins.
Warning to shut off power and lockout/tag-out before servicing fan systems.
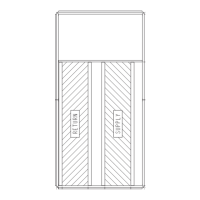
Illustrates the general unit arrangement and access locations.
Details monthly or bi-monthly checks for unit upkeep and component condition.
Lists checks for air conditioning and heating systems at the start of each season.
Information on cleaning and replacing return air filters and outdoor air screens.
Describes the supply fan system, including blower wheels, shaft, bearings, and belt drive.
Guidance on checking belt condition and tension using a spring-force tool or manual method.
Step-by-step instructions for adjusting the V-belt tension on the supply fan motor.
Procedure for adjusting fan wheel speed by modifying the motor pulley pitch diameter.
Steps for ensuring proper angular alignment between the fan and motor pulleys.
Instructions for tightening the concentric split locking collars on fan shaft bearings.
Explains the SAV system's use of VFD to adjust fan speed for cooling and heating operations.
Information on VFD installation, setup, and troubleshooting.
Detailed steps for replacing the supply fan motor, including pulley and belt adjustments.
Details on the construction of the RTPF condenser coil.
Recommended procedures for cleaning condenser coil surfaces to ensure proper operation.
Instructions for removing dirt and fibers from coil surfaces using a vacuum or brush.
Guidance on performing a beneficial clean water rinse for coils in specific environments.
Monthly cleaning procedures for evaporator coils using Totaline environmentally sound coil cleaner.
Specific steps for cleaning two-row evaporator coils, including power and panel removal.
Detailed steps for removing surface fibers and dirt from coils prior to water rinsing.
Benefits and procedures for a low-velocity clean water rinse for coils.
Monthly cleaning with specific coil cleaner and application instructions.
Guidelines for using Totaline cleaner with garden sprayers and ensuring proper application.
Information on fixed-bore metering devices and how to check for blockages.
Overview of the system's modes: Subcooling and Hot Gas Reheat.
Describes how the system operates in subcooling mode for dehumidification needs.
Explains the reheat mode for dehumidification without cooling, using hot gas bypass.
Lists the standard and unique components of the Humidi-MiZer system.
Explanation of how the TXV meters refrigerant to maintain superheat at the evaporator outlet.
Step-by-step guide for replacing the TXV, including refrigerant recovery and brazing.
Guidelines for preparing the unit and charging refrigerant using cooling charts.
Using cooling charging charts to adjust refrigerant based on suction pressure and temperature.
Instructions on how to read and use the cooling charging charts for proper system charge.
Note that compressors are factory-charged with the correct amount of oil.
Information on POE oil, tube plugs, and contractor requirements for replacement.
Guidance on periodic inspection and torque specifications for compressor mounting bolts.
Procedure to determine if a 3-phase scroll compressor is rotating in the proper direction.
Instructions for replacing the filter drier when the refrigerant system is exposed to atmosphere.
Steps for adjusting the condenser fan height for optimal performance.
Describes non-powered and unit-powered GFCI duplex receptacles and their ratings.
Limitations on the duty cycle for the unit-powered convenience outlet transformer.
Procedure for installing a weatherproof cover to protect the GFCI receptacle.
Instructions for periodically testing the GFCI receptacle by pressing the TEST button.
Describes the four-wire controller and sensor system for shutting down the unit.
Details on the controller housing, circuit board, LEDs (Power, Trouble, Alarm), and test/reset button.
Information on the sensor's plastic housing, PCB, sampling tubes, and LEDs.
Specifies locations for supply air and return air smoke detectors.
How FIOP smoke detectors automatically shut down unit operations upon smoke detection.
How smoke detector signals interact with PremierLink and RTU-Open control systems.
Steps to test the sensor's ability to signal an alarm state using a test magnet.
Procedure to test the controller's ability to initiate and indicate an alarm state.
Test to verify the controller's ability to initiate a dirty sensor test.
Indicates the sensor's ability to compensate for gradual environmental changes.
How to configure sensor dirty test operation to use the controller's supervision relay.
Checks the test/reset station's ability to initiate and indicate an alarm state.
Tests the station's ability to initiate a sensor dirty test.
Instructions for cleaning the duct smoke sensor when the Dirty LED flashes.
Step-by-step guide for cleaning the sensor housing and optic plate.
Details on overcurrent, overtemperature, high pressure, and low pressure protection for compressors.
Information on internal overtemperature devices and external overload breakers for fan motors.
Description of the heat exchanger system, burners, collector box, and induced draft fan.
Details on natural gas supply line pressure and manifold pressure ranges.
Information on accessory kits for LP fuel conversion and associated pressure ranges.
How the LP conversion kit's low pressure switch operates to control gas valve power.
Location and purpose of the limit switch in preventing operation under certain conditions.
Procedure for inspecting and cleaning flue collector box and heat exchanger surfaces.
Periodic cleaning of the blower wheel for proper airflow and heating efficiency.
Seasonal inspection of main burners for deterioration, blockage, and flame characteristics.
Procedure for accessing the burner section for inspection and adjustment.
Reference for maximum projection dimension for the orifice face to manifold tube.
Steps for safely removing the gas valve, manifold, and burners.
Procedures for cleaning burners, adjusting spark gap, and checking orifice projection.
Procedure for setting high and low stage gas valve pressure settings.
Steps to check unit operation and adjust manifold pressure and burner flames.
Description of the direct spark ignition system and IGC controller functionality.
Table listing LED indications and corresponding error code descriptions for the IGC.
Information on selecting and replacing unit orifices for optimal operation.
Table providing common heating problems, causes, and remedies.
Illustrations showing component locations for EconoMi$er IV, X, and 2 systems.
Summary table detailing logic for DCV, Enthalpy, Compressor, and Damper outputs.
Function of the ambient temperature lockout switch to prevent compressor operation below 42°F.
Details on control modes including Outdoor Dry Bulb Changeover and Differential Dry Bulb Control.
Using two enthalpy sensors to compare outdoor and return air for free cooling.
Using IAQ sensor for demand-controlled ventilation based on CO2 levels.
Setting the minimum damper position for building airflow during occupied periods.
Information on the time required for damper movement from full open to full closed.
Specifies compatibility with conventional thermostats and lack of support for space sensors.
Setting up occupied and unoccupied modes using jumpers or timeclock functions.
Considerations for DCV control, including equipment selection and proportional anticipatory strategy.
Procedure for setting CO2 sensor voltage output for minimum and maximum ventilation.
Procedure to prepare the EconoMi$er IV for troubleshooting or testing.
Procedure to check the supply-air sensor input and actuator response.
Steps to return the EconoMi$er IV to normal operation after troubleshooting.
Technical specifications for the W7220 economizer module, including electrical and environmental data.
Description of the economizer controller's LCD display, keypad navigation, and menu structure.
Voltage, transformer, and power consumption requirements for the economizer module.
Details on required and optional sensors for the W7220 economizer module.
Information on actuator signals and relay outputs provided by the economizer module.
Specifications for actuator signals and operating temperature/humidity ranges.
Wiring instructions for connecting the CO2 sensor to the W7220 controller.
Guide to using the W7220 controller's keypad for menu navigation and parameter changes.
Description of the menu hierarchy and how to navigate through settings and parameters.
Information on the economizer's screensaver and automatic exit after inactivity.
How the W7220 controller interacts with two-speed supply fans for economizer operation.
Steps for applying power and the initial display sequence after mounting the module.
Notes on how setpoints and advanced settings are restored after power interruptions.
Using the Status menu to check parameter values for configured devices and sensors.
Instructions on how to perform checkout tests for damper operation and configured outputs.
How alarm messages are displayed on the economizer module's LCD.
Ensuring the unit is installed correctly and checking for shipping damage.
Inspecting field-installed accessories and checking for potential issues via RTU-OPEN Alarms.
Procedure for checking gas piping for leaks before unit operation.
Notes on compressor mounting, internal wiring checks, and refrigerant service ports.
Steps to check compressor rotation direction by monitoring suction and discharge pressures.
Procedure for starting the unit in cooling mode and checking the refrigerant charge.
Verifying main burner ignition, heating controls, and evaporator fan operation.
Steps for purging gas supply line and checking electrical supply for heating operation.
Reference to specific instructions for PremierLink controller operation and configuration.
Guidance on manuals for installation, wiring, and troubleshooting of RTU-Open controllers.
Explanation of model series designation and unit heat type codes.
Details on available heat options and refrigerant system configurations.
Information on cooling capacities and available sensor options.
Details on indoor fan configurations and coil material options.
Information on base unit control types and available voltage configurations.
Details on economizer types, convenience outlets, and packaging options.
Information on electrical options such as SAV, VFD, and disconnects.
Data on circuits, compressors, refrigerant charge, and pressure trips.
Specifications for evaporator coil material, tube diameter, rows/FPI, and face area.
Details on the Humidi-MiZer coil material, tube diameter, rows/FPI, and face area.
Information on fan motor quantity, drive type, horsepower, RPM, frame size, and type.
Data on condenser coil type, length, height, rows/FPI, and face area.
Details on return air filter and outdoor air inlet screen sizes.
Specifications for the second circuit of the condenser coil.
Information on condenser fan motor quantity, drive type, HP/RPM, and fan diameter.
Details on return air filter and outdoor air inlet screen sizes.
Data on refrigeration system components and evaporator coil construction for RTPF coils.
Specifications for the Humidi-MiZer coil used in specific models.
Details on fan motor specifications for various static configurations.
Physical data for the first circuit of the condenser coil.
Physical data for the second circuit of the condenser coil.
Specifications for condenser fan motor quantity, drive type, and diameter.
Details on return air filters and outdoor air inlet screens.
Data on refrigeration system components and evaporator coil construction.
Details on Humidi-MiZer coil material, tube diameter, rows/FPI, and face area.
Fan motor specifications for various static configurations.
Physical data for the first circuit of the condenser coil.
Physical data for the second circuit of the condenser coil.
Specifications for condenser fan motor quantity, drive type, and diameter.
Details on return air filters and outdoor air inlet screens.
Data on refrigeration system components and evaporator coil construction for RTPF coils.
Details on Humidi-MiZer coil material, tube diameter, rows/FPI, and face area.
Fan motor specifications for various static configurations.
Physical data for the second circuit of the condenser coil.
Specifications for condenser fan motor quantity, drive type, and diameter.
Details on return air filters and outdoor air inlet screens.
Data on refrigeration system components and evaporator coil construction.
Details on Humidi-MiZer coil material, tube diameter, rows/FPI, and face area.
Fan motor specifications for various static configurations.
Details on stages, burners, connection size, rollout switch, and temperature rise for natural gas.
Details on stages, burners, connection size, rollout switch, and temperature rise for propane.
Details on stages, burners, connection size, rollout switch, and temperature rise for natural gas.
Details on stages, burners, connection size, rollout switch, and temperature rise for propane.
Tables showing fan RPM at different motor pulley settings for vertical units.
Fields for model number, job name, serial number, address, and technician details.
Checks before start-up including voltage, packaging removal, and condensate connection.
Checks for electrical, temperature, and pressure readings during start-up.
Recording suction and discharge pressures and temperatures for both circuits.
Verifying economizer settings, smoke detector shutdown, and fan/compressor rotation.
Step-by-step procedures for starting up the Humidi-MiZer system in cooling and dehumid modes.
| Refrigerant | R-410A |
|---|---|
| Compressor Type | Scroll |
| Voltage | 208/230V |
| Phase | 1 |
| Series | 48TC |
| Type | Air Conditioner |
| Cooling Capacity | 4 to 5 Tons |



 Loading...