CARVIN
®
GOLD SERIES OVAL POOL | USER MANUAL
4
INSTALLATION
Before starting the installation of your pool, make sure you have all the necessary
tools listed below. Check the contents of each of the boxes containing the parts of
the pool and make sure everything is there before starting your installation. All parts
included in the boxes are important and should all be installed. If parts are left out
from the installation, this could cause serious failure of the pool structure. Once the
installation of a swimming pool is started, it should be completed as soon as
possible.
If a part is missing or defective, please contact your CARVIN
®
retailer were your
purchase was made.
TOOLS
• Shovel
• Water hose
• Hammer
• Rubber mallet
• Soil Compactor (manual or mechanic)
• Pliers
• Vacuum cleaner
• Gardening rake
• Measuring tape
• Drill, ratchet or adjustable wrench
• Screwdriver bit #3 Phillips or Robertson
• Hexagonal socket 7/16”
• Wheelbarrow
• Punch 3/16” diameter
• Stepladder
• Vinyl covered hook, rope and tent pegs
• Hexagonal Socket ¾’’
• Hex Key ¾’’
• Linear level/transit level
• Tape measure
• Pump
• Filter
• Skimmer
• Water return
REQUIRED MATERIAL
• Duct tape 2”
• Nails or rods 8” (number of uprights +1)
• Wall stabilizing hooks (number of uprights)
• Sand (see below quantities)
• Patio slab (equal to the # of uprights)
• Prefabricated cove sections (option)
• Under liner pool carpet
• Plywood sheet ½”, (2x) 3’x3’
• Cardboard 16”x9“
• Wooden plank 2”x4” of length equal to the radius of the pool
• Straight plank
• Patio slabs 8x4x2’’
• CARVIN
®
pool parts
PREPARING THE SITE
INFORMATIONS REQUIRED FOR SWIMMING POOL INSTALLATION
POOL SIZE
12’x 15’x 18’x
15’ 18’ 21’ 24’ 21’ 24’ 30’ 33’ 39’
POOL OVERAL
FINISHED WIDTH*
13’2’’ 13’2’’ 13’2’’ 13’2’’ 16’2’’ 16’2’’ 16’2’’ 19’2’’ 19’2’’
POOL OVERAL
FINISHED LENGHT
16’ 19’ 22’ 25’ 21’6’’ 24’6’’ 30’6’’ 34’2’’ 40’2’’
FOUNDATION
DETAILS
REFER TO PAGE XX
CONCRETE PATIO
BLACKS 8X16X2’’
4 6 8 10 6 8 12 12 16
SAND REQUIRED
(TONS)
2.5 3 3 3 3.5 3.5 4 5 5.5
* Refer to Installation overall dimensions to be sure of burried structure dimensions will t.
The Warranty of the Product will be canceled if all instal-
lation requirements and guidelines are not respected.
IMPORTANT
WARNING
Be aware that the installation diagrams are based on a
15x24 oval pool, if you have a dierent size pool you will
nd that your pool has more/fewer uprights sections
to install.
Be aware that STEP 1 Through STEP 3 will be more time
consuming and labor intensive than the rest of the steps,
since the foundation of your oval pool must be done
right in order to increase the longevity of your pool.
The permissible tolerance of the soil in the straight metal
structure and the round ends must be a maximum of
± 1/8 in (3,18 mm) across the whole pool. If the general
level tolerance of the pool is not respected this could
void the warranty.
STEP 1
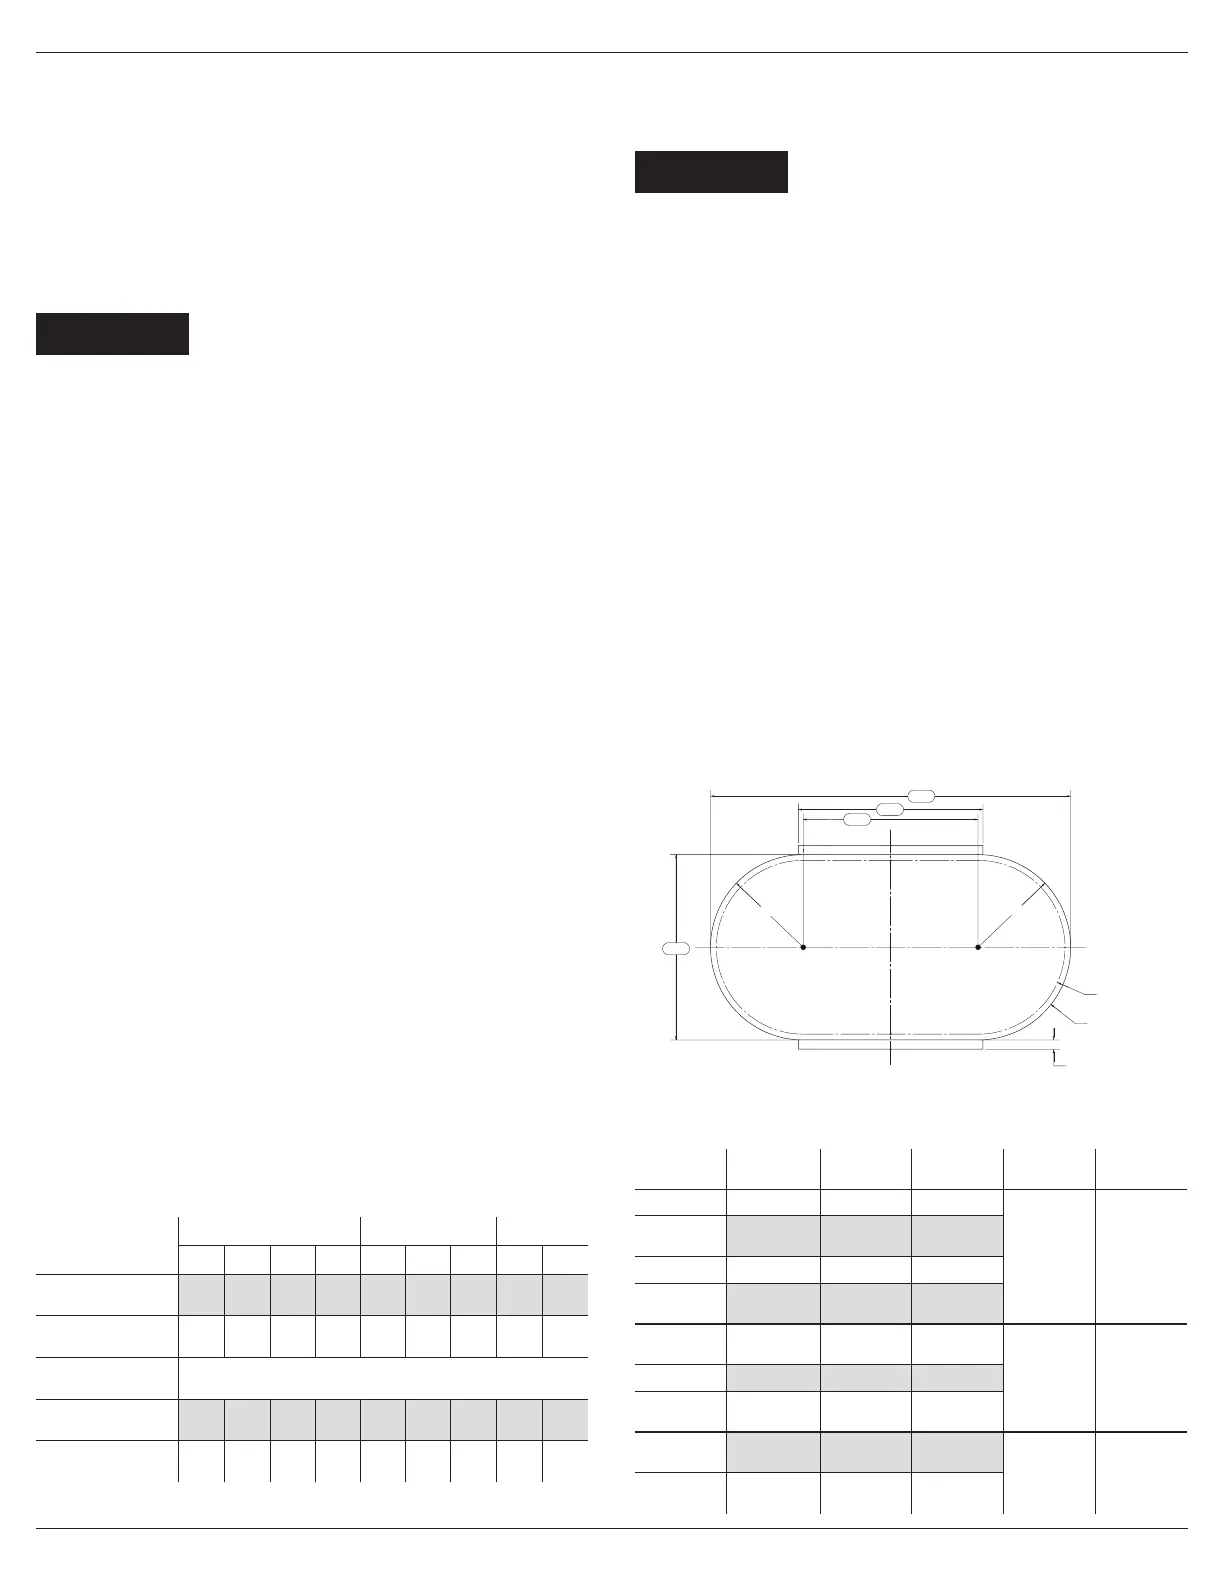
Refer to the ‘’Marking Diagram’’ and ‘’Marking Dimension Table’’. Once you have the
measurements and have the pool location, you will mark the soil with bright
colored spray paint that will not wear o while working the ground. All pools require
to have extra space to be able to work. Also, the pool buried foot beam will extend
12’’ past the pool wall.
1. Drive a stake at point A and Point B at least 6’’ in the ground. This will dene the
centers of round sections and align the straight sections at measure specied in
the table.
2. Tie a rope that will be attached to a spray can be able to draw the 2x half round
sections. Use the Radius inscribed in the table to tie the can at the right length
and spray the 2 halves.
3. Measure from the middle of the stakes to draw a line to Join the 2 halves with
a straight line on each side to form an Oblong.
4. Draw the outside trench corridor as specied on the Marking Diagram.
Radius
D4
D1
D2
D3
A
CL
CL
B
Radius
Pool wall
23 cm (9’’)
Both sides
Working area
outline
MARKING DIMENSIONS
M (FT)
Pool size
Center
(D1)
Sideline
(D2)
Lenght
(D3)
Width (D4) Radius
12x15’ 0.19 (3’0’’¼) 1.18 (3’11’’) 4.72 (15’6’’)
3.96 m (13’)
1.98 m
(6’6’’)
12x18’
1.83
(6’0’’
7/16
)
2.10 (6’11’’) 5.65 (18’7’’)
12x21’ 2.76 (9’0’⅝) 3 (9’11’’) 6.55 (21’6’’)
12x24’
3.68
(12’0’’⅞)
3.93
(12’11’’)
7.49 (24’7’’)
15x21’
1.83
(6’0’’7/16)
2.10 (6’11’’) 6.55 (21’6’’)
4.87 (16’) 2.43 (8’)15x24’ 2.76 (9’0’’⅝) 3 (9’11’’) 7.49 (24’7’’)
15x30’
4.60
(15’1’’⅛)
4.85
(15’11’’)
9.32 (30’7’’)
18x33’
4.60
(15’1’’⅛)
4.85
(15’11’’)
10.24
(33’7’’)
5.79 (19’) 2.89 (9’6’’)
18x39’ 6.44 (21’1½) 6.70 (22’)
12,07
(39’8’’)
 Loading...