Alarm Mode
▼
▼
▼
▼
Stopwatch Mode
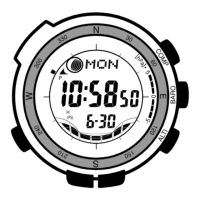
GENERAL GUIDE
TIMEKEEPING MODE
• Hold down
+
/M
+
in the Timekeeping Mode to
display the Telememo data you last accessed.
• Alarm data (the data that was on the display the
last time you exited the Alarm Mode) is shown
on the display as long as you hold down
÷
/MC
in
the Timekeeping Mode.
To set the time and date
1. Press A while in the Timekeeping Mode. The
seconds digits flash on the display because
they are
selected
.
2. Press B or C to change the selection in the
following sequence. Holding down either button
changes the current selection at high speed.
• While any selection is flashing, press E to switch between 12-hour and 24-
hour formats.
D
E
+
/M
+
×
/MR –/M–
7
890
4
56
• PM
1
23
P
A
BC
÷
/MC
SPC
=
PM indicator
Day of week
Year
Month – Date
Key pad
Hour : Minutes
Seconds
Seconds
Left Hour
Digit
Right Hour
Digit
Right
Minutes
Left
Minutes
Right
Month
Left
Month
Right
Year
Left
Year
Right
Date
Left
Date
Press B
Press C
• Press B to change from mode to mode. Hold down B for one or two
seconds in any mode to switch back to the Timekeeping Mode.
• In any mode, press C to illuminate the display for about two seconds.
3. While the seconds digits are selected (flashing), press
0
to reset the
seconds to
00. If you press
0
while the seconds count is in the range of
30 to 59, the seconds are reset to
00 and 1 is added to the minutes. If the
seconds count is in the range of 00 to 29, the minutes count is unchanged.
4. While any other digits (besides seconds) are selected (flashing), press the
keys on the key pad to input the numbers you want.
• If you are using the 12-hour timekeeping format, the A (AM) or P (PM)
indicator flashes along with the hour and minutes digits. While either hour
digit or minutes digit is flashing, press
• PM
to switch between AM and PM.
• The date can be set within the range of January 1, 1995 to December 31,
2094. Inputting a year from 95 to 99 is set as 1995 to 1999, while an input
from 00 to 94 is set as 2000 to 2094.
5. After you set the time and date, press A to return to the Timekeeping
Mode.
• The day of the week is automatically set in accordance with the date.
• If you do not operate any button for a few minutes while a selection is
flashing, the flashing stops and the watch goes back to the normal
Timekeeping Mode automatically (no digit’s flashing).
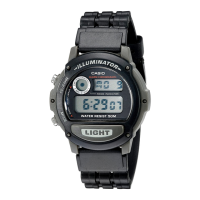
About the backlight
In any mode, press C to illuminate the display for about two seconds.
• The backlight of the watch employs an electro-luminescent (EL) light, which
loses illuminating power after very long use.
• The illumination provided by the backlight may be hard to see when viewed
under direct sunlight.
• The watch will emit an audible sound whenever the display is illuminated. It
does not indicate malfunction of the watch.
• The backlight automatically turns off illuminating whenever an alarm sounds.
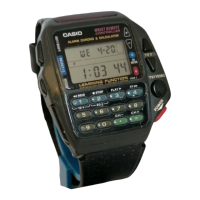
VOICE MODE
The Voice Mode lets you record and playback
your voice or other sounds. You can also clear
recordings when you no longer need them.
• The area number shows a value from 1 to 5 that
indicates the location of a recording and number
of recordings currently in memory.
• The watch also has a built in speaker.
• If you do not operate any button for 2 or 3
minutes while in the Voice Mode, the watch
automatically goes back to the Timekeeping
Mode.
Recording Duration
The watch has enough voice memory for up to 30
seconds of sound data. You can make one
recording 30 seconds long, or up to five recordings
that total up to 30 seconds. Whenever you make a
recording, the sound data is stored together with
the date and time that the recording operation
began.
D
E
P
A
BC
Month – Date
Area number
Graphic display
Hour : Minutes
Mode indicator
Microphone
Important!
• You can perform record, playback, and clear operations in the Timekeeping
Mode, Voice Mode, or Telememo Mode. In the Timekeeping Mode and
Telememo Mode voice memory contents can be played back in sequence
starting from the newest recording. In the Voice Mode, you can select a
specific area for playback.
• Total recording time is 30 seconds, and a full 30 seconds of recording are
provided when only a single recording is stored in voice memory. A full 30
seconds of recording may not be provided when more than one recording is
stored in voice memory (due to memory used up by memory partitioning).
• Once voice memory is full, you will not be able to record any more until you
clear all existing data.
• It is always a good idea to check the number of recordings already in voice
memory and the voice memory’s remaining capacity before starting a new
recording.
• All alarms (including the hourly time signal and Countdown Alarm) are
temporarily turned off while a recording operation is being performed. Any
alarm that occurs during a recording operation will sound after the recording
operation is complete.
• If playback produces a sound that is broken or unclear, try changing the
distance between the source of the sound and the microphone. Good
results can normally be obtained by speaking clearly in a normal voice with
about 5cm (2 inches) between your mouth and the microphone.