Music Presets
E-59
1.
Perform steps 1 through 4 of the procedure
under “Chord Progression Editing Flow” on
page E-56.
2.
While holding down the R-13 (FUNCTION)
button, press the C-13 (MENU) button.
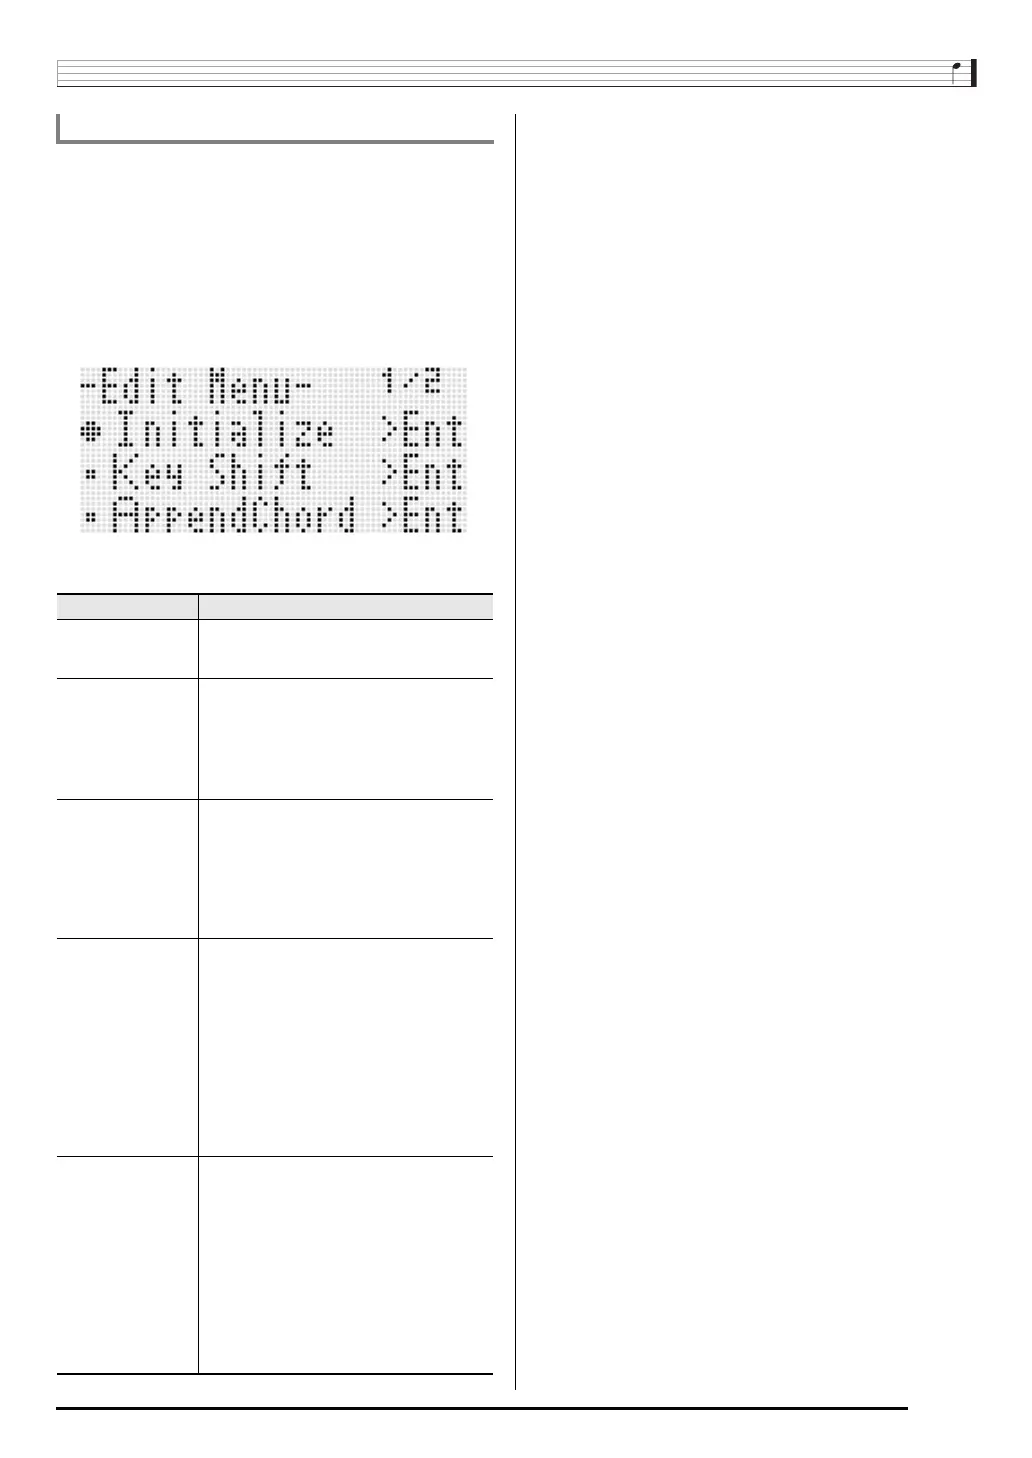
3.
This displays a screen like the one shown
below.
4.
Execute the desired menu operation.
5.
In response to the “Sure?” message that
appears, press the R-14 (YES) button to execute
the operation you performed in step 4 or the
R-14 (NO) button to cancel.
• Pressing the R-14 (YES) button starts the process. The
message “Please Wait” will remain on the display if the
process takes time to perform. Do not perform any
operation while this message is on the display.
To perform menu operations
To do this: Do this:
Delete all existing
chords
(Initialize)
*1
Use the R-17 (t, y) buttons to move the 0
to “Initialize” and then press the R-16
(ENTER) button.
Key shift all existing
chords
(Key Shift)
1. Use the R-17 (t, y) buttons to move the
0 to “Key Shift” and then press the R-16
(ENTER) button.
2. Use the dial or R-14 (–, +) buttons to
specify how much you want to shift the key.
• You can specify a value from –5 to +6.
3. Press the R-16 (ENTER) button.
Insert another music
preset chord
progression
following the chord
progression data of
the preset being
edited
(AppendChord)
*2
1. Use the R-17 (t, y) buttons to move the
0 to “AppendChord” and then press the
R-16 (ENTER) button.
2. Use the dial or R-14 (–, +) buttons to scroll
through the music preset numbers until the
one you want is displayed, and then press
the R-16 (ENTER) button.
Delete existing
chords in a specific
measure
(Delete Measure)
*3
1. Use the R-17 (t, y) buttons to move the
0 to “DeleteMeas.” and then press the
R-16 (ENTER) button.
2. Use the dial or R-14 (–, +) buttons to
specify the start measure of the delete
operation.
3. Press the R-17 (y) button to move the
thick brackets (%) to “Size”.
4. Use the dial or R-14 (–, +) buttons to
specify the number of measures you want
to delete.
5. After everything is the way you want, press
the R-16 (ENTER) button.
Insert blank
measures at a
specific location
(Insert Measure)
*2
1. Use the R-17 (t, y) buttons to move the
0 to “InsertMeas.” and then press the
R-16 (ENTER) button.
2. Use the dial or R-14 (–, +) buttons to
specify the start measure of the insert
operation.
3. Press the R-17 (y) button to move the
thick brackets (%) to “Size”.
4. Use the dial or R-14 (–, +) buttons to
specify the number of measures you want
to insert.
5. After everything is the way you want, press
the R-16 (ENTER) button.
*1 Deletes all existing chords, and replaces it with four
measures of data with a C-chord at the first beat of the first
measure (user preset initial data).
*2 You will not be able to execute this operation if the number
of measures specified exceeds 999.
*3 You cannot delete all measures. If you specify range that
includes all of the measures, the first measure will remain
without being deleted.