— 8 —
6. Remove 4 connectors then the front panel.
CN9
CN212
CN206
CN203
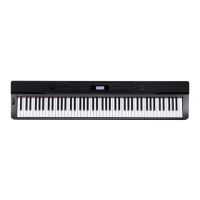
■ Removing the speaker
7. Remove 7 screws then the speaker cover.
* Take the same procedure for the speaker on the right side.
8. Remove 4 screws then the speaker.
* Take the same procedure for the speaker on the right side.
■ Removing the PCBs (M404-CNA1, M404-CNB2, M404-CNB3, and M404-CNB4).
9. Remove the volume knob.
M404-CNB3 PCB
M404-CNB2 PCB
M404-CNA1 PCB
M404-CNB4 PCB
10. Remove 10 screws and then the PCB (M404-CNB3).
11. Remove 16 screws and then the PCB (M404-CNA1).
12. Remove 10 screws and then the PCB (M404-CNB2).
13. Remove 3 screws and then the PCB (M404-CNB4).

 Loading...