IMPORTANT - READ BEFORE USE
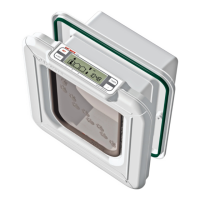
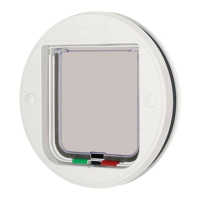
1. ‘PROG’ (PROGRAM) button
2. Microchip / I.D. Disc search indicator
3. Low battery indicator
4. AM/PM indicators (12Hr clock mode)
5. ‘TIMER’ function indicator
6. ‘TIMER’ mode ‘Start/Finish’ indicators
7. ‘TIMER’ button
8. ‘4 WAY’ button
9 - 11. CAT 1 - 3 location symbols
12. ‘4 WAY’ lock indicators
13. Alphanumeric display (normally states time)
14. ‘ADVANCE’ button
IMPORTANT SAFETY INSTRUCTIONS
• Readallinstructionsbeforeinstallingorusingthisproduct.
• Registeryourpurchaseon-lineatwww.pet-mate.com
(seeguarantee).
• Donotallowchildrentoplaywiththisproduct.
• Inspectproductregularlyforcorrectoperationand
damage.Donotuseifindoubt.
• Thisproductisdesignedforusewithpetsonly,as
describedintheseinstructions.
• Thelockingsystemofthispetdoorisnotintendedasa
securitydevice.
• Thispetdoorisnotareresistantdoorandmustnotbe
usedwherethereisariskfromrespread.
• Theinstallerofthispetdoorisresponsibleforcomplying
withallrelevantbuildingregulations.
• Duringinstallationofthispetdoortakeappropriate
care.Followsafetyinstructionsforalltoolsandwear
appropriatepersonalprotectiveequipment.
• Disposeofallpackagingmaterialproperly.
NOTE: Plastic bags could cause suocation – keep away
from children and animals.
SAVE THESE INSTRUCTIONS
1. Introduction
ThankyouforchoosingtheCatMateEliteMicrochipCatFlap
withTimerControl.
CAREFULLY READ THESE INSTRUCTIONS AND PROGRAM
/ TEST THE CAT FLAP BEFORE YOU INSTALL IT.
TheCatMateEliteMicrochipCatFlapwithTimerControl
allowsentryforupto9catsintoyourproperty.Italsoallows
youtocontroltheexitofallyourpetsusingatimeror4way
lock.Furthermore,itwillallowyoutomonitorthemovementof
upto3individualcats-showingwhenyourcatlastenteredor
leftthehouse,andhowmanyhourssinceyourcatlastused
theap.
Thecatapissuitableforallpopularmicrochips.Alternatively
itmaybeoperatedbyaCatMateI.D.Disc(available
separately).YoumaywishtouseanI.D.Discforcatswithouta
microchiporintheeventthatyourcat’smicrochipisfaultyor
poorlypositioned.
To ensure that your chosen settings cannot easily be tampered
with, we have made the control buttons so that they need to be
pressed rmly to operate.
Ifyouwishtostopanytask(exceptprogramming)atanystage,
thesystemwilltimeoutafter60seconds.
Settingswillnotbesavedunlessyoupressthe‘PROG’button.
2. Fitting the Batteries
2.1Removethebatterycoverbypushingthebatterycover
upwards(seeFig.2).Thecoverwillsnapo.
2.2Insert4xAA(R6)batteriesasshown(Fig.3),byslidingthe
2endbatteriesinrst.
2.3Thecatapwillself-checkforupto60secondsafter
whichonlythe‘IN&OUT’arrowswillbevisibleontheLCD
display.Theapisreadytoprogram.
Allpopularbatteriescanbeusedincludingrechargeable
batteries,butthelowbatteryindicator(
3
,Fig.1)willonly
workcorrectlywithalkalinebatteries.Goodqualityalkaline
batteriesshouldlastapproximately12months(depending
onnumberofcatsandusage).YouMUSTNOTuselithium
batteries.
3. Programming
Thenextstepistoprogramthemicrochip(orI.D.Disc)
belongingtoeachcat.
NOTE: The programming sequence is time sensitive and
the LCD will revert to the normal display if each step is not
completed within approximately 15 minutes.
Inorderfortheaptorecogniseyourcat(s)microchipyouneed
todothefollowing:
3.1Pressandholdthe‘PROG’buttonfor5seconds(
1
,Fig.
1)untilthesearchindicator(
2
,Fig.1)appears.
3.2‘CAT1’andthenumber‘1’willash-therewillbelines
movingaroundtherst‘TWOZEROS’.
3.3Toprogramyourcat’smicrochip,encourageyourcatto
slowlypassthroughthetunnelbyholdingtheapopen
asshowninFig.4.Alternatively,toprogramyourcat’sI.D.
Disc,placethefrontoftheI.D.Discinthetunnelopening
(Fig.5).
3.4Whenprogrammed,the‘TWOZEROS’willdisappearand
‘Pr1’willash.
3.5Pressthe‘PROG’buttontosavethesetting.
For additional cats, up to a maximum of 9, repeat steps 3.1
to 3.5.
4. Fitting Instructions (see Figs. 8a to 16)
IMPORTANT:
• Do not cut tunnel of cat ap.
• To check that your cat’s microchip is correctly positioned
and functioning, we strongly recommend you program the
cat ap for all your cats before installation (see Section 3).
Then check the cat’s microchip operates the lock when
the cat’s head is pushed gently against the ap as shown
in Fig. 6.
4.1. Wooden Doors 0-50mm (0-2”) Thick
4.1.1Placeexteriorframeindesiredpositionondoor.We
recommendthebottomoftheapertureisapproximately
150mm(6”)abovegroundlevel.(Fig.8a).Ifyoumustt
higherconsiderprovidingasteptohelpyourcatenter.
4.1.2Drawaroundtheaperture(Fig.8a),thenusinganelectric
jigsawcut4mm(
5
/32”)outsideoftheline.(Fig.8b).
Becarefultocutholesquaretothedoor,particularlywith
thickerdoors.Ensureinteriorframeisfreettinginhole.
4.1.3Determinethicknessofdoorpanel,(t).(Fig.10).
4.1.4Holdingtheinteriorframeandtheexteriorframein
position,markthe2screwholes.(Fig.11).
4.1.5Removetheframesanddrillscrewclearanceholesin
panelto6mm(
1
/4”)diameter.
4.1.6Positioninteriorframeoninsideofdoorandscrew
exteriorframetoitbyusingappropriatescrewsforpanel
 Loading...