5958
ENGLISH ENGLISH
9. Scheduling
10. Edge cleaning
11. Power levels
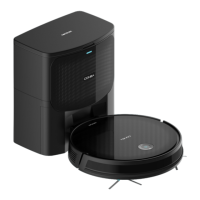
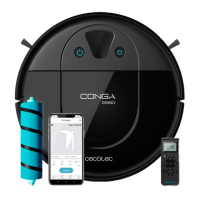
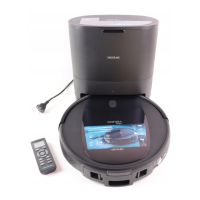
Conga Home 2000
Fig. 16
Front part
1. Cover
2. Dust tank
3. Charge/empty function light indicator
4. IR lenses
5. Charger plug in
6. Suction inlet
Inside
7. Cover sealing ring
8. Fan lter bracket
Back
9. Air outlet
Base
10. Transparent dirt tube cover
2. BEFORE USE
- Take the product out of the box.
- Remove all packing material and keep the original box.
- Make sure all parts and components are included and in good conditions. If any sign of
visible damage is observed, contact immediately with the ocial Technical Support
Service of Cecotec.
- Place the Conga Home 2000 base on a at surface, 6 cm from the wall. Fig. 17
- Maintain a separation of at least 1.2 m in front and 0.5 m on both sides of the unit. Fig. 18
- Connect the Conga Home 2000 base to a power socket. Wind and store the remaining cord
in the lower part to prevent accidents. Fig. 19
Note
Remove all objects around the robot such as clothing, papers, cables, curtains or other fragile
objects. Fig. 20
- If the area to be cleaned has a balcony or stairs, a physical barrier must be placed in order
to prevent product damage and ensure safe operation. Fig. 21
- Direct exposure to sunlight or great light contrasts may aect to the correct operating of
the sensors. When exposed, the robot will stop. Replace it to start working again.
- Install both side brushes in their corresponding slots, located on the robot’s bottom part.
Press until it clicks to make sure they are properly xed. Fig. 22
- Press the on/o switch located on the bottom part of the robot. Make sure the on/o
switch is on the On position. Fig. 23
- Place the robot on the Conga Home 2000 base and make sure the charging terminals
match. Once the robot is properly placed, it will beep once and the power button will light
up If the light is oscillating orange, it means the battery is not completely charged. To
ensure the longest cleaning time, wait until the light is steady blue. This will indicate the
battery is fully charged and the robot is ready to be used. Fig. 24
Information about your Conga Home 2000 base
The self-emptying base includes a loading and emptying function and a new dirt bag. After
cleaning, the robot will automatically return to the self-emptying base. If the robot does
not have a water tank installed, the self-emptying base will empty the dirt tank and charge
it. If the water tank is installed on the robot, it will be charged automatically. When the
robot is on the self-emptying base, remove the water tank and the self-emptying base will
empty the dirt tank and charge the robot.
3. OPERATION
Start cleaning
- Hold down the power button on the robot to turn the robot on.
- Press the power button on the robot or on the remote control to start cleaning.
Note
If the robot runs out of battery during cleaning, it will automatically return to the Conga Home
2000 base. Once the battery is fully charged, the robot can start a new cleaning cycle.
Warning
If there is no good access to the Conga Home 2000 base, the robot will not have a good access
to it. If the robot could not access and has stopped, take it manually to the Conga Home 2000
base.
Pause
- Press the power button on the robot or on the remote control to pause the cleaning
process.
- Press the power button on the robot or on the remote control to resume the cleaning
process. Fig. 25
Return to the Conga Home 2000 base
Press the back home button on the robot or on the remote control in order to send the robot to
the Conga Home 2000 base.