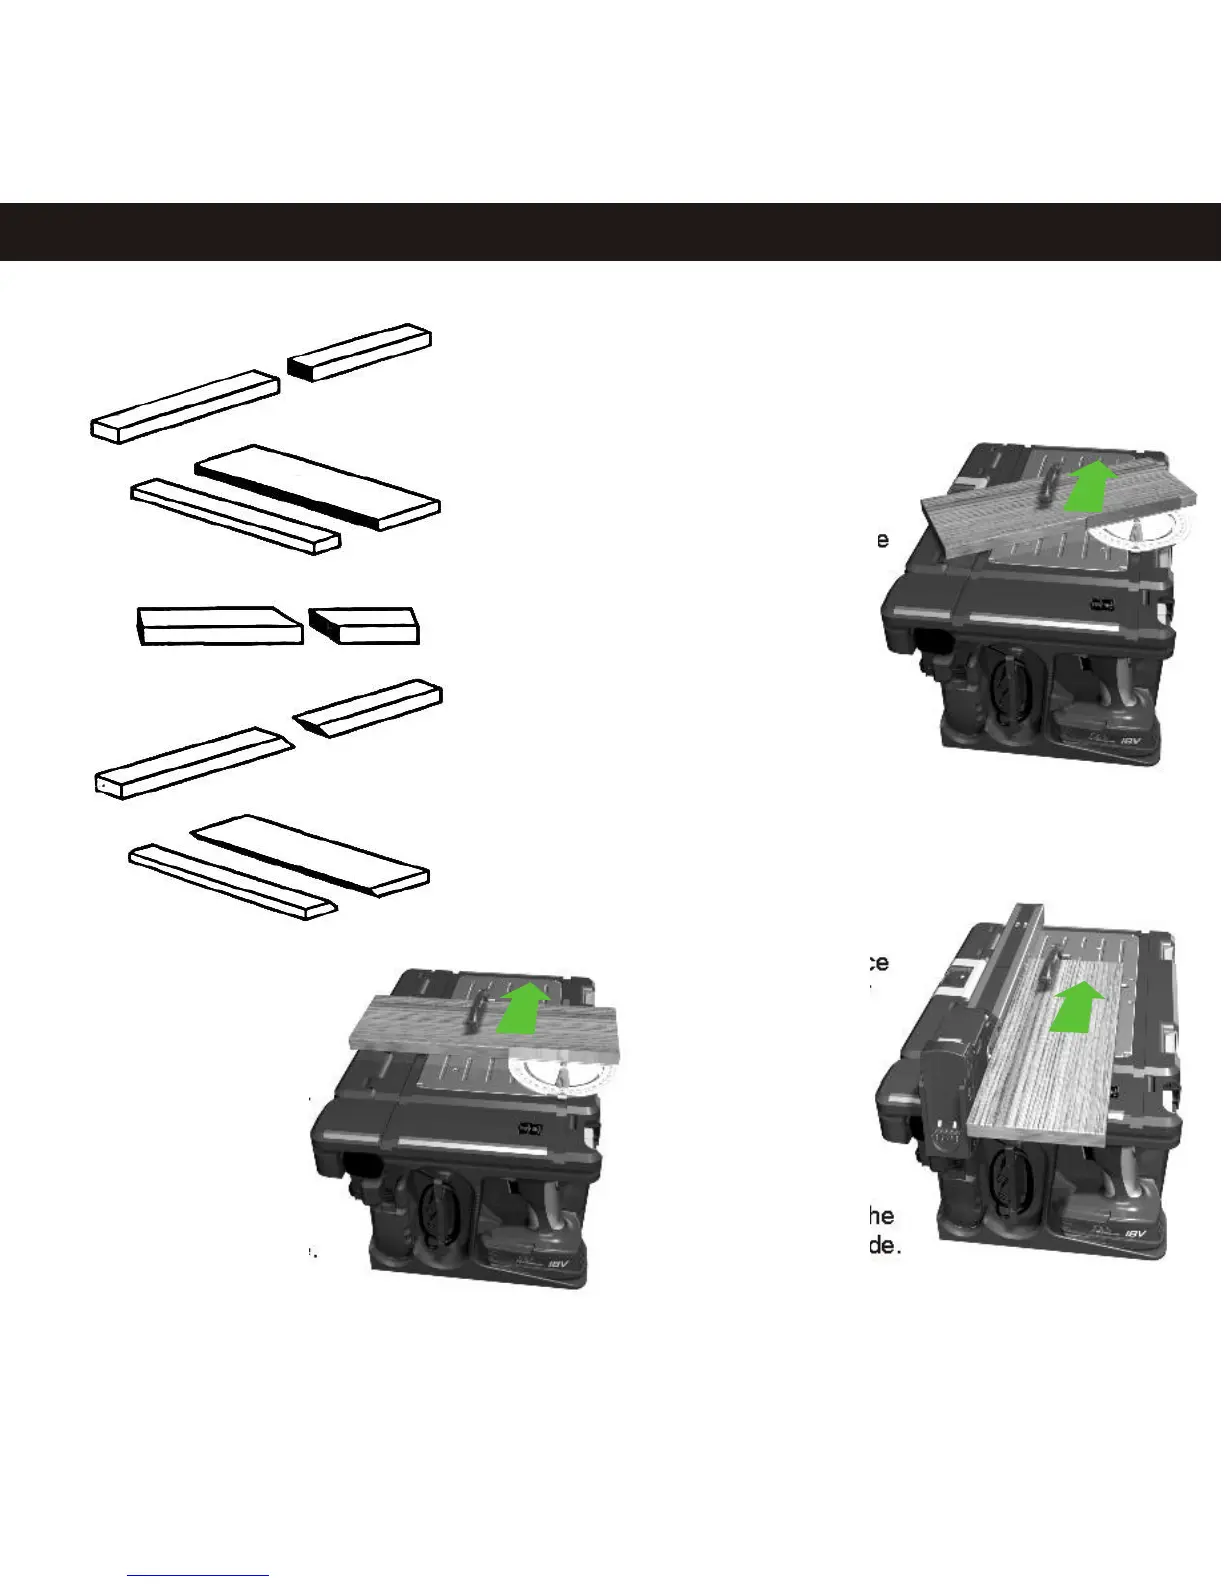
Miter Cut
Rip Cut
1. Position the fence
the desired distance
from the blade for the
cut. Securely lock the
fence on the table by
pressing the post slider
head down firmly.
3.
1. Remove the fence
2. Adjust the protractor
to the desired angle for
your cut.
3. Put the protractor
into a groove on the
saw table.
4. Hold the workpiece
and protractor firmly
together and feed
them slowly into the
saw blade.
Hold the workpiece
and protractor firmly
together and feed
them slowly into the
saw blade.
4. Use the provided
push stick or a push
block to move the
workpiece through the
cut and past the blade.
Cross Cut
1. Remove the fence
2. Adjust the protractor
angle to 90°.
3. Put the protractor into
the groove at the front of
the saw table.
4. Hold the workpiece
and protractor firmly
together and feed
slowly into the saw blade.
them
Table Saw - Operating Instructions 10.4
Switching Table Saw On and Off
1. Setup the table saw to your cutting
requirement with the use of the accessory
provided (parallel fence, protractor or push
stick).
2. Switch on the machine by pressing the green
operation button above the charger dock.
3. Hold the workpiece firmly with both hands and
feed into the saw blade slowly. For narrow work
which has the fence set closely to the blade use
the push stick end of the post lever to hold the
work down next to the blade.
1. To start the saw, press the green operation
button above the charger dock.
2. The machine will now run continuously.
3. To stop the machine, press the red operation
button above the charger dock.
NOTE: When the table saw is configured in the
way you require it is time to add a
POWERhandle into the charger dock, this will
supply power to the case.
NOTE: The table saw will not work unless the
table saw shield is correctly installed and the
case lid is shut. If the case is connected to the
mains then the POWERhandle will be charged
when the table saw in not in operation.
Making a Cut
When he ut
is
urn sa of
4.
t c
made, t the
w f by
res
t
but o p sing he red
t n.
5.
W
or
h l
t
a om e ait f
t e b ade to come o
c
plet
stop
bef ov t wo
pi e.
ore rem ing he rk ec
Adj s n t e
w
u
ti g h
T
able Sa
CA O .
A w ur
t
he
able aw UTI N
l
ays ens
e
hat t
t s is
s
c off
a t
P handle
s
r ov
wit
hed
nd he
OWER
i em ed
bef
e
m nt
m
or any
adjust
e
s are ade.
1.
T adj t
t
ade t
t
li
,
and
o
us
he bl dep
h,
open he d
r t
h ent
l ck t lower t
elease he dept adjustm
o
hen
he
c
ular aw
o pos t
c rec
ount
irc
s t ex
e he
or
t am of
b
ade, t
k h
dj
t ent
ev
.
l hen reloc t
e a us m l er
E
o t c
t per
orm
e, tNOT
:
T
give bet er
ut ing
f
anc he
dept
s
be
t so
he
blade
h
hould
se that t upper
s t bl de
gher t
t
w piece
point of he
a
are hi
han
he
ork
im
ely
m
/ i
o m
4 by
approx
at
3 m
(1 8 n) t 6m
(1/ in).
us he
ang e,
open
l
and
2. T
o adj t t
blade l
the
id
t
t
bev gl
oc t c
r
adjus
he
el an e l k knob on
he i
cular
aw o
des
r
c t ng
gls
t
the
i
ed
ut
i an e.
o h wi
t
of
a ut when
ing he
3.
T
adjust t e d h
c
us
t
loos
t
f
e
i
he
t head fence
en
he enc
by rais
ng t
pos
li
el
e he
een r
t h s der
up. R
eas t
gr hook and eat
ac it
you des w
dt us
t
po li
at
r ired i h.
P h he
st
s
der head
own
o
ight
t nce t
t t
s ac
d
t t
en
he fe
on o he able urf
e.
Table Saw - Operating Instructions
10.4
Cutting depth @ 0º:
(20mm) ~ (38mm)
Cutting depth @ 45º:
(14mm) ~ (27mm)
Table Saw Different Cut Types
Cross Cut
Rip Cut
Miter Cut
Bevel Cross Cut
Bevel Rip Cut
Cross Cut
Miter Cut
Rip Cut