Scroll Saw - Assembly
12.3
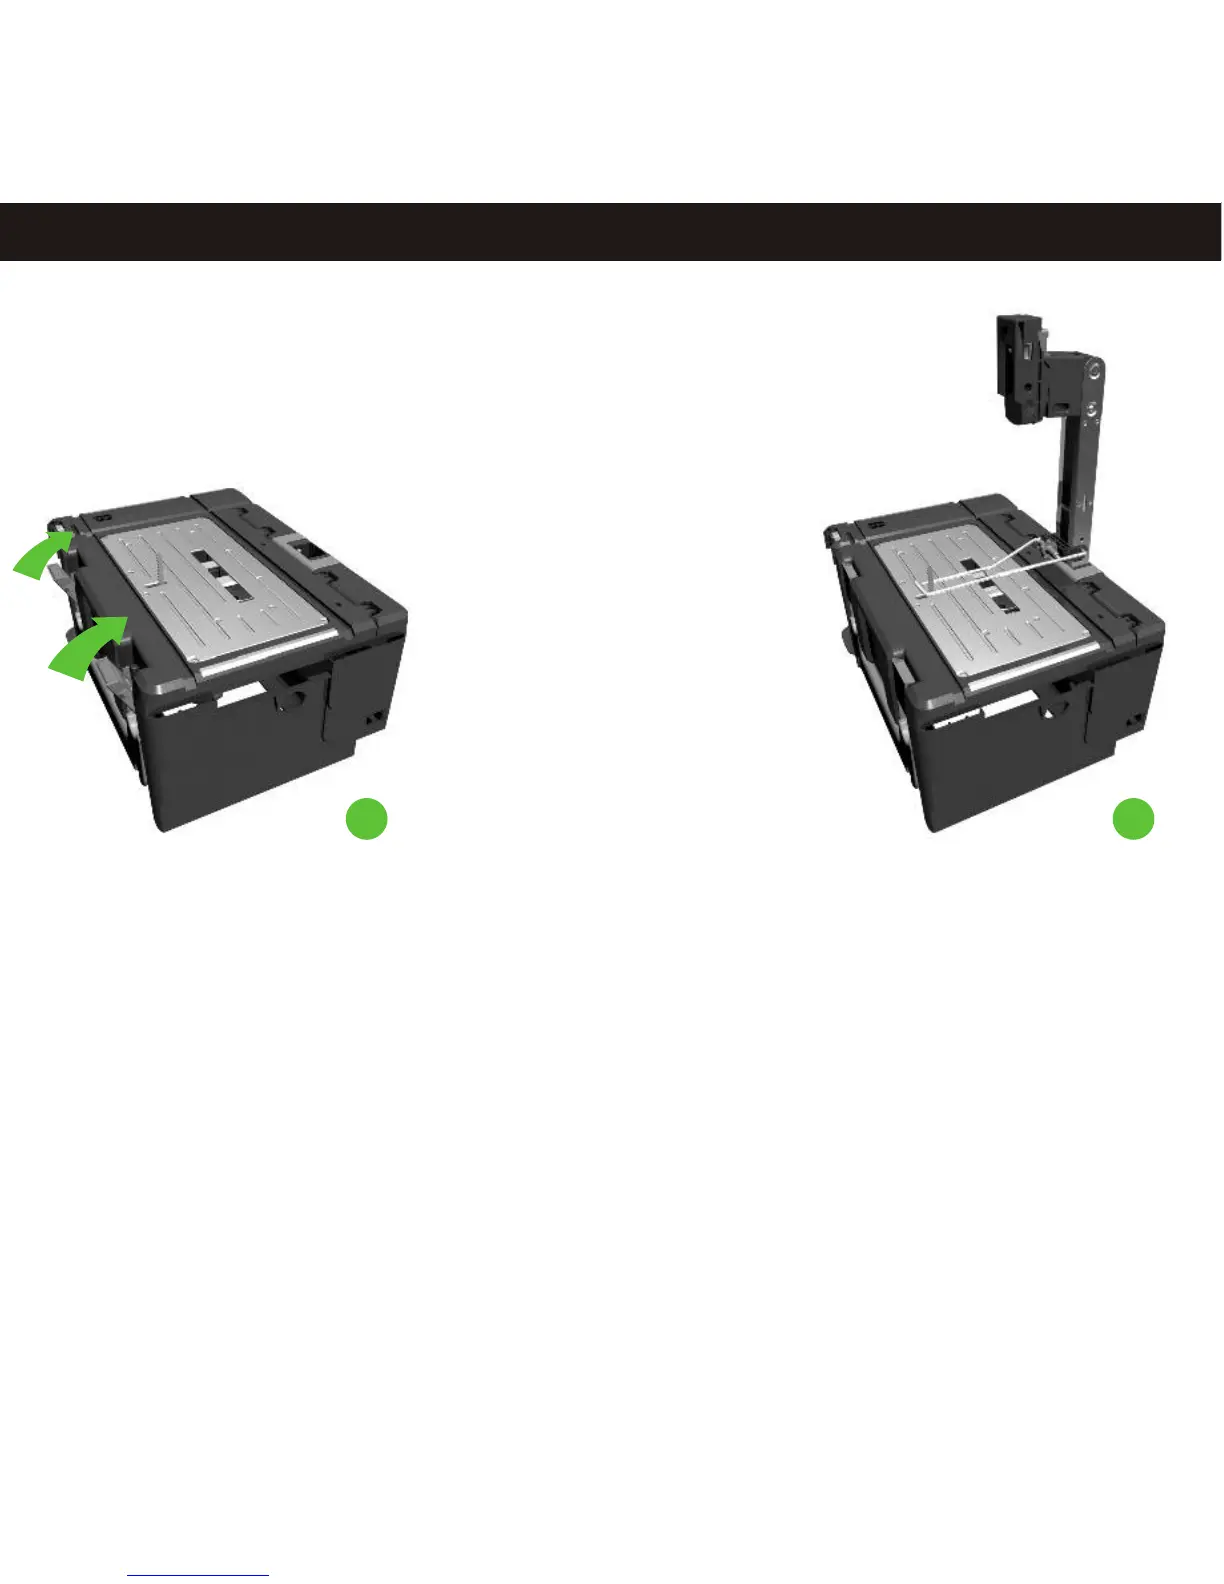
5. Close the lid. Snap shut both
the case latches.
6. The table clamp can be fitted to
press the work piece against the
work surface. First install the post
into the vertical position at the
highest level. Rotate the
adjustment knob until the open
jaws can be passed over the post.
Align the bar ends to fit onto the
holes on the post and re-tighten to
secure in place. The tighter the
adjustment to the clamp knob the
more pressure is applied to hold
down your work.
7. Only after full installations and
adjustments have been made
should the POWERhandle be
fitted into the charger dock to
enable the product.
8. The scroll saw is started and
stopped by the main case
operation ON/OFF button above
the charger dock.
Scroll Saw - Operating Instructions
12.4
M ng P c C
t
aki
o
ket
u
s
1.
Us t dr
ll s
or
ril
t bor
a on
he e
he i
pres
d
l
o e
hole t
i
side he ea
ou
to
rem e, c
to
n of
t ar
y want ov
lose
t c
t
l
ns
that
t
drill d amet is he ut ing
ine. E ure
he
i
er
grea
er han th bl
de
by 1 2mt t e
a or
m
2. P
e he
over t s
roll s
ade and
lac t
hole he c
aw
bl
ali
n he
ut
i face t
blade h he g t
c t ng
of he
wit
t
direc
ion
ut
and our m
ed
ne. or
t
st
of
c y ark li F
hi
oper ion
ou
l
e
o
em e he
able at
y
wil hav
t
r ov
t
t
c
p
d your
wor
eat i
. N
lam
or
sli
e
k
undern
h
t ow
c
inue
o t
2
ak Cut
’.ont t
s age of ‘M ing s
Maki
g i t
o
Corn r C
t
n
T gh
r
e
u
s
E
ry and
ut
a ur w
c
is
t
NOT : Don’t
t
c c
ve hi h
oo
i
t
by
or
i the ade
his wil
put undue
t
gh
f
c
ng
bl . T
l
s on t
blade using
o
nap.pres
ure
he
ca
it t
s
f
y int t
m e poc
et cu
h nternal I
ou
end o
ak a
k
t
wit
i
unded orner it
is best to
the l
ess
ro
c
s
use dril pr
irs h
he or t
diam er drilf t wit t c
rec et l.
ex er or
ont n your
c
t
tFor
t nal c ners
c
i
ue
ut pas
he
our m
t
r gn t wor
piec wit
y ark and
hen
eali he k
e
h
he bl
f
cing t
c ect d r tion.t
ade a in
he
orr
i
ec
Or
en
ge
o he
ight ex ernal orner
m
e
Wh you
t t t
t t c
ov
he
work
piec gent
ba
f war at
tt
e
ly
ck and
or d
he
sam
ti
e rot
ing
he
ork in
he
i ed
e
m
at t
w
t
des r
di ecti
t
e
ar
t c
h
o
he
r on o
nl ge
he ut
widt
s t blade
can tu
enough t al w
t y
ark
rn o
ign
i
h our m
ed
di
ec ir t
on.
Making Cuts
CAUTION. Always ensure that the scroll saw is
switched off and the POWERhandle is removed
before making any adjustments.
1. First insure that you have install the correct
blade into the jigsaw for the material and design
you are about to cut. Wood blade for all types of
wood and a metal blade for metals and plastics.
2. Before starting the scroll saw or installing a
POWERhandle into the charger dock adjust the
table clamp so that it firmly presses your work
piece against the work surface but still allows
easy movement.
3. Align the first cut with the cutting face of the
blade with a small gap; holding your work piece
with your right hand, start the scroll saw with
your left.
4. Grip your workpiece on both sides of the table
clamp and gently push it into the cutting face of
the scroll saw. Firmly but smoothly guide the
work over the blade following your marked
design. Depending on the material of your work
piece you might have to blow the dust away to
keep good visibility of your marked cut line.
5. When you have completed your cut hold the
work steady with you right hand and stop the
scroll saw with your left.
Making Bevel Cuts
The jigsaw can be adjusted to lean 10° in either
direction to enable a bevel cut.
65