EasyManua.ls Logo

Chamberlain 41A7114-7 User Manual

Chamberlain 41A7114-7
12 pages
To Next Page IconTo Next Page
Page #1 background imageLoading...
Page #1 background image
1
You will need:
1/4" nut driver or socket, Phillips head screwdriver.
NOTE: Close the garage door BEFORE installing the travel module.
TRAVEL MODULE
Model 41A7114-7
Preparation
Disassemble the garage door opener
1
To prevent possible SERIOUS INJURY or
DEATH:
Disconnect ALL electric and battery
power BEFORE performing ANY service
or maintenance.
The garage door MUST be in the fully
closed position during installation.
ALWAYS wear protective gloves and eye
protection when changing the battery or
working around the battery compartment.
1.1 Disconnect all electrical and battery
power (if applicable) to the garage door
opener.
A
B
D
C
1.2 Disassemble the garage door opener by
removing the following:
A Light lens
B Cover
C Wire harness from the travel module
D Travel module (to remove, locate
the 2 screws which hold the travel
module to the motor and remove).
1.3 Discard the old travel module.
A
NOTE: The images throughout this manual are for reference and your product may look different.
Question and Answer IconNeed help?

Do you have a question about the Chamberlain 41A7114-7 and is the answer not in the manual?

Chamberlain 41A7114-7 Specifications

General IconGeneral
BrandChamberlain
Model41A7114-7
CategoryControl Unit
LanguageEnglish

Summary

Preparation and Disassembly

Disconnect Power Before Service

Disconnect all electric and battery power before performing any service or maintenance on the garage door opener.

Disassemble Garage Door Opener Components

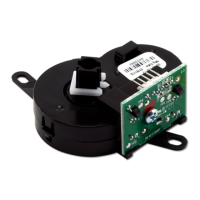
Remove light lens, cover, wire harness, and travel module by unscrewing mounting screws.

Discard Old Travel Module

Dispose of the old travel module after its removal from the garage door opener.

Installation of New Travel Module

Align and Mount New Travel Module

Align the new travel module's spindle with the motor and secure it using two mounting screws.

Reconnect Wire Harness and Reassemble

Reconnect the wire harness to the travel module and reassemble the garage door opener.

Restore Power and Proceed

Reapply all electrical and battery power to the garage door opener and proceed to the adjustment phase.

Programming Garage Door Travel Limits

Initiate Travel Programming

Press and hold the Adjustment Button until the UP Button flashes or a beep is heard.

Set and Confirm UP Travel Position

Move the door to the desired UP position, press Adjustment Button to confirm.

Set and Confirm DOWN Travel Position

Move the door to the desired DOWN position, press Adjustment Button to confirm.

Test Programmed Travel Limits

Cycle the door using UP and DOWN buttons to ensure programmed travel limits are functional.

Safety System Testing

Test Safety Reversal System

Test the safety reversal system by ensuring the door reverses upon contact with a 1-1/2 inch object.

Test Protector System

Test the protector system to ensure the door stops and lights flash when an object obstructs the path.

Related product manuals