Do you have a question about the Chamberlain Merlin Whisper Drive MT3850 and is the answer not in the manual?
List of hand tools required for assembly, installation, and adjustment of the opener.
Diagram showing header wall, ceiling, door, and opener mounting for sectional doors.
Diagram showing mounting for one-piece tilt doors with tracks.
Diagram showing mounting for one-piece tilt doors without tracks.
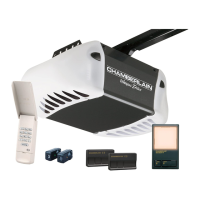
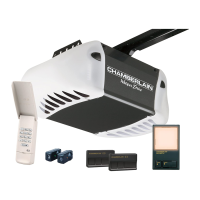
List and images of components included in the opener carton.
List and images of components included in the rail cartons.
Instructions for assembling the sectional rail sections securely.
Steps to properly hook the trolley connector into the inner trolley assembly.
Guide to sliding the pulley bracket and inner trolley into the rail assembly.
Steps for assembling the header sleeve assembly onto the rail.
Procedure for sliding the outer trolley into the rail assembly.
Instructions for securely fastening the rail assembly to the opener.
Guide to setting the correct belt tension using spring nut and screwdriver.
Steps to position and attach the belt pulley cover with hex screws.
Guidance on finding the correct header bracket position for various door types.
Instructions for mounting the header bracket using wall or ceiling mount methods.
Procedure for connecting the rail to the header bracket using clevis pins.
Instructions for positioning the opener based on door type using timber spacers.
Steps for securely hanging the opener to structural supports using brackets.
Instructions for attaching the door bracket to sectional and tilt doors.
Procedure for connecting the door arm sections to the trolley and door bracket.
Guide to wiring and mounting the LCD motion detecting control panel.
Steps for installing the safety reversing sensors (IR beams) on the opener.
Instructions for installing the light bulbs and lenses into the opener.
Procedure for threading and attaching the emergency release rope and handle.
Guide to installing the battery backup unit into the opener.
Steps to set the desired open and closed positions for the garage door.
Procedure to adjust the force required for opening and closing the door.
Procedure for testing the safety reversal system with a 40mm obstacle.
Instructions for operating the opener light using the Light button.
Guide to activating and deactivating the lock feature on the control panel.
Details on how the motion sensor activates the opener light automatically.
Instructions for programming remote controls using the LEARN button.
How to toggle language and temperature units on the control panel.
Instructions for enabling and disabling the automatic close timer feature.
Steps to program or reprogram remote controls using the learn button or control panel.
Procedure to erase all previously programmed remote control codes.
Instructions for programming keypads and fingerprint entry systems.
Steps to program the C840 Keyless Entry System using the learn button.
Method to program keyless entry using the C198 control panel.
Instructions for programming the C379 Fingerprint Entry System.
Troubleshooting for safety reversing sensor wire issues causing 1 flash.
Troubleshooting for safety reversing sensor wire shorts or polarity reversal.
Troubleshooting for a shorted control console or wiring causing no LCD display.
Troubleshooting for misaligned safety reversing sensors indicated by dim or flashing LEDs.
Troubleshooting for RPM sensor failure indicated by short travel.
Troubleshooting steps for opener not responding to controls or remotes.
Troubleshooting for issues with the LCD motion detecting control panel.
Troubleshooting steps when remotes are not working but the control works.
Tips for improving short range performance of remote controls.
Troubleshooting door reversing unexpectedly with flashing opener light.
Steps to ensure remote push buttons are not stuck 'on'.
Guidance on re-setting limits and forces for complete door closure.
Troubleshooting steps for the door not closing fully.
Steps to check for power issues or replace light bulbs.
Troubleshooting opener strain due to unbalanced door or broken springs.
Steps to take when the opener is not activated due to power failure.
Detailed steps for manually setting door travel limits.
Procedure for manually opening and closing the door using the release handle.
Describes opener actions when activated by remote or LCD control.
Details on when the opener lights automatically turn on and their behavior.
Recommended monthly maintenance tasks for the opener.
Recommended yearly maintenance tasks for the opener.
Details on seller's liability for damages and implied terms in Australia.
Details on seller's liability for damages and implied terms in New Zealand.
Contact information for Chamberlain service centres in Australia and New Zealand.
| Drive System | Belt Drive |
|---|---|
| Battery Backup | No |
| Power | 120V AC |
| Max Door Height | 3.5 m |
| Speed | 7 inches per second |
| Remote Controls Included | 2 |
| Safety Features | Auto-reverse, photoelectric sensors |
| Smart Features | MyQ Compatibility (Requires additional MyQ accessories) |
| Smartphone Control | Yes |