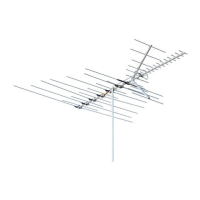
Model CM-3020
Modelo CM-3020
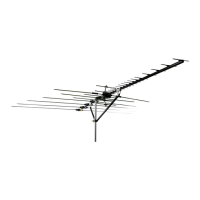
Model CM-3016
Modelo CM-3016
Model CM-3018
Modelo CM-3018
INSTALLATION TIPS
A. USEFUL INSTALLATION TOOLS
• Largeandsmallbladescrewdrivers
• AdjustableWrench
• WireCutters
• Pliers
A. INSTALACIÓN DE HERRAMIENTAS ÚTILES
• Grandesypequeñosdestornilladorescuchilla
• Llaveajustable
• Cortadoresdecable
• Alicates
B. WHERE TO MOUNT YOUR ANTENNA
Yourantennacanbemountedoneitherthechimney,therootoronanoutsidewallorin
anattic.Choosethemethodthatbestsuitsyourparticularlocation.
B. DONDE MONTAR LA ANTENA
Laantenasepuedemontarenlachimeneaobien,laraízoenunaparedexterioroenun
ático.Elijaelmétodoquemejorseadapteasusituaciónparticular.
C. TRANSMISSION LINE
75 Ohm coaxial cable has a Ionger Iife-span than 300 Ohm twinlead cable and is
unaffectedbycontactwithmetalormoisture.Toinstallcoaxialcable,beginbyconnecting
theantennaendofthecabletotheantennabalun(suppliedwithantenna).Attachthe
inputwiresofthebaluntotheantennaterminals,Next,runthecoaxialcablethrougha
standoutmountedonthemast.ThiswillpreventtheweightoftheIinefrompullingonthe
antennaconnections.
C. LÍNEA DE TRANSMISIÓN
75Ohmcablecoaxialtieneuna vida Ionger-span de 300 Ohmtwinleadcableynose
veafectadaporelcontactoconelmetalolahumedad.Parainstalarelcablecoaxial,
empezarporconectarlaantenaextremodelcablealaantenabalun(suministradocon
laantena).Conectelaentradadeloscablesalaantenabalunterminales,y,después,el
cablecoaxialatravésdeunstandoutmontadoenelmástil.Estoevitaráqueelpesodela
Iinetirandodelasconexionesdelaantena.
D. LIGHTNING PROTECTION
ThemastandtransmissionIineshouldbegroundedforIightningprotection.Runa#8
(orlarger),aluminumorcopperwirefromabolt on the mast or its base,downtoa8’
groundrod.KeeptheIineatarespectabledistancefromyourtransmissionwiretoprevent
signalinterference.Acoaxialgroundingblock(ChannelMasterModel3274),shouldbe
connectedtotheantennatransmissionwireatthepointwhereitentersthehouse.
D. PROTECCIÓN CONTRA RAYOS
ElmástilylatransmisiónIinedebeIightningatierraparaprotección.Ejecutarun#8(o
mayor),dealuminioocobredeunpernoenelmástilodesubase,hastaun8‘varade
tierra.MantengaelIineaunrespetabledistanciadelcabledetransmisióndeseñalpara
evitarinterferencias.Unbloquedetierracoaxial(ChannelMasterModelo3274),debe
estarconectadoalaantenadetransmisióndecableenelpuntoenqueentraenlacasa.
E. AIMING YOUR ANTENNA TOWARD THE TRANSMITTING STATION
Oncetheantennainstallationiscompleted,turnyourTVsetonandhaveanassistant
observethereception.Ontheroof,IoosentheU-boltnutsandturntheantennauntilyou
getthebestreception.Oncethisisaccomplished,tightenU-boltsnutssecurely,
NOTE:Ifbroadcaststationsareindifferentdirections,youwillneedanantennarotator.
Thiswillallowyoutorotatetheantennaandpinpointindividualstationsfrominsideyour
home.(Formoreinformationonrotators,visitwww.channelmaster.com.)
Findtheinstallationyouplantomakeonthefollowingpages-READ THE INSTRUCTIONS
FOR ASSEMBLING THE ANTENNA AND THE INSTALLATION BEFORE YOU START
THE ACTUAL WORK!
Visityourlocalretailerorourwebsiteforavailablemountsandaccessoriesyou’llneedfor
yourinstallation.
Fromthispoint,therestofthecoaxmaybetapedtothemast.
E. ENCAMINADA HACIA SU ANTENA TRANSMITE LA ESTACIÓN
Unavezquelaantenasehayacompletadolainstalación,enciendasutelevisorytener
unayudanteobservarlarecepción.Eneltecho,elU-Ioosentuercasypernosasuvezla
antenahastaobtenerlamejorrecepción.Unavezqueestoselogra,aprietelospernos
enUnuecessegura..
NOTA: ilasemisorasseencuentranendistintasdirecciones,necesitaráunaantenade
losrotadores.Estolepermitirágirarlaantenayestacionesaisladasdeidenticardesde
elinteriordesuhogar.(Paramásinformaciónsobrerotadores,visitewww.channelmaster.
com.)
Encuentralainstalaciónvaahacerenlaspáginassiguientes-¡LEA LAS INSTRUCCIONES
DE MONTAJE DE LA ANTENA Y LA INSTALACIÓN ANTES DE COMENZAR EL
TRABAJO REAL!
Visiteasudistribuidorlocalonuestrositiowebdisponibleparamonturasyaccesoriosque
ustednecesitaparasuinstalación.
Desdeestepunto,elrestodelacoaxialpuedensergrabadasparaelmástil.
Instruction Sheet
Hoja de Instrucciones
WARNING: Installation of this product near power lines is DANGEROUS!
For your safety, read the enclosed “DANGER” booklet before beginning your installation.
ADVERTENCIA: Instalar este producto cerca de líneas eléctricas es PELIGROSO!
Por su seguridad, lea el folleto incluido antes de empezar su instalación.
Model CM-3016 3018 3020
Modelo CM-3016 3018 3020
www.channelmaster.com
Tel +1.877.746.7261
©2010ChannelMaster.ChannelMasterisaregisteredtrademark.Specicationssubjecttochange.Allrightsreserved.PubCM.301630183020.INST.201007.
©2010ChannelMaster.ChannelMasteresunamarcaregistrada.Especicacionessujetasacambio.Todoslosderechosreservados.PubCM.301630183020.INST.201007.
A
A
D
D
D
J
E
F
G
H
I
K
L
B
B
B
B
C
C
C
C
D
E
M
N
O
B
C
INSTALLATION LOCATIONS
LUGARES DE INSTALACIÓN
ATTIC MOUNT
MONTAje eN
ATICO
ROOF MOUNT
(Using Guy Wire)
MONTAje
eN TeChOs
(Uso de Guaya
de Tensión)
WALL MOUNT
MONTAje eN
PARed
TRIPOd
TRíPOde
Roof Mount
Montura para Techo
Mast
Mástil
Coaxial Cable
Cable Coaxial
Snap-On Standouts
Guías a Presión
Screw-In Standouts
Guías atornillables
Guy Wire
Guaya de Soporte
Guy Ring & Clamp
Anillo y abrazadera
Eyebolts
Tuercas de ojo
Chimney Mount Straps
Amarres de Montaje
Chimney Mount
Montura para Chimenea
Ground Mount
Montura para Suelo
Wall Mount
Montura para Pared
Tripod Mount
Montura de Trípode
Pitch Pads
Adaptadores
Lag Screws
Tirafondos
ChIMNeY
MOUNT
MONTAje eN
ChIMeNeA
IMPORTANT SAFEGUARDS
• Remember,whenworkingonaroof,usetwoadults.
• Neverwalkonacompositionroofincoldweather.
• Wearsneakersorcrepesoles,anduseasafetyrope.
• Alwayswatchforpowerlines.
A. ATTIC MOUNT
Usingaroofmount,attachashortpieceofmasttoaconvenientroofrafter.Attachand
aimtheantennainthesamemannerasoutlinedforoutdoorinstallations.
B. ROOF MOUNT
Used on peaked or at roofs.
Suggested Height Limit: 10feetaboverooftop.
Usingaroofmount,connectthemastwithguyringandguywiresattached,tothe
mount.Usethreeorfourguywires,equallyspacedaroundthemast,andanchortheguy
wirestotherooforeaveswitheyebolts.Theguyringshouldbeclampedapproximately
one(1)footbelowtheantenna,Useroongcompoundaroundthebaseofthemount,
screwsandeyeboltstosealagainstmoisture.Aftertheinstallationhasbeencompleted,
mounttheextraWARNING LABEL suppliedwiththeantennahardwaretothemastat
EYE LEVEL!
C. CHIMNEY MOUNTING
Suggested Height Limit: 10feetaboverooftop.
First,checkyourchimneythoroughlyforstabilitytomakesurethatitisstrongenoughto
supporttheantennaduringseverewinds.Donotuseachimneythathasloosebricksor
mortar.Installtheupperbracketjustbelowthetopcourseofbricksandthelowerbracket
atleast21/2feetbelowthetopbracket.(Formaximumstrength,spacethebrackets
asfarapartaspossible.)Aftertheinstallationhasbeencompleted,mounttheextra
WARNING LABEL suppliedwiththeantennahardwaretothemastatEYE LEVEL!
NOTES: Antennasshouldnotbeinstalledinanatticiftherooforwallsaremetalorarelined
withfoilbackedinsulation.
“S”Clamp
75Ohm
Coaxial
Cable
SpadeLugs
(ConnecttoVHF
TerminalsonTVSet
WireLugs
(ConnecttoUHF
TerminalsonTVSet)
Balun
75 OHM SEPARATOR
*For older TV sets only