EasyManua.ls Logo

Char-Broil 11301672 User Manual

Char-Broil 11301672
20 pages
To Next Page IconTo Next Page
Page #1 background imageLoading...
Page #1 background image
Product Guide
Model 11301672
Estimated Assembly Time: 1 Hour
Tools needed for assembly:
Phillips Screwdriver
Adjustable wrench
FOR OUTDOOR USE ONLY
CAUTION:
Read and follow all safety statements, assembly instructions,
and use and care directions before attempting to assemble
and cook.
INSTALLER/ASSEMBLER:
Leave this manual with consumer.
CONSUMER:
Keep this manual for future reference.
WARNING:
Failure to follow all manufacturer’s instructions could
result in serious personal injury and/or property
damage.
CAUTION:
Some parts may contain sharp edges – especially as
noted in the manual! Wear protective gloves if
necessary.
WARNING:
CARBON MONOXIDE HAZARD
Burning charcoal inside can kill you. It gives off carbon
monoxide, which has no odor. NEVER burn charcoal inside
homes, vehicles, or tents.
CAUTION:
THIS UNIT IS HEAVY! DO NOT attempt to
assemble without a helper.
If you have questions or need assistance during assembly, please call .
To insure your satisfaction and for follow-up service, register your appliance online at www.charbroil.com/register
1-800-241-7548
42804619 -11301672 - 03/02/11
Serial Number
Date Purchased
IMPORTANT: Fill out the product record information below.
30” Charcoal Grill
The following are trademarks registered by W.C. Bradley Co. in the U.S. Patent and Trademark Office: Caldera®; Charcoal2Go®; Char-Broil®; American
Gourmet®; Bandera®; Brush Hawg®; CB 940®; Char-Diamonds®; Char-Broil Charcoal/Gas®; Everybody Grills®; Grill 2 Go®; Grill 2 Go® Express®; Grill
Lovers®; Infrared Grilling That’s All About U®; Keepers of the Flame®; Magneto®; New Braunfels Smoker Company®; Patio Bistro®; Patio Caddie®; Patio
Kitchen®; Pro-Sear®; RED®; Quantum®; Santa Fe®; Sear and Grill®; Sierra®; Signature Series®; Sure2Burn®; The Big Easy®; U®; Wild West Tradition®;
and the following marks:
® ®
The following are trademarks of W.C. Bradley Co.:America's Legendary Barbeque Company™; Advantage Series™; Auto-Clean™;Chef Tested™;
Commercial Series™; Designer Series™;; Diamond Flame™; Double Chef™; Everybody Outside™; FastStart™; FlavorMaster™; Front Avenue™; Grill 2
Go® Advantage™; Grill 2 Go® Ice™; Hog and Yard Bird™; H20 Smoker™; Infrared. Grilling’s Juicy Little Secret™; Incredible Taste. Infallible Results™;
Infrared Inside™; Let’s Grill Something Together™; Longhorn™;; Precision Flame™; Quick2Burn™; QuickSet™; Ready When You Are™; Season, Set, And
Savor™; Sizzle On The Grill™; SureFire™; Torchfork™; Trentino™; Universal Grill Parts™; You Bring the Party™ TEC™ is a trademark of Tec Infrared
Grills.
TM REVISION 08
Question and Answer IconNeed help?

Do you have a question about the Char-Broil 11301672 and is the answer not in the manual?

Char-Broil 11301672 Specifications

General IconGeneral
BrandChar-Broil
Model11301672
CategoryGrill
LanguageEnglish

Summary

Safety Symbols and Warnings

DANGER

Indicates an imminently hazardous situation, resulting in death or serious injury if not avoided.

WARNING

Indicates a potentially hazardous situation, resulting in death or serious injury if not avoided.

CAUTION

Indicates a potentially hazardous situation or unsafe practice, resulting in minor or moderate injury if not avoided.

Preparing to Use Your Grill

First Time Use

Instructions for initial seasoning of cast iron grates to prevent rust and sticking.

Seasoning

Detailed steps for seasoning cast iron grates using vegetable shortening for optimal use.

To Prevent Rusting

Regular re-seasoning and care advice to prevent rust on cast iron grates.

Maintenance

Guidance on maintaining cast iron grates after use and proper storage.

Grill Maintenance

Cooking Surface

Advice on cleaning grill cooking surfaces, ensuring no loose bristles remain before grilling.

Cooking Tips

Building Your Fire

Step-by-step instructions for building a charcoal fire, including fuel amounts and lighting methods.

Know When Your Fire is Ready

Guidance on assessing coal readiness and adjusting grill temperature for optimal cooking.

The Heat of the Coals

A chart detailing coal heat levels, temperature ranges, and visual cues for grilling.

Grilling Techniques

Direct Grilling

Explanation of direct grilling method for quick-cooking items and temperature control.

Indirect Grilling

Explanation of indirect grilling method for long, slow cooking in a covered grill.

Grilling with Wood Chips/Wood Chunks

Advice on using wood chips and chunks to enhance smoke flavor during grilling.

Limited Warranty Information

Scope of Coverage

Details the extent of warranty coverage, including parts and period.

Items Manufacturer Will Not Pay For

Lists specific exclusions from warranty coverage and costs not reimbursed by the manufacturer.

Disclaimer of Implied Warranties and Limitation of Remedies

Explains disclaimers of implied warranties and limitations on remedies for product issues.

Assembly Instructions

Step 1: Attach Firebox Panels

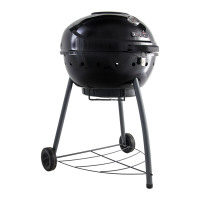
Connects firebox end panels to front/rear panels using screws and nuts.

Step 2: Attach Legs to Firebox

Attaches legs, with and without caster sockets, to the firebox using screws.

Step 3: Attach Bottom Shelf to Legs

Secures the bottom shelf to the legs using screws.

Step 4: Attach Casters to Legs

Attaches casters to the front and rear legs after turning the grill upside down.

Step 5: Install Wheels

Guides the installation of wheels onto the axle, washers, and securing with hair pin clips.

Step 6: Attach Charcoal Pan Assembly

Mounts the charcoal pan assembly to the front panel of the firebox using hex bolts.

Step 7: Attach Air Damper Wheel

Attaches the air damper wheel to the inside of the firebox, allowing for rotation.

Step 8: Attach Ash Pan Handle and Insert Ash Pan

Attaches the handle to the ash pan and slides the ash pan into the bottom of the firebox.

Step 9: Attach Lid Handle and Handle Seats

Secures the lid handle and handle seats to the lid using screws.

Step 10: Attach Hinge Assemblies to Lid

Attaches hinge assemblies to the rear of the lid using screws and flange nuts.

Step 11: Assemble Smoke Stack Body

Assembles the smoke stack body, damper, spring, and cap nut, then attaches to the lid.

Step 12: Attach Lid Assembly to Firebox

Places the lid assembly onto the firebox and secures it with hinges and screws.

Step 13: Attach Clean Out Door Handle

Assembles the handle, latch, and washers to the clean out door.

Step 14: Attach Tool Hooks and Side Shelf

Mounts tool hooks to the side shelf and attaches the shelf assembly to the left legs.

Step 15: Attach Other Side Shelf to Right Legs

Attaches the second side shelf to the right legs using shoulder screws.

Step 16: Install Adjuster Crank

Screws the adjuster crank through the firebox and engages it with the crank lever.

Step 17: Insert Swingaway Grid

Inserts the swingaway grid into the lid and firebox, securing it with hair pin clips.

Step 18: Place Cooking Grates

Positions the cooking grates onto the front and rear ledges of the firebox.

Step 19: Install Temperature Gauge

Installs the temperature gauge through the lid and secures it with the wingnut.

Related product manuals