22
the harnesses in an outward direction (Fig. 19A).
Fit the buckle straps in the relevant slots located
on the sides in the cover (Fig. 19B); this makes
it easier to position your child.
Positioning the child in the child car seat.
WARNING! Always make sure that your child is
seated with his back resting against the back-
rest of the child car seat and with the crotch
strap positioned correctly.
Position the crotch strap correctly, take the
straps and join the two buckle straps. (Fig. 20).
Push them together rmly inside the buckle
until you hear a loud click (Fig. 21). In order
to ensure safety, the two buckle straps are
designed to prevent either from being released
one at a time.
To tension the safety harness of the child car
seat, pull the adjustment strap (E) (Fig. 22) of
the harness, until the harness straps adhere to
the child’s body correctly.
WARNING! Do not over-tighten the harnesses
around the child: if you can insert one nger
between the harness and your child’s shoul-
ders, it means that they are tightened correctly.
WARNING! Check that the harness is not
twisted.
Turn the child car seat to position it facing
rearward.
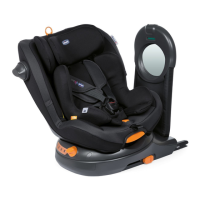
This position makes it possible to watch your
child while driving by using the relevant mirror
WARNING: Before use, remove the protective
lm covering the mirror surface
WARNING: the REDUCER CUSHION is to be
used from birth to 6 kg - 60 cm.
6. USING THE CAR SEAT FACING FORWARD
(from 16 months to a maximum height
of 105 cm)
WARNING: Forward-facing installation is al-
lowed only from 16 months of age.
To adjust the belt height and
child car seat headrest, see
chapter 7.
Before sitting your child in the child Car seat,
press the harness adjustment button (D) and,
at the same time, hold the two child Car seat
harnesses under the shoulder straps, and pull
them in your direction to slacken them (Fig. 17).
Unfasten the buckle (G) of the child car seat
harnesses by pressing the red button (Fig. 18),
and pull the harnesses in an outward direction
(Fig. 19A).
Fit the buckle straps in the relevant slots
located on the sides in the cover (Fig. 19B);
this makes it easier to position your child.
Positioning the child in the child car seat.
WARNING! Always make sure that your child is
seated with his back resting against the back-
rest of the child car seat and with the crotch
strap positioned correctly.
Position the crotch strap correctly, take the
straps and join the two buckle straps. (Fig. 20).
Push them together rmly inside the buckle
until you hear a loud click (Fig. 21). In order
to ensure safety, the two buckle straps are
designed to prevent either from being released
one at a time.
To tension the safety harness of the child car
seat, pull the adjustment strap (Q) (Fig. 22) of
the harness, until the harness straps adhere to
the child’s body correctly.
WARNING! Do not over-tighten the harnesses
around the child: if you can insert one nger
between the harness and your child’s shoul-
ders, it means that they are tightened correctly.
WARNING! Check that the harness is not
twisted.
WARNING To turn the child car seat facing
forward, use the release lever (E) and position
the car seat in forward-facing position until
you hear the CLICK when it is fastened cor-
rectly (Fig. 23).
7. ADJUSTING THE HEADREST AND HAR-
NESSES
The height of the headrest and restraint har-
nesses can be simultaneously adjusted to 8
positions by using the headrest adjustment
ring (F).
WARNING! To adjust them correctly, the
headrest must be tted so as to allow that
the harnesses come out from the backrest at
the height of the child’s shoulders (Fig. 24). To
adjust the height, pull the adjustment ring (F)
located above the headrest (Fig. 25) up until
the desired position is reached; now release
the ring and ease the headrest until a click
is heard, indicating that it is locked correctly
into position.
To tension the safety harness of the child car
seat, pull the adjustment strap (E) (Fig. 26) of
the harness, until the harness straps adhere to
the child’s body correctly.
WARNING! Do not over-tighten the harnesses
around the child: If you can insert one nger
between the harness and your child’s shoul-
ders, it means that it is tightened correctly.
8. ADJUSTING THE INCLINATION OF THE
CHILD CAR SEAT
The child car seat can be reclined to 4 positions.
To adjust the inclination of the child car seat,
pull the reclining lever (J) (Fig. 27).
To make reclining as easy as possible, we rec-
ommend doing so with the child car seat in
an intermediate position.
9. INSTALLING THE SIDE SAFETY SYSTEM
The Side Safety System is a device that is in-
stalled on the door side for utmost protection
in the case of a side impact.
To install it, insert the end in the hole in the
structure, press the central portion and rotate
it (Fig.28).
10. BUILT-IN MIRROR
The car child seat is equipped with a mirror
that allows you to check the position of the
child while driving; it is possible to adjust the
inclination of the mirror by acting on it with a
light pressure (Fig. 29)
11. MAINTENANCE
The cleaning and maintenance of the product
must only be carried out by an adult.
How to clean the fabric cover.
The child car seat’s fabric cover can be removed
and cleaned by hand or in a washing machine
at 30°C. Please refer to the care label for instruc-
tions on cleaning the seat fabric.
Machine washable at 30°C.
Do not bleach
Do not tumble dry
 Loading...