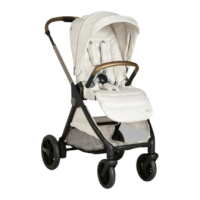
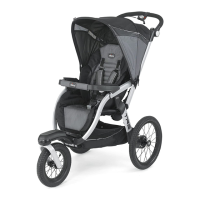
16
MAINTENANCE
Regularly check the condition of the wheels and clean o
all dust and sand. To avoid friction that may compromise
the correct functioning of the stroller, make sure that all
plastic parts are clean of dust, dirt and sand. Keep the stroll-
er in a dry place. If necessary, lubricate the moving parts
with dry silicone lubricant.
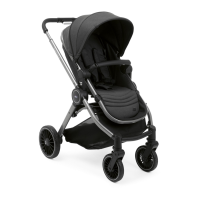
LIST OF COMPONENTS
Check that none of the components of this model are miss-
ing before assembling the product. If any part is missing,
contact Chicco Customer Service. No tools are needed to
assemble this product. The following pieces are needed for
product assembly:
• Frame
• Seat with lining
• Canopy
• Bumper bar
• Comfort kit (shoulder straps and crotch straps)
• Storage basket
• Rain cover
• 2 Rear wheels
• 2 front wheels
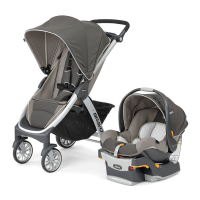
IMPORTANT NOTE: the pictures and instructions con-
tained in this booklet refer to a specic version of the stroller.
STROLLER FIRST ASSEMBLY
WARNING: When opening or closing the stroller, make
sure that your child or other children are at a safe distance.
Make sure that during these operations the moving parts of
the stroller do not come into contact with your child.
1. To open the stroller take hold of the handle and front
tube and rotate until a click conrms that the stroller has
opened completely (Fig. 1).
2. Insert the front wheel in the dedicated hole on the frame
until you hear the locking click (Fig. 2). Repeat the same
operation for the other front wheel.
3. To assemble the rear wheels, pull down on the indicated
lever and insert the wheel pin in the hole on the tube
that forms the rear leg.(Fig. 3). Repeat the same operation
for the other wheel.
WARNING: Before using the stroller, make sure that the
wheels are rmly attached to the structure by gently pull-
ing them outwards.
4. To remove the front wheels, use a sharp object to exert
pressure on the appropriate slot, which is located on the
front part of the frame (Fig. 4) and pull the wheel down-
wards. To remove the rear wheels pull the release lever
shown in gure 4A.
FITTING THE SEAT ON THE STROLLER
5. To attach the stroller seat to the frame, insert the seat into
the appropriate plastic connection points until you hear
the locking click (Fig. 5).
The seat can be assembled either forward facing (Fig. 5A) or
rear facing (Fig. 5B).
WARNING: Before using, make sure that the seat is proper-
ly locked on by pulling it upwards.
To release the seat press the buttons located on the seat
joints simultaneously and pull up (Fig. 5C).
WARNING: The child must never be sitting in the seat
when fastening/unfastening it.
BUMPER BAR
6. The seat features a bumper bar. To fasten the bumper bar
insert it in the housing located next to the joint (Fig. 6)
and make sure that the bumper bar is properly fastened
by pulling it towards you.
To remove the bumper bar press on the two external side
buttons (Fig. 6A) and extract the bumper bar from the
housing. You can release one side of the bumper bar to
easily seat your child. The bumper bar can be used both
forward facing and parent facing.
WARNING: Always fasten your child with the safety harness-
es. The bumper bar IS NOT a device for containing your child.
WARNING: Never use the bumper bar to lift the product
with your child sitting in it.
ADJUSTING THE BACKREST
7. The backrest can be reclined in four dierent positions; to
adjust the inclination use the lever located on the rear of
the stroller backrest (Fig. 7). The inclination can be adjust-
ed until the desired position is reached. By releasing the
lever, the backrest will lock in the nearest position.
WARNING: The child’s weight can make these operations
more dicult.
HOW TO USE THE SAFETY HARNESS
8. The stroller comes with a ve-point safety harness which
consists in two shoulder straps, a waist strap and a crotch
strap with a buckle. The buckle included has a magnetic
closure (Fig. 8).
On the backrest there are three pairs of slots for adapting the
height of the shoulder straps to the size of the child (Fig. 8A).
After placing the baby in the stroller, fasten the safety belts
by inserting the shoulder strap component (A) into the ap-
propriate housing on the component (B) of the waist strap
(Fig. 8B). This operation must be carried out for both safety
belts. Then join the two components together until they
engage correctly (Fig. 8C) and complete the belt fastening
with the belt buckle (C) by joining it to the two previously
assembled components (Fig. 8D). The belts have a magnet-
ic buckle that clicks once it has been secured. Finally, adjust
the shoulder straps so that they t snugly against the child's
shoulders (Fig. 8E). To unfasten the safety belts, press the
two side buttons on the crotch strap and remove it from
the connector (Fig. 8F).
WARNING: For use with children from birth to about 6
months the shoulder straps must be inserted in the lowest
slots (Fig. 8A - no. 1); the length of the straps may need to
be reduced so that they t the size of the child.
To change the position of the belts on the backrest, after
opening the cover using the zip at the base of the backrest,
access the back and pass the buckle through the backrest
to release the belts. (Fig. 8G). Complete the operation by
inserting the retaining buckle into the chosen slot, passing
it through the backrest. After this, pull rmly to check the
correct positioning of the belts.
The padded shoulder straps can also be adjusted (point 9).
WARNING: Always make sure that the straps are fastened
correctly.
WARNING: To guarantee the safety of your child, the safety
harness must be fastened at all times. To make sure the har-
ness straps are tted correctly, place your child inside the
stroller and pull the ends of the straps rmly.
 Loading...