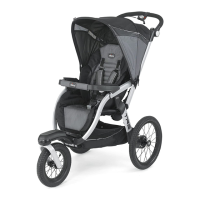
20
Prolonged exposure to direct sunlight may
cause the fabric to fade.
• Prevent the stroller from coming into
contact with salt water. It may cause
rusting.
• Do not use the stroller on the beach.
• When it is not being used, the stroller
should be kept out of children’s reach.
CLEANING AND MAINTENANCE
The cleaning and maintenance of this product must be carried
out on a regular basis by the user. The cleaning and maintenance
of the stroller must only be carried out by an adult.
CLEANING
The cover cannot be removed. Clean all fabric parts with a
damp sponge and neutral detergent. Please refer to the care
labels for instructions on how to clean the fabric parts. Below
are the cleaning symbols and their meanings:
Wash by hand in cold water
Do not bleach
Do not tumble dry
Do not iron
Do not dry clean
Periodically wipe clean plastic parts with a soft damp cloth.
Always dry the metal parts to prevent the formation of rust if
the stroller has come into contact with water.
MAINTENANCE
Lubricate the moving parts only if necessary, with the light
application of a silicone based lubricant. Regularly check the
condition of the wheels and, keep them clean of dust and sand.
To avoid friction that may prevent the correct operation of the
stroller, ensure that all the movable plastic parts placed along
the metal frame are clean of dust, dirt or sand. Keep the stroller
in a dry place.
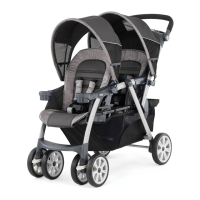
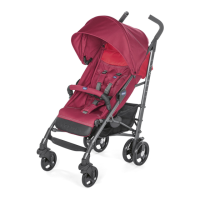
GENERAL INSTRUCTIONS
ASSEMBLING AND OPENING THE STROLLER
CARRYALL TRAY
1. The mechanism which opens and closes the stroller is tted
inside the carry-all tray. The 2 tabs on the end of the carry-all
tray are used to fasten it to the stroller frame: slide the 2 tabs
along the slots inside the handlebar (diag. 1A) and push the
tray towards the handlebar until you hear it click into place
(diag. 1B).
Check that the closing mechanism wire does not interfere with
the carry-all tray fasteners.
HOW TO OPEN THE STROLLER
WARNING: before you start, check that your children are at a
safe distance.
Ensure that during these operations the moving parts of the
stroller do not come into contact with your child.
2. Once the carry-all tray has been fastened to the frame,
move the sliding button on the tray (diag. 2A) to the left whilst
pressing the centre button and raising the handle (diag. 2B);
now open the stroller by using your other hand to push the
front section of the frame downwards, until you hear it click
into place (diag. 2C).
Make sure the stroller is open properly before proceeding any
further.
3. The rear seat on the stroller is tted with a footrest. Once
the stroller is open, lower the footrest (diag. 3).
4. To adjust the height of the handlebar, press the two side
buttons (diag. 4) at the same time and move the handlebar to
the required position.
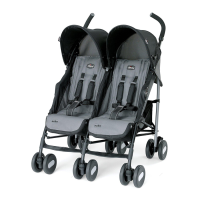
BASKET
5. The stroller comes with a practical carry-all basket. To
assemble the basket, slide the U-shaped tube into the tube
ends on the back of the stroller, as seen in diag. 5A. The
U-shaped tube is tted correctly when you see the 2 grey rods
on the bottom, protruding from the holes below the stroller
frame tubes and you hear them click into place.
To finish, fasten the fabric to the tube using the press studs
(diag. 5B). Never use the carry-all basket without the supports
inserted properly. Always remove all contents from the basket
before you close the stroller.
6. You can also open the zip (diag. 6) on the back of the basket
to access it more easily.
FITTING THE BACK WHEELS
7. Parts needed to t the back wheels: see diag. 7.
8. Remove the caps from the ends of the rear axle, then slot
the rear axle onto the frame, until you hear it click into place
(diag. 8).
WARNING: always check the rear axle is tted properly before
using the stroller.
9. To assemble the wheels on the rear axle A) follow the
instructions in the correct order (see diag. 9A):
- the wheel B)
- the washer C)
- the spring pin D)
- the cap E)
Make sure you insert the fastening spring pin as indicated in the
diagram: the at side must be inserted in the whole on the axle,
whilst the closed end of the spring pin must be facing outwards
(diag. 9B). Repeat the operation to assemble the other wheel,
following the instructions in the same order.
FITTING THE FRONT WHEELS
10. Slot the front wheel block onto the stroller frame as seen in
diag. 10, until you hear it click into place. Repeat this procedure
for the other wheel block.
WARNING: before use, make sure the wheel locks are properly
secured, by pulling them rmly.
BUMPER BAR
11. To assemble the bumper bar, simply slot it into the two
holes on the ends of the front armrests, as seen in diag. 11.
12. To remove the bumper bar, press the two buttons found
under the armrests, and pull the bar towards you (diag. 12).
WARNING: Always fasten your child with the safety belts. The
bar IS NOT a device for containing your child.
WARNING: Never use the bumper bar to lift the stroller up
with the child sitting in it.
HOOD
The stroller comes with two hoods.
13. To assemble the front hood, connect the hood fastener to
the guides on the armrests (diag. 13). Repeat the operation to
fasten it to the other side of the stroller.
14. To assemble the rear hood, connect the hood fastener to
the round stopper on the rear stroller tube (diag. 14). Repeat
the operation to fasten it to the other side of the stroller.
15. How to open the hoods: open the hood as illustrated in
g. 15A and press the two side snap-bars down to lock it in
place (diag. 15B). Warning: always release these two snap-bars
before trying to close the hood.
USING THE SAFETY HARNESS
Each seat is tted with a ve-point safety harness which
consists of two shoulder straps, a lap belt and a crotch strap
with a buckle. WARNING: when carrying children from 0 to 6
months of age, the shoulder straps must be threaded through
the adjuster slots before being fastened.
16. Thread the safety clasps through the fabric loops (diag.
16A) and check that the shoulder straps are fitted at the right
height for the child: if this is not the case, adjust the height
as necessary (diag. 16B). You can also use the padded strap
covers by sliding them onto the straps (diag. 16C).
17. Place the child inside the seat, connect the safety clasps to
the 2 toothed ends, and insert the 2 toothed ends into the buckle
(diag. 17). Now use the clasps to adjust the length of the lap belt.
18. For extra safety, the stroller is tted with D-rings which
can be used to t a separate safety harness, compliant with BS
6684 Standards. The rings are tted internally on the right and
left side of the stroller seat, as seen in diagram 18.
19. To release the lap belt, press the two toothed ends together
at the same time (diagram 19).
WARNING: the safety harness must always be fastened to
guarantee safety for your child.
WARNING: the safety harness must always be used with the
crotch strap to guarantee safety for your child.
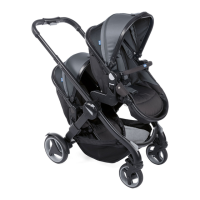
ADJUSTING THE FRONT SEAT BACKREST
20. To release the recliner mechanism on the front seat
backrest: use your thumb to press button A and then slide it to
the left whilst pulling the handle upwards (diag.20).
21. Now push the backrest backwards (Diag. 21). To raise the
backrest, simply lift it to the desired position, without pressing
on the handle.
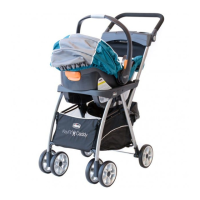
The front seat backrest can also be adjusted forwards, so the
stroller can be used with the child car seat (see the “USING
THE CHILD CAR SEAT” section).
ADJUSTING THE REAR SEAT BACKREST
22. To recline the rear seat backrest, lift the adjuster handle on
the back of the backrest and pull it downwards (diag. 22). To
raise the backrest, simply lift it to the desired position, without
pressing on the handle.
WARNING: these operations can become more difcult when
the child is sat in the seat.
REAR BRAKES
The rear wheels are tted with a twin-braking system which allows
you to use just one foot pedal to control both the rear wheels.
23. To apply the brakes, press one of the two levers on the rear
wheels downwards, as illustrated in diagram 23.
24. . To release the brakes, press one of the two levers on the

 Loading...