Do you have a question about the Christie CP4220 and is the answer not in the manual?
Details warning labels and their meanings displayed on the projector for safety.
Provides essential safety guidelines for connecting and operating the projector to AC power.
Outlines critical safety measures and warnings for handling projector lamps due to high pressure.
Information for contacting Christie support and recording purchase/installation details.
Specifies environmental and physical conditions necessary for safe projector installation.
Lists the necessary tools for properly installing the CP4220 projector.
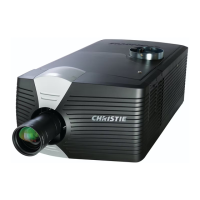
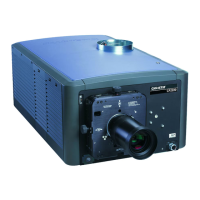
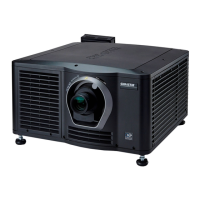
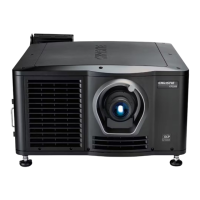
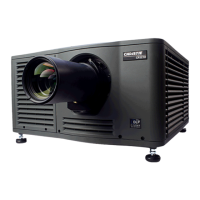
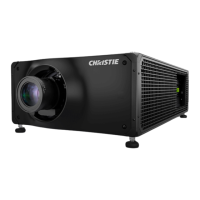
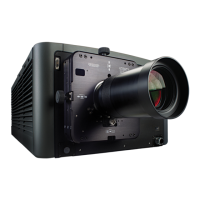
Identifies and describes the various physical components of the projector.
Details critical safety procedures and warnings to follow during projector installation.
Provides guidance on correctly positioning the projector for optimal display and stability.
Explains how to adjust the projector's tilt and level using its adjustable feet.
Step-by-step instructions for mounting and connecting the Touch Panel Controller.
Details requirements and procedures for connecting external exhaust ducting for cooling.
Instructions on how to safely remove the projector shroud to access internal components.
Guide on installing the primary projection lens, including safety precautions.
Procedure for installing an optional anamorphic lens for specific aspect ratios.
Instructions for installing an optional wide converter lens for image format changes.
Detailed procedure for installing the projector lamp, emphasizing safety.
Steps for securely connecting the projector to AC power via a permanent wired connection.
Instructions for connecting the projector to AC power using a pluggable Type B connection.
Guidance on connecting and configuring an Uninterrupted Power Supply (UPS) for the projector.
Procedures for connecting input sources and initial projector power-on sequence.
Information on connecting computers or servers via Ethernet or serial communication.
Details on using the Simple Contact Closure Interface (SCCI) port for projector control.
Explains connections to the General Purpose Input/Output (GPIO) port for external devices.
Information on connecting devices to the 3D connector for stereoscopic content.
Ensures peak screen brightness by adjusting lamp position using LampLOC™.
Procedure to calibrate screen brightness using the Foot Lamberts Calibration wizard.
Ensures the projected image is parallel and centered with the screen and lens.
Adjusting horizontal and vertical offset for optimal image centering and minimal aiming error.
Using the Intelligent Lens System (ILS) for automatic offset adjustments.
Balancing lens mount tilt and maintaining axial position for boresight alignment.
Detailed steps for adjusting vertical boresight to balance top and bottom edges of the image.
Using ILS for automated adjustment of vertical boresight for image alignment.
Guidance on correcting red, green, and blue micromirror misalignments with safety notes.
Adjusting the fold mirror to correct missing corners or edges in the projected image.
Using TPC for calibrating image color and defining electronic screen masking settings.
Procedures for ensuring accurate color display by measuring and setting color gamut values.
Using masking tools to correct image edge blanking, similar to film projector aperture plates.
Information and procedures for setting up and managing 3D presentations and hardware.
Lists the essential hardware items required for displaying 3D images with the projector.
Details the hardware setup for 3D projection using various polarization or filter methods.
Steps for installing and connecting a 3D server and configuring its associated lamp file.
Modifying the default 3D lamp file to match specific 3D hardware requirements.
Creating a Measured Color Gamut Data (MCGD) file for accurate 3D color display.
Configuring channel settings for 3D Flat 1998x1080 input, including color and sync.
Configuring channel settings for 3D Scope 2048x858 input, including color and sync.
Using test patterns to verify the correct functioning of 3D hardware.
Procedures to verify 3D cinema content display, including checking for reversed images.
Common issues and solutions for 3D display problems like reversed effects and image breakup.
Step-by-step guide to powering on the projector and igniting the lamp.
Instructions for safely powering off the projector and initiating the cool-down sequence.
Table detailing projector states based on TPC button interactions (Power/Lamp).
Explanation of projector status indicated by red, yellow, and green LEDs.
Procedures for optimizing lamp performance and managing lamp life for best image quality.
Steps to turn the projector lamp on using the Touch Panel Controller.
Steps to turn the projector lamp off using the Touch Panel Controller.
Adjusting the lamp power percentage via the Advanced Setup menu.
Temporarily disabling LiteLOC settings to adjust the lamp power percentage.
Optimizing lamp position for peak brightness and uniform illumination using LampLOC™.
Manual adjustment of lamp position using the TPC and a light meter for optimal brightness.
Accessing historical data on installed lamps, including type and serial number.
Configuring alarms to notify when a projector lamp approaches its expiry.
Setting up alarms for lamp rotation notifications to ensure even lamp usage.
Table listing maximum operating hours for projector lamps before replacement.
Table detailing minimum and maximum lamp power settings for various lamp types.
Guidance on installing, adjusting, and managing projector lenses and the Intelligent Lens System.
Activating automatic lens adjustments for focus, offset, and zoom via ILS settings.
Disabling automatic ILS adjustments, allowing manual control over lens positioning.
Navigating to the ILS File Setup window within the projector menus.
Activating the Intelligent Lens System (ILS) for a specific input channel.
Modifying the active ILS settings for focus, offset, and zoom, overwriting existing ILS files.
Disabling automatic ILS to maintain a fixed lens position across channel changes.
Resetting the Intelligent Lens System (ILS) due to lens movement or system changes.
Performing a full calibration of the Intelligent Lens System (ILS) after new lens installation.
Information and procedures for using the projector to display movies.
Connecting digital media storage or cinema servers to the projector's input ports.
How to use an anamorphic lens to achieve 'scope' aspect ratios for large screens.
Using a Wide Converter Lens (WCL) to magnify flat images into scope format.
Using top and side masking to conceal unused screen edges for optimal image framing.
Connecting and displaying content from standard or high-definition non-cinema sources.
Selecting input sources by choosing pre-configured channels on the Touch Panel Controller.
Overview of the TPC's functionality for controlling projector settings and viewing status.
Description of the TPC Main screen elements for accessing controls and settings.
How to access and use the on-screen keyboard for numerical input.
Defines user levels and permissions for accessing different windows on the TPC.
Viewing projector status information, system components, and alarm conditions.
Displays details of active alarms, their condition, state, time, and acknowledgment.
Using the interrogator to capture diagnostic information and retrieve log files.
Displays signal integrity of HD-SDI signals and counts SMPTE errors.
Retrieving or downloading system log files for troubleshooting and analysis.
Testing subtitle and metadata commands for presentation content from the server.
Managing TI Integrated Cinema Processor (ICP) electronics, including communication and self-tests.
Accessing web interfaces of external peripherals like Christie ACT via network setup.
Creating and storing customized projector settings for different inputs across multiple channels.
Configuring channel settings for input, data format, source, screen, lamp, and ILS files.
Adjusting color settings for a channel, including measured color, target color, and gamma.
Adjusting and synchronizing incoming 3D signals with external 3D equipment.
Defining projector parameters including lamp settings, ILS, and file configurations.
Controlling lamp power and enabling LiteLOC™ for consistent lamp brightness.
Displaying a list of previous and current lamps installed in the projector.
Repositioning the projector bulb for optimized light output using LampLOC™.
Modifying Intelligent Lens System (ILS) settings within an ILS file.
Configuring primary/auxiliary lenses and the Intelligent Lens System (ILS).
Creating source files to store resolution, offset, and aspect ratio settings for inputs.
Defining display panel size and image cropping settings for the screen.
Correcting on-screen colors by setting Measured Color Gamut Data (MCGD) files.
Modifying or creating custom Target Color Gamut Data (TCGD) files for display.
Accessing and configuring projector settings requiring Administrator or Service permissions.
Provides access to the projector's Windows operating system functions.
Managing and organizing channels that appear on the TPC Main panel.
Managing and organizing available test patterns for display selection.
Modifying projector system settings like temperature units, language, and brightness.
Indicating installation of Link Decrypter (LD) or Image Media Block (IMB) in the projector.
Changing projector time settings, including time zone and daylight savings.
Scheduling projector power on/off times using the built-in scheduler.
Configuring Ethernet, serial, SNMP, and remote access settings for the projector.
Viewing web interfaces of external peripherals like Christie ACT and IMB.
Configuring input and output settings for the General Purpose Input/Output (GPIO) interface.
Calibrating the internal light meter to Foot Lamberts for brightness measurements.
Managing users, passwords, and access rights for the projector interface.
Upgrading projector software using available upgrade files via the interface.
Accessing windows for managing projector data backups and restores.
Managing backups and restoring system settings, including factory defaults.
Activating projector marriage to engage Direct Couple Interlock (DCI) for secure content.
Adjusting red, green, and blue micromirror devices (DMD) electronically for image alignment.
Accessing projector functions through the Microsoft Windows interface.
Activating Image Media Block (IMB) marriage for secure content playback.
Specifying the cable length for connecting the projector to an external power supply.
Viewing projector information including serial number, software version, and installed components.
Accessing help information for the Touch Panel Controller (TPC) windows.
Checking projector vents and louvers to ensure adequate airflow and clearance.
Procedure for checking and refilling the projector's liquid cooling system reservoir.
Checking lamp connections for cleanliness and ensuring all electrical connections are secure.
Guidance on inspecting and cleaning the projector lens and lamp reflector carefully.
Step-by-step instructions for cleaning the projector lens to remove dust or smudges.
Checking and cleaning the lamp blower to prevent overheating and ensure proper airflow.
Cleaning the high voltage terminal and insulator to remove dust or dirt.
Checking and cleaning airflow interlocks (vane switches) for proper operation.
Instructions for inspecting the LAD filter and contacting support for replacement if needed.
Detailed, safety-critical procedure for replacing the projector lamp, performed by technicians.
Recommended procedure for rotating the lamp to ensure even burn and extend its life.
Procedure for replacing the light engine air filter to maintain optimal performance.
Instructions for replacing the liquid cooling air filter to maintain system efficiency.
Step-by-step guide for removing and installing projector lenses, including calibration.
Steps to diagnose and resolve issues when the projector fails to power on.
Troubleshooting steps for when the projector lamp fails to ignite or strike.
Diagnosing and resolving issues where the projector lamp turns off unexpectedly.
Troubleshooting image issues like flicker, shadows, or dimness in the projected display.
Resolving issues where the LampLOC™ automatic adjustment feature is not functioning.
Troubleshooting LiteLOC™ functionality when it fails to maintain lamp brightness.
Resolving issues with the TPC display, responsiveness, or recalibration.
Diagnosing and resolving network communication issues between devices and the projector.
Troubleshooting steps for a blank screen or lack of image display from cinema sources.
Resolving severe motion artifacts, potentially related to sync or pull-down issues.
Correcting image aspect ratio issues like vertical stretching or squeezing.
Troubleshooting 'pink snow' or no image issues, often related to encrypted content keys.
Resolving inaccurate display colors by adjusting source and projector color settings.
Correcting non-rectangular image shapes by adjusting projector leveling and lens offsets.
Troubleshooting noisy image artifacts by adjusting source tracking and input termination.
Resolving issues where the display image freezes unexpectedly.
Correcting image cropping issues by resizing and adjusting aspect ratio settings.
Troubleshooting steps when the projector is powered on but displays no image.
Resolving display jitter or instability by checking connections and signal frequencies.
Troubleshooting faint display issues by verifying input source termination and sync tip clamp.
Correcting image display issues where parts are cut off or warped.
Resolving compressed or vertically stretched display issues using pixel clock and anamorphic lenses.
Troubleshooting inconsistent picture quality by checking signal source and frequencies.
Detailed specifications for the projector's display panel, resolution, and refresh rate.
Technical details on pixel format, processing path, and refresh rates for various image modes.
Nominal and maximum brightness values for different lamp types.
Specifications for the projector's ANSI and full frame contrast ratios.
Information on displayable colors and gray scale resolution capabilities.
Nominal white point specifications for theatrical use, including calibration values.
Nominal gamma correction values for theater applications.
Compatibility details for cinema and non-cinema video input signals.
Specifications for the projector's cinema input ports, including number and standard.
Specifications for non-cinema DVI inputs, including formats for single and twin-link connections.
Details on compatibility with various control signal interfaces like Ethernet and RS232.
Specifications for the Ethernet port, including interface, connector, and bit rate.
Specifications for the RS232 port used for PIB communication.
Specifications for the RS232 port used for ICP communication.
Details on the GPIO port's interface, connector, and I/O line specifications.
Specifications for the SCCI port, including inputs for lamp and douser control.
Specifications for the proprietary 3D connector, including bit rate and communication protocol.
Specifications for the USB 1 port, including interface type and maximum bit rate.
Specifications for the USB 2 port, including interface type and maximum bit rate.
Specifications for the Motorized Auxiliary Lens Mount (MALM) interface and I/O lines.
Specifications for the TPC, including display type, size, resolution, and OS.
Details on AC input and UPS AC input power requirements for the projector.
Specifications for the projector's AC input, including voltage, current, and power consumption.
Specifications for the projector's UPS AC input, including voltage, current, and power consumption.
Information on lamp types, power ratings, average life, and warm-up times.
Overall dimensions, weight, and operating position limits of the projector.
Conformity to safety, environmental, and electromagnetic compatibility regulations.
List of safety standards (CAN/CSA, UL, IEC) the product complies with.
Details on emissions and immunity standards for electromagnetic compatibility (EMC).
Information on EU directives and standards regarding hazardous substances and waste.
Specifications for operating and non-operating environmental conditions like temperature and humidity.
Recommended temperature, humidity, and altitude ranges for projector operation.
Recommended temperature and humidity ranges for projector storage.
Lists standard included accessories and optional accessories available for purchase.
List of accessories included with the projector, such as TPC and user manual.
Catalog of optional lenses and other accessories available for purchase.
List of additional optional accessories, including IMB and 3D equipment.
List of serial API commands for controlling projector functions via remote interface.
Serial commands for controlling the motorized auxiliary lens position and settings.
Serial commands to enable/disable Automatic Scan Type Detection for channels.
Serial command for setting the baud rate for serial communications.
Serial command for selecting and configuring channel settings for input signals.
Serial command for setting the icon file name and path for channel display.
Serial command for controlling color space and colorimetry information.
Serial commands to reset preferences, configurations, and user controls to default values.
Serial commands for setting log levels and extracting engineering log data.
Serial command for selecting data packing format for selected input signals.
Serial command to enable or disable broadcasting of projector error messages.
Serial commands for adjusting lens focus position with specified direction and calibration.
Serial command for setting the gamma response curve for source signals.
Serial command to retrieve history of installed lamps, including current lamp details.
Serial commands to get help listings for other serial commands.
Serial commands for managing ICP files like LUTs, MCGD, TCGD, Source, and Screen.
Serial commands to set, get, save, or delete current ILS files for channels.
Serial commands to enable/disable the Intelligent Lens System for each channel.
Serial commands to set or query the installed state and device type of the IMB.
Serial commands to start interrogation and check its status, retrieving diagnostic files.
Serial commands to list and select internal test patterns for projector diagnostics.
Serial commands to calibrate lamp intensity feedback mechanism to footlamberts.
Serial commands to set the Look up Table (LUT) Color Look Up Table (CLUT) file.
Serial commands to bypass the link decrypter (LD) for non-encrypted content.
Serial commands to set or query the installed state of the Link Decrypter (LD).
Serial commands to define model and serial number for installed lenses.
Serial commands to adjust lens offset to specific horizontal position with direction.
Serial commands to adjust lens zoom position with specified direction.
Serial commands to set time format and display options for temperature units.
Serial commands to record current lamp information into lamp history.
Serial commands to set, get, save, or delete current lamp files for channels.
Serial command to get information on installed lamp usage and strikes.
Serial commands to set lamp intensity setpoint for maintaining brightness.
Serial commands to set/get expected lamp life and manage expiry warnings.
Serial commands to set lamp mode to constant power or LiteLOC™.
Serial commands to set lamp power in Constant Power mode.
Serial commands to adjust lens offset to specific vertical position with direction.
Serial commands to select Measured Color Gamut file for accurate color processing.
Serial commands to enable or disable monitoring of additional card cage fans.
Serial commands to set the descriptive channel name for a specified channel.
Serial commands to set network parameters for Eth0, Gateway, and Subnet.
Serial command to retrieve basic projector information like type and software version.
Serial commands to change the projector's power state (On, Off, Standby).
Serial commands to set the remote serial protocol access level for Ethernet and RS232 ports.
Serial command for rebooting the Touch Panel Controller (TPC).
Serial commands to schedule projector power up or down events.
Serial commands to select screen format files for output image geometry.
Serial commands to retrieve various system status groups like alarms, cooling, and health.
Serial commands to temporarily stop DLP communication for software upgrades.
Serial commands to query projector platform and motherboard version information.
Serial commands to set the Target Color Gamut file for desired output colorimetry.
Serial commands to enable or disable 3D projection on specified or current channels.
Serial commands to set dark time for 3D control, affecting glasses gating.
Serial commands to set output reference delay phase for 3D control timing.
Serial commands to set the Left/Right display reference for 3D control.
Serial commands to control output reference delay time for 3D synchronization.
Serial commands to select L/R display sequence for 3D control.
Serial commands to setup frame rate multiple for 3D control.
Serial commands to retrieve LD or ICP certificates.
Serial commands to setup the Input Reference for 3D control.
Serial commands to set or get the projector's time, date, and time zone.
Serial commands to setup output timing signal reference polarity for 3D control.
Serial commands to allow users to login to the serial interface.
Serial commands to adjust lens zoom position with specified direction.
| Brightness | 22, 000 lumens |
|---|---|
| Illumination Technology | DLP |
| Contrast Ratio | 2000:1 |
| Projection Technology | DLP |
| Input Connectors | HDMI, DVI-D, VGA, 3G-SDI |