6
Access Point Mounting Instructions
OL-166451-01
Mounting an Access Point on a Hard Ceiling or a Wall
Step 9 (Optional) Use the ground screw to ground the access point to a suitable building ground. See the
“Grounding an Access Point” section on page 10 for general grounding instructions.
Step 10 Connect the Ethernet and power cables to the access point.
Step 11 Align the access point feet over the keyhole mounting slots on the mounting bracket. If you created a
hole for the cables, make sure the access point is positioned so that the cables reach their respective ports.
Step 12 Gently slide the access point onto the mounting bracket until it clicks into place.
Mounting an Access Point on a Hard Ceiling or a Wall
This procedure describes the steps required to mount the access point on a ceiling constructed of 3/4-in
(19.05-mm) or thicker plywood using #8 fasteners using the universal mounting bracket
(AIR-AP-BRACKET-2).
Note Access points with integrated antennas perform best when the access point is mounted on horizontal
surfaces such as a table top or ceiling. For advanced features such as voice, location, and rogue access
point detection, ceiling mounting is strongly recommended. However, for smaller areas such as
conference rooms, kiosks, transportation environments, or hot-spot usage where data coverage is the
primary concern, the unit may be wall mounted using wall anchors or screws.
Follow these steps to mount the access point on a solid ceiling or wall.
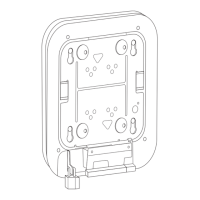
Step 1 Use the mounting bracket as a template to mark the locations of the mounting holes on the bracket.
Figure 7 shows details of the mounting bracket.
Caution Be sure to mark all four locations. To ensure a safe and secure installation, make sure you are using
adequate fasteners and mount the access point using no less than four fasteners.
Caution Do not use plastic wall anchors or the keyhole slots on the mounting bracket for ceiling installations.
When mounting the access point on a hard ceiling, use four fasteners capable of maintaining a minimum
pullout force of 20 lbs (9 kg).