13
Cisco XR 12000 Series Router Ethernet Line Card Installation
OL-7861-01
Removing and Installing a Line Card
Caution Be careful not to damage or disturb the EMI spring fingers located on the front edge of the card face
plate.
Note Always insert a dust plug in an optical port opening for each port that is not in use.
For information on disconnecting interface cables, see the “Removing and Installing Fiber-Optic
Interface Cables” section on page 52.
For information on removing the cable-management bracket, see the “Removing a Line Card
Cable-Management Bracket” section on page 39.
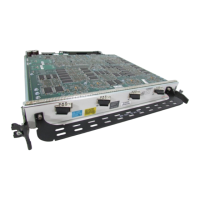
Installing a Line Card
A line card slides into almost any available line card slot and connects directly to the backplane. If you
install a new line card, you must first remove the line card blank from the available slot.
Note Refer to the installation and configuration guide for your router for information on line card slot types,
slot width, and slot location.
Caution The router may indicate a hardware failure if you do not follow proper procedures. Remove or insert only
one line card at a time. Allow at least 15 seconds for the router to complete the preceding tasks before
removing or inserting another line card.
To install a line card, follow these steps:
Step 1 Attach an ESD-preventive wrist or ankle strap and follow its instructions for use.
Step 2 Choose an available line card slot for the line card, and verify that the line card interface cable is long
enough for you to connect the line card with any external equipment.
Caution To prevent ESD damage, handle line cards by the captive installation screws, the provided handle, ejector
levers, or the card carrier edges only. Do not touch any of the electrical components or circuitry.
Step 3 Grasp the faceplate (or handle) of the line card with one hand and place your other hand under the card
carrier to support the weight of the card; position the card for insertion into the card cage slot. Avoid
touching the line card printed circuit board, components, or any connector pins.
Step 4 Carefully slide the line card into the slot until the ejector levers make contact with the edges of the card
cage, then stop when the ejector lever hooks catch the lip of the card cage. If they do not catch, try
reinserting the line card until the ejector lever hooks are fully latched. (See Figure 5.)
 Loading...